Contents
Build a gated arbor by Les Kenny
Introduction and lumber requirements
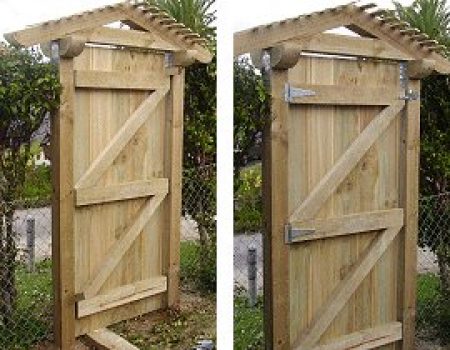
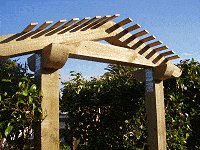
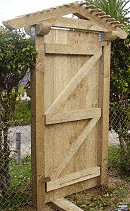
This narrow (depthwise) gated arbor is basically two gate posts with an overhead top consisting of two short decorative beams, two rafters and laths (strips of wood) capable of holding a vine or similar type of plant if so required.
The arbor houses a basic 1800mm (6ft) high gate constructed of 150mm x 25mm (1″x 6″) vertical boards and 100mm x 50mm (2″x 4″) rails and braces.
The arbor and gate give privacy and make an ideal entry unit to fit into a hedge or incorporate into a fence.
This arbor is made entirely of 100×100 (4×4) lumber, excepting for the laths (the thin strips of wood on top of the rafters) which are 40mm x 10mm (3/8″x 1 5/8″) stock or similar.
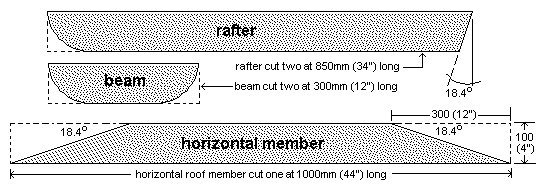
The pitch (angle, slope) of the rafters (off horizontal) is 18.4°.
That is: a rise of 1 in 3 (or 1/3) which means that the rafters rise 1 unit of measurement for every 3 units of measurement along the horizontal plane (run).
In the United States the pitch is given in inches, with the run (horizontal plane) being 12 inches and the rise being a ratio of that. In this case, the slope of the rafters would be given as 4″ of rise over 12″ of run, which is still the same thing as a rise of 1 in 3 or 18.4°.
Lumber requirements
Use lumber suitable for exterior use.
You will need….
- 2 of: 100mm x 100mm (4″x4″) posts 2400mm (8ft) long.
- 2 of: 100mm x 100mm (4″x4″) beams 300mm (12″) long.
- 2 of: 100mm x 100mm (4″x4″) rafters 850mm (35″) long.
- 1 of: 100mm x 100mm (4″x4″) horizontal roof member 1000mm (40″) long.
- 16 of: 40mm x 10mm (3/8″x 1 5/8″) laths 300mm (12″) long.
- 6 of: 150mm x 25mm (1″x 6″) vertical gate boards 1800mm (72″) long.
- 6 meters (20ft) of: 100mm x 50mm (2″x 5″) for gate rails and braces.
You will also need…
- 4 nail plates approximately 100mmx 200mm (4’x 8″).
- 3 gate hinges and a gate latch.
- An assortment of galvanized nail, including 40mm (1 5/8″) flathead nail for the laths and nail plates, 60mm (2 1/2″) flathead nails for the gate and a few 100mm (4″) nails for the frame.
Gated arbor plans

Gated arbor roof pieces
Building the arbor
Put in the gated arbor posts
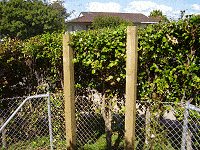
- Dig the holes for the arbor posts. For reasonably firm ground make the holes 350mm (14″) square by 600mm (24″) deep.
- Refer to the arbor plan for dimensions.
- Concrete the two 100mm x 100mm (4″x 4″) posts in place.
At this stage the posts are longer that the required length. - Wait until the next day for the concrete to harden a bit before cutting the tops of the posts to the required height.
The roof pieces
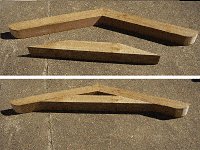
- Cut two beams 300mm (12″) long out of 100mm x 100mm (4″x4″) stock.
- Cut one horizontal roof member 1000mm (44″) long out of 100mm x 100mm (4″x4″) stock.
Angle each end as shown in the drawing above. - Cut two rafters 850mm (34″) long out of 100mm x 100mm (4″x4″) stock.
- Angle the cuts at one end of each rafter 18.4° off square. See drawing above. Also refer the plan if necessary for further angle clarification.
Mark the curves on the beams and the rafters
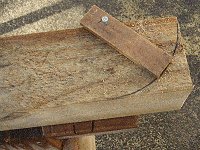
- Mark a 100mm (4″) radius arch at both ends of both beams and one end of each rafter.
- This can be done by making a rotatable arm out of a strip of 120mm (5″) long wood.
Hammer a small nail into the arm 100mm (4″) up from the end until it protrudes out the other side. - Tap the protruding part of the nail into the beam 100mm (4″) up from the end and slightly in from the edge. (See the picture.)
- Cut and curve on the arbor beam The arm should be able to rotate using the nail as the axis.
- Hold a pencil at the end of the rotatable arm to mark the curve.
- Do this to both ends of both beams and one end of each rafter.
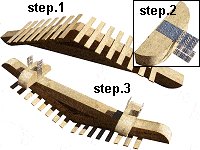
Cut the curves

- If you do not have a band saw, then you can use a miter saw to cut the curve by making a number of straight cuts at different angles around the curved line (see fig.1). The rounding off process is then completed with sandpaper and a sanding block.
Building the arbor continued
Assemble the gated arbor top
- On an even work surface nail the two rafters together.
- Then fix the horizontal roof member to the rafters.
- Cutting instructions and dimensions of the all top members are given in the ‘roof pieces’ chapter above.
Add the gated arbor laths
- The laths are the thin strips of wood fixed to the top of the rafters for either decorative purposes or to hold some plant form.
- Nail the 40mm x 10mm (3/8″x 1 5/8″) laths to the rafters. Begin the first lath 50mm (2″) down from the tops of the rafters and space all the rest 80mm (3 1/4″) from center to center.
- Fix nail plates to each side of each beam as shown in the picture (marked step.2 above) and then fix the beams to the rafters.
Put the gated arbor roof on
- It is now just simply a matter of lifting the completed arbor top onto the posts and securing with nails.
Making the gate
Gate layout
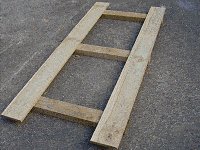
- Cut three rails 25mm (1″) shorter than the distance between the two arbor posts.
- Lay the rails evenly spaced on a flat working surface.
- Lay two vertical gate boards on the rails, one each at side.
- Ensure that the top rail is 150mm (6″) down from the top of the gate boards and that the bottom rail is 150mm (6″) up from the bottom of the gate boards.
Make the gate square
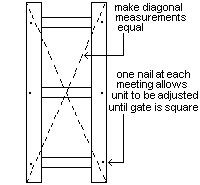
- Hold the two vertical gate boards with one nail at each meeting.
- Measure the two overall diagonals of the gate (see diagram above). Adjust the frame until the two opposing diagonal measurements are equal.
- The gate will then be square.
- Add another nail at each meeting. This will stop the unit from moving ‘out of square’.
Add the intermediate gate boards
- Add the intermediate vertical gate boards and fix to the rails with at least two nails at each meeting.
- The last board may need to be ripped down (cut down lengthwise) in order to fit, or a ripping may need to be added.
- This will depend on the width of the boards and the width of the gate.
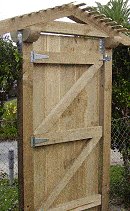
Brace the gate

- Turn the unit over.
- Measure, cut and fit two diagonal braces as shown in the picture above.
- Nail the end of each brace to the rails.

- Turn the unit over and nail through the gate boards into the braces. Use two nails at each meeting.
Fitting the gate
Position and fix the gate in place
- Place the gate in between the two arbor posts and sit it on packers (bits of wood) so the gate is about 50mm (2″) off the ground. (Adjust accordingly if required, to allow for the contour of the ground and to ensure that the gate will be able to swing all the way open.)
- Place wedges or packers at the sides of the gate so that the gaps between the gate and posts are even, and the gate is ‘jammed’ in place.
- The gate should remain in position by itself while the “T” hinges are screwed in place. Place a hinge on each gate rail (3 in all).
- Once the hinges are screwed in place, take out the wedges and/or packing and fit the gate latch.
Put on the gate stop
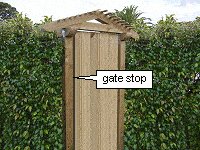
- The gate stop is a vertical piece of wood fixed to the post, which will block the gate from going further than intended. It will help avoid any damage to the gate latch and hinges should the gate be blown or slammed shut with excessive force. It also helps stop the gate from twisting or warping.
- The gate stop can be a ripping of 25mm (1″) thick board or similar. Fix it to the post in such a position that when the gate is closed the gate rails will be flush with the post on the latched side. See drawing below.
- Make the gate stop the same length as the gate.


