Contents
Introduction and the plans
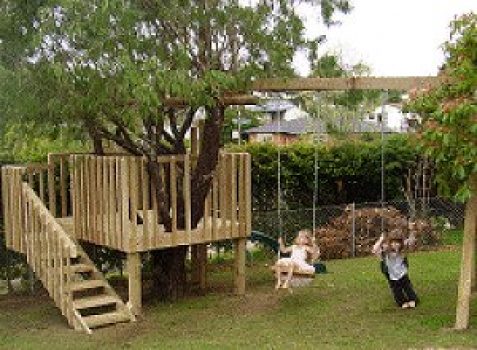
This article explains how to construct a platform or deck around a tree, how to make steps up to it, a safety handrail up the steps and around the platform, and also how to add a slide and swing-set.
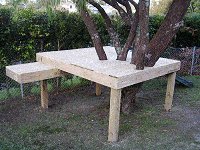
This tree house is really a tree platform – a platform built around a tree rather than the traditional type of tree house consisting of a small playhouse built or placed in the tree’s branches.
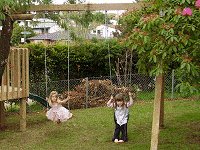
The tree house was specifically designed for younger kids. Since built, it has had plenty of use from kids three years old and upwards and it’s amazing just how fast the kids seem to hone their climbing skills.
The stairs make it easy for younger kids to get up to the tree house and there is a good handrail around the entire platform.
If you are making a similar type of structure for older and more adventurous kids, then you could probably do away with the steps and incorporate a ladder instead.
Safety note: Young kids should not be left to play on such a structure unsupervised.
Below are the plans and lumber amounts, followed by building instructions on other pages.
Keep in mind that this tree house was designed for a particular patch around a particular tree, and as patches and trees vary, you may also need to vary the plans to suit your tree and surroundings. Therefore, these plans and instructions are intended as a guide only.
The plans

Lumber stock sizes and total amounts
Excluding the swing-set
- 150×50 (2″x6″) stock for joists and stair treads. 26 meters (85 ft) required.
- 100×100 (4″4″) stock for posts and sides of slide. 14.5 meters (47 ft) required.
- 200×50 (2″x8″) stock for stair stringers. 3.6 meters (12 ft) required.
- 50×50 (2″x2″) stock for balusters. 70 meters (230 ft) required.
- 75×50 (2″x3″) stock for handrail. 12 meters (40 ft) required.
- 150×25 (1″x6″) stock for decking. 33.5 meters (110 ft) required.
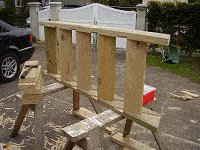
Making the platform
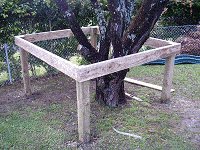
Step 1: The boundary joists
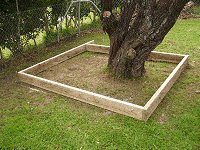
- Nail the boundary joists together around the tree.
- Use 150mm x 50mm (2″x6″) lumber suitable for exterior use and fix with 100mm (4″) galvanized nails.
- Refer to the plans for dimensions.
Step 2: Raise the boundary joists
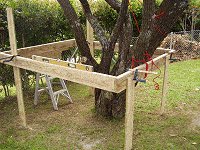
- Temporarily prop-up the boundary joists to the required height.
- Use any available wood for the props and fasten them to the boundary joists with clamps.
- Further support with rope around the tree and joists to prevent sway.
- Ensure that the boundary joists are level all the way around.
Step 3: The footing holes
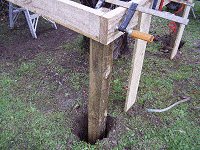
- Dig footing holes directly below each corner.
- Make the holes 300mm x 300mm (12″x12″) square and about 600mm (2ft) deep if the ground is medium firm.
- Cut the posts to length so that they are flush with the top of the boundary joists and at least 75mm (3″) off the bottom of the hole.
- Clamp the posts to the joists and ensure that they are plumb.
Step 4: Concrete around the posts
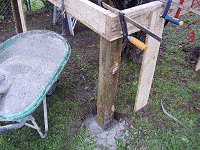
- Make a mix of concrete in a wheelbarrow at a ratio of 3 gravel, 2 sand and 1 cement. Add clean water and mix to a uniform consistency
- Carefully shovel the concrete into each hole.
- Fill to within 75mm (3″) of the top of the hole.
Step 5: Fix the posts to the boundary joists
- When the concrete has cured, drill and bolt the boundary joists to the posts.
- Use two 12mm (1/2″) galvanized bolts at each corner.
- You can then remove the temporary props.
Deck frame
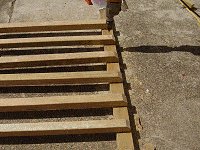
Step 6: The intermediate joists
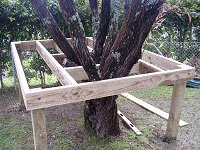
- Place and fix the intermediate joists.
- Space them so that the deck boards do not have to span more than 400mm (16″) at any point.
- Refer to the plans for an example.
Step 7: Block around the tree
- Block around the tree branches.
- Use any available off-cuts of wood.
- The purpose of this step is to give the deck boards a support to attach to close up to the branches.
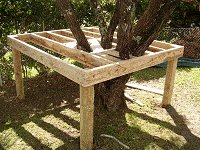
Step 8: Platform extension
- Add any (only if needed) additional platform extensions.
- The purpose of this particular platform jut-out is to off-set the angle of the slide in order to keep it a safe distance from the fence.
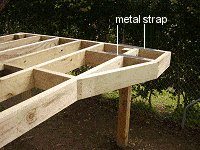
- Any such jut-out extensions should have a galvanized metal strap fixed to the top of the joists/blockings to prevent possible downward tilt. See picture.
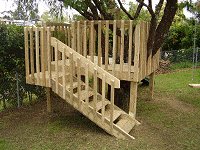
Step 9: The stair landing

- Make the stair landing.
- Cantilever the landing from under the platform joists.
- Run the landing joists 1500mm (5ft) under the platform joists.
- Secure the landing joists to the platform boundary joist with galvanized twist strap or similar. (See the picture as well as the plans for further detail.)
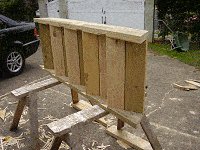
Laying the deck boards
Step 10: The deck boards

- Start laying the deck boards.
- Begin by nailing the first deck board flush with the front joist and then continue with the rest.
- Cut around any branches.
Step 11: More deck boards
- Continue laying the deck boards until finished.
- Trim off any excess.
- Do the same on the landing.
Attaching the slide
Step 12: Attach the slide
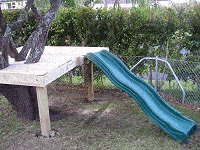
- Attach the slide.
- Most slides that you purchase will come with full installation instructions.
- For information about slides and where to purchase them click here.
Making the steps
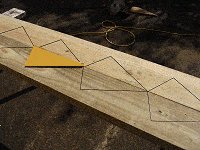
Step 13: Make the step pattern
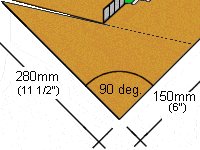
- Make a template that you will use to mark out the tread positions on the stair stringers.
- Take a piece of cardboard 300mm (12″) square or larger (alternatively you can use any type of board or thin wood).
- Cut out a triangular piece from the cardboard as shown in the diagram.
Step 14: Mark the steps on the stringers
- Lay out the two stringers 200×50 (2×8) flat on a couple of work stools.
- Hold the cardboard template with its longest edge flush to one edge of the stringer, approx 300mm (12″) in from one end, and pencil mark around the template. Repeat this action five times on each stringer.
- Ensure that one stringer mirrors the other.
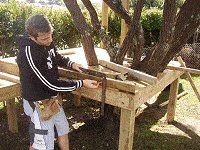
Step 15: Mark the treads
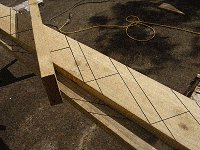
- To continue marking out for the treads, use a piece of lumber about 600mm (24″) long and the same thickness as the treads, which is approximately 46mm (1 1/2″). This piece of lumber is to be used only for marking and can then be discarded.
- Hold this piece of lumber flush on one of the tread pencil lines marked on the stringer.
- Mark each side of the 46mm (1 1/2″) thick lumber across the full width of the stringers, as shown in the picture.
- Repeat this action to all tread lines, on both stringers
Step 16: Cut the stringers to length

- Cut the stringers to length.
- Lay them in place to check for length.
- Make any necessary adjustments.
- Sometimes the bottoms of one or both of the stringers may need to be trimmed if the ground is uneven.
Step 17: Notch the stringers
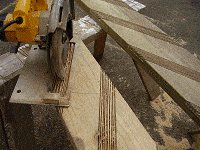
- Lay the two stringers back on the work stools.
- Notch (check out, rebate) the stringers to house the treads.
- Set the blade depth on a circular saw to approximately 12mm (1/2″) and make repeated cuts along and between the tread markings on the stringers.
- There is another article on how to make exterior steps here
The steps
Step 18: Tread housing
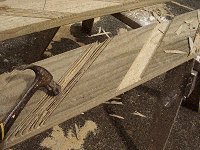
- Tap and knock over the remaining uncut bits between the tread lines with a hammer.
- Then clean out the grooves with a sharp chisel. The more saw cuts that were made, the easier the chiseling.
Step 19: Fix the treads

- Insert the front treads into the rebated grooves.
- Remember, each tread is made up of two pieces of 150mm x 50mm (2″x6″) stock.
- Hold them in place with little nails angled through the bottom edge of the treads into the stringer.
Step 20: Fix the stringers to the treads
- Place the other stringer on top of the treads mirroring the bottom stringer.
- Nail through the stringer into the treads using 100mm (4″) or 90mm (3 1/2″) galvanized nails: 3 nails per tread per side.
Step 21: Add the back treads
- Fit the back treads in place.
- Tap them along the tread groves until they are about 10mm (3/8″) from the front treads.
- Nail through the stringer into the treads using 100mm (4″) or 90mm (3 1/2″) galvanized nails: 3 nails per tread per side.
Step 22: Place the stairs
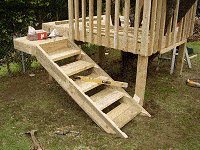
- Fix the steps in place. Nail the top of the stringers to the landing.
- Temporarily pack with blocks of wood under the bottom tread until treads are level.
- Dig a hole 250x250x250 (10″x10″x10″) under each stringer and fill with concrete. Place a galvanized wire or bracket into the wet concrete against the two stringers.
- When the concrete has cured, place a piece of damp course membrane under the stringer and on top of the concrete pad. This prevents moisture from the concrete pad leaching into the lumber.
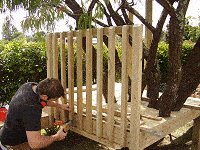
Making the handrail
Step 23: Mark for the handrail uprights
- Cut the handrail pieces to size and lay them in place on top of the tree house deck.
- Work out where the balusters go and mark the positions on both the handrail and the boundary joist.
- Ensure that the gap between balusters is not more than 100mm (4″).
Step 24: Fix the balusters to the handrail
- Lay the handrail on a flat work surface.
- Nail the top of the balusters to the handrail on the marks.
- Use three 75mm (3″) galvanized nails at each meeting. Nail one through the face of the baluster into the handrail and angle nail the other two through the sides of the balusters into the handrail.
- Pre-drill the holes in the balusters first.
Step 25: Fix the balusters to the joists
- Pick the handrail portion up and temporarily clamp it in position to the boundary joist.
- Nail the bottom of the balusters to the boundary joist on the marks.
- Use three 75mm (3″) galvanized nails at each meeting. Nail one through the face of the baluster into the joist and angle nail the other two through the sides of the balusters into the joist.
- Pre-drill the holes in the balusters.
Step 26: Posts for the slide entry
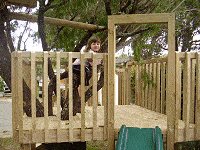
- Position two posts, one each side of the slide.
- Dig the post into the ground about 500mm (20″).
- No concrete is necessary, just ram and compact the soil around the post.
- Cut the tops of the posts to the required height and add a header.
Step 27: The stair handrail
- Use 150×50 (2″x6″) stock for the stair handrail.
- That is so the balusters can be fixed to the handrail about 62mm (2-1/2″) from the top, leaving enough free space for hands to be able to slide along the handrail without fingers catching the tops of the balusters.
- Make the height of the handrail 1000mm (44″) off the deck around the platform but a little lower up the outer side of the stairs.
Making the swing-set
Step 28: position the tree end of the beam
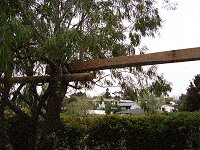
- Sit one end of the swing-set beam in between two solid branches.
- Tie securely with rope.
- We used a 125mm x 125mm (5″x5″) beam that was 3300mm (11ft) long. The height of the beam off the ground was 2500mm (100″).
Step 29: Prop the other end of the beam
- Prop the other end off the ground 100mm (4″) above level.
- This is to allow enough room to position and concrete the posts (A-frame) into the ground.
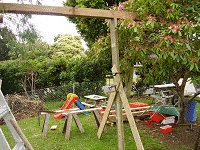
Step 30: Make and place the ‘A’ frame for the beam
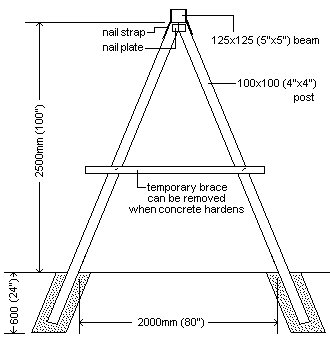
- Make up the A-frame which supports the end of the beam.
- Work out the overall height of the A-frame (including the part that goes into the ground) and also work out the top angle cuts then make the fame up on the ground.
- Fix a temporary brace to the two posts to hold the shape.
- When the A-frame is made, determine the position of the footing holes and dig them.
- Then stand the A-frame upright in the holes. Use whatever braces and props are necessary to hold the A-frame in the right position and plumb (upright).
- Make a mix of concrete in a wheelbarrow at a ratio of 3 gravel, 2 sand and 1 cement. Add clean water and mix to a uniform consistency and carefully shovel the concrete into each hole.
- Fill to within 75mm (3″) from the top of the hole.
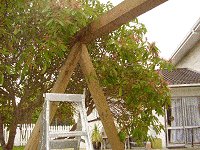
Step 31: Fix the beam
- When the concrete has cured, lower the beam onto the A-frame and fix with galvanized nails, nail straps and nail plates.
- Finally, hang your choice of swing(s) from the beam.


Thanks so much for this treehouse post. We prepping to build this in our backyard and we noticed that the images are no longer loading. We’re happy to purchase the plans, just let us know how. Thank you!
Hi Jon, yes we were working on the website yesterday and we had a few problems with the images.
This should be fixed now.
Sorry for the inconvenience.
Hi there,
Thanks so much for this post. We are building a tree house in our back garden following your instructions.
Could I please ask what’s the logic behind “Fill to within 75mm (3″) of the top of the hole.” Does this get filled with anything else at the end? Otherwise when it rains there will be water sitting on it.
Apologies if that’s stated in the instructions and I missed it.
Thank you,
Elisa
I so appreciate people like you who share their knowledge so freely with others. I’m a little more confident now to tackle this project. Thank you, Les!