
Contents
Ft and inch version:
Lumber stock sizes used in this project are 1×6 for the seats and table top and 1×3 for the legs, seat supports, table supports and brace
1×6 lumber usually machines (dresses, planes) down to approx 3/4″ x 5-1/2″.
1×3 lumber usually machines (dresses, planes) down to approx 3/4″ x 2-1/2″.
Pine is a typical lumber that can be used for this project. Untreated lumber can be used if the table is to be used indoors. If the table is to be left outside, choose a lumber that has a natural resistance to decay (doesn’t rot easily) in preference to a pressure-treated lumber. The chemicals in some pressure-treated lumber can make for a potentially dangerous eating surface.
Your local lumber store can advise you on the available options.
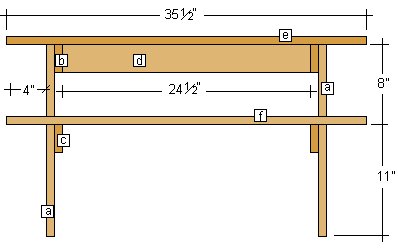
End profile

Front profile
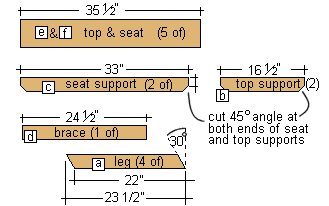
Individual pieces
| Item | Size / Description | Quantity | |
| a | Legs | 1×3 (actual size 3/4″ x 2-1/2″) 23 1/2″ long and angled each end 30 degrees off square. See diagram above. | |
| b | Cross member table top supports | 1×3 (actual size 3/4″ x 2-1/2″) x 16-1/2″ long. Angle each end. Angle is for decorative purposes only. | |
| c | Cross member seat supports | 1×3 (actual size 3/4″ x 2-1/2″) x 33″ long. Angle each end. Angle is for decorative purposes only. | |
| d | Brace / Spreader | 1×3 (actual size 3/4″ x 2-1/2″) x 24-1/2″ long. | |
| e | Table top boards | 1×6 (actual size 3/4″ x 5-1/2″) x 35-1/2″ long. | |
| f | Seat boards | 1×6 (actual size 3/4″ x 5-1/2″) x 35-1/2″ long. |
The Instructions
Step one
- Cut all the pieces of lumber as per cutting list and drawing above.
Step two
- On an even surface make up the two end frames. To do this first lay the cross members (b) and (c), i.e. table and seat supports, flat on the ground and then lay the legs (a) in place on top.
- Ensure the seat/table supports and the legs are as dimensions shown in the ‘end profile’ diagram above.
- Fasten together using 4 1-1/2″ wood screws at each intersection.
Step three
- Stand the two end frames up and fix the brace (d) in place using two 1-1/2″ wood screws at each end.
- Ensure the brace is in the middle of the two end frames and flush with the top. This brace also acts as a spacer for the two end frames.
Step four
- Lay the remaining five boards, i.e. two seat boards (f) and three top boards (e), in place on top of the seat and top supports. Check that the overhang is equal at both ends and that all is square.
- Fix boards (f) to the seat supports (c) and boards (e) to the top supports (b). Use two 1-1/2″ wood screws at each meeting.
Note: For added strength, glue all joins before screwing.
Pre-drill the screw holes with a drill bit slightly smaller than the shank of the screw. This will stop possible splitting.
All done. Eazy with a “Z”
Metric version:
Timber sizes used in this project (in millimetres) are 150×25 (seats and table top) and 75×25 (legs, seat supports, table supports and brace)
150×25 timber usually machines (dresses, planes)down to approx 140×20.
75×25 timber usually machines (dresses, planes)down to approx 65×20.
Pine is a typical timber that can be used for this project. Untreated timber can be used if the table is to be used indoors. If the table is to be left outside, choose a timber that has a natural resistance to decay (doesn’t rot easily) in preference to a pressure-treated timber. The chemicals in some pressure-treated timber can make for a potentially dangerous eating surface.
Your local timber supplier can advise you on the available options.
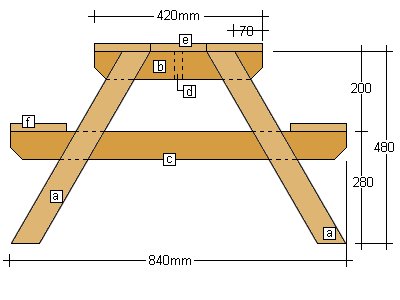
End profile
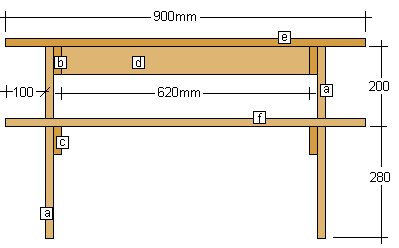
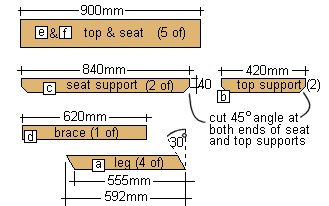
Front profile Individual pieces Item Size / Description Quantity a legs 75×25 (actual size 65×20) 592mm long and angled each end 30 degrees off square. See diagram above. b Cross member table top supports 75×25 (actual size 65×20) x 420mm long. Angle each end. Angle is for decorative purposes only. c Cross member seat supports 75×25 (actual size 65×20) x 840mm long. Angle each end. Angle is for decorative purposes only. d Brace / Spreader 75×25 (actual size 65×20) x 620mm long. e Table top boards 150×25 (actual size 140×20) x 900mm long. f Seat boards 150×25 (actual size 140×20) x 900mm long.
The Instructions
Step one
- Cut all the pieces of timber as per cutting list and drawing above.
Step two
- On an even surface make up the two end frames. To do this first lay the cross members (b) and (c) i.e. table and seat supports, flat on the ground and then lay the legs (a) in place on top.
- Ensure the seat/table supports and the legs are as dimensions shown in the ‘end profile’ diagram above.
- Fasten together using 4 32x10g csk wood screws at each intersection.
Step three
- Stand the two end frames up and fix the brace (d) in place using two 40x10g csk wood screws at each end.
- Ensure the brace is in the middle of the two end frames and flush with the top. This brace also acts as a spacer for the two end frames.
Step four
- Lay the remaining five boards, i.e. two seat boards (f) and three top boards (e), in place on top of the seat and top supports. Check that the overhang is equal at both ends and that all is square.
- Fix boards (f) to the seat supports (c) and boards (e) to the top supports (b). Use two 40x10g csk wood screws at each meeting.
Note: For added strength, glue all joins before screwing.
Pre-drill the screw holes with a drill bit slightly smaller than the shank of the screw. This will stop possible splitting.
All done. Eazy with a “Z”.


hi, thank you for the updates, email. I made the kids picnic table from from wood. also the adult one. Wife , over the moon.
I not very good, writing plans, on pcs, not know how to. lol. 2 tips. one buy large parasol.
When it lowered all way down, it a tent, den, hide away, only kids, allowed. We to big to get under. they love it.
I going to another kids one. next one. don’t use a centre , brace/spreader. use two out side ones. make it into, box. plywood , bottom, removalable, centre, tops. that way, it a sand pit, also. with seats. the removalable, tops keep the cats, out. yo, know what they. like to do in sand. thank you for the update, regards, Tony kelly.
For Mother’s Day, May 8th 2011, we had our family together to build picnic tables for the grandkids.
I can’t express how much fun it was to have everyone involved.
Grandkids are ages 2 1/2, and 2 1 1/2 year olds. We also had a friend come with her 3 year old.
We ended up making 5 tables all together. One stayed at Grandma’s, one went with the friend, 1 went to both of our daughters and one my sister took for her granddaughter.
The plans were easy to follow, and the guys did a great job cutting them all correctly.
It was great fun and the kids got to take something home with them along with the memory of building the tables with their family.
What a blast, this has gone down as the all time favorite Mother’s Day.
Cindy
My wife asked me what we should get for our grand daughter’s 2nd birthday and mentioned a kid’s picnic table.
I didn’t have much time so I immediately Googled and found your site and that weekend, we presented her new table to her at her birthday party. As you can see, it was a big hit!
Thank you very much.
John and Donna Toombs in Arkansas
Hi,
Thanks for the nifty picnic table plans. I found them on your site and gave them to my brother who was on his way to work as a volunteer in an orphanage in Kenya. The plans proved invaluable for making some sturdy furniture for the children. The kids just had to sit on them even before they were painted. They loved them. Six tables were completed in just a couple of days.
Thanks again for the excellent picnic table plans. Just the ticket for a very fun volunteer project
Sincerely,
Hugh Schmelzenbach
Dear BuildEazy
I made this picnic table for my 5 yrs old son. Very simple plan and easy to follow. Result is fantastic. My whole family loves it.
I used 100% scrapped woods.
Many thanks all the way from Malaysia
Best regards
Azman Md Ali
Kajang, Malaysia
Oh I’m so proud! I actually managed to build the kids picnic table for my son’s 3rd birthday. It took me quite a while – the kids helped! I had a few problems too – mostly where I didn’t follow the buildeazy instructions!
When I do the next one I think I’ll paint the wood before I put it together.
I’d like to make a bigger one for slightly older children (although as you can see in the picture all 4 of ours fit on the table and they are from 3 to 10), can I use the same plans and just make everything a bit bigger or not?
Thanks for the great plans!
A-M M Dusseldorf
I built two copies of your “Children’s BBQ table” from reclaimed lumber. I’m a volunteer for ReStore, an affiliate of Habitat for Humanity in Iowa, USA. We build demonstration projects from reclaimed building materials both to educate the public on material re-use and also to sell as a “value-added” recycled product.
Since the material we used was “reclaimed” stock of several species and we stained the table a dark color, it has the look of an “instant antique”.
Thanks for the plans and the inspiration for this project. We hope it was inspire others to keep old building materials out of landfills.
Rob Bruce Iowa, USA
My wife had been hinting that she would like a kids picnic table that would suit our kids, ages 6 and 4. I had not built one before, but started looking for a simple plan to follow as a first attempt. I found the one on your site, it seemed simple enough, and pulled a bunch of scrap from my pile of wood for the first �attempt�. It turned out great. I ended up giving that one away to my sister in law, as the plan is slightly small for a 6 year old, but great for 2-4 year olds. I then took the original plan, and modified it. I lengthened the legs another few inches, and altered the length to have a 5 foot table, and slightly deeper as well. My version has 4 2×6 boards on the top as opposed to the 3 in the plan. I took my router to all the edges, then took my orbital sander to everything, masking it as smooth as possible, as I was using stock spruce construction grade lumber, counter sunk the screw holes, plugged them, and finished it with outdoor stain paint. I got it together, and it was barely dry and it ended up going to my sister for her kids! Now my own kids were getting upset as I kept giving away their picnic tables. I built another one immediately, and all I have left to do is paint it. My own mother wants one too for when the grandkids come over! It�s been fun though�keep up the simple approach plans�they�re awesome.
Darryl Harder
Delmar Commodities Ltd.
I just wanted to say thanks for the plans. They were well laid out, easy to follow and produced a great final product.
My husband and I decided to tackle a wood property fence after Hurricane Ike and we had a bunch of scrap wood left over from the project.
Outside of fences I have never built anything, This project took me about three hours and my girls LOVE it!
I did make a few changes, since I was dealing with treated lumber,
I purchased some untreated pine 2*6’s for the table top and benches and then used the left over scraps from the fence project for the structure. And I rounded the corners.
Total cost = $13.00
Renshaw Design, E. Renshaw, League City, TX
My husband and I just finished building the child-sized picnic table for our daughter. It is perfect in every aspect and just what we were looking for. It only cost us around $40., far cheaper than buying a wooden one already made or even the plastic ones We used treated lumber and switched out the 1×3’s with 2×4’s. The plans were great and we didn’t even argue once. Great site! We will be back soon for more plans.
THANK YOU!! The Randalls, Mars Hill, NC
Hi there,
Just wanted to say a big thank you for the plans/instructions on making the kids picnic table.
I’m a complete beginner and even i made a pretty good table. My little boy absolutely loves it.
Thank you, Aftab, (Bristol, UK)
Just wanted to let you know the plans were perfect.
Living in central NY I beefed it up a bit using 2×4, 2×6 and decking boards all treated lumber to withstand the harsh winters. I’ve attached a few pictures, nice project the kids could help with. It’s the twins 5th Birthday next week.
Thanx for the plans
Paul
Hello, my husband Ray Lankton, built this kid’s picnic table for our grandchildren.
They loved it. He said the plans were easy to follow and the table turned out beautifully.
Many Thanks, Jean Lankton
Using plans from your website, my husband made this lovely pine picnic table for our daughter’s birthday party out of a used bookshelf! Easy to build–thanks!
Susanne
This was my first woodworking project and after I finished it, I painted the picnic table! It turned out great and my kids LOVE it!!!
Lisa
Wanted to add this pic to my comments about children’s picnic table.
Thanks! Still love checking out your site
Lorrie Marantz
This was a great project and the grandkids love it–simple to make but a very sturdy little table
—–
Sam from Tennessee
Thanks so much for the great plans. My 3 year-old daughter absolutely loves her picnic table. We keep it inside and have picnics and snacks indoors. It’s great fun. Next summer I will make another for outside. Excellent website. Looking forward to trying some more projects from here.
Sincerely,
L Marantz
Photo #1. I took the plans for the kids BBQ table and boxed in the table top now I have an elevated sand box. Kids can sit or stand and have a blast.
Photo #2. Put together the kids picnic table and decided to paint it. Every one loves it except my son. Built it for the grandkid. Now it’s up for grabs. Here it’s in the back of my truck sitting on the garden bench beside the wheelbarrow planter.
Terry King
Thanks for posting the design online.
I used the plan to build a kids picnic bench with storage from timber left over from a deck project.
I modified the design slightly as I went along made it 600mm wide and 1100mm long to give a bit more room for the sand pit/water table/storage area.
Your planned seat height and table height are ideal.
James Bewley
Made for kids
I built this a couple of weeks ago. It went together really easily, and fits my 2 & 5 year olds perfectly with room to grow. It is their dining table! This is Fergus & Kelsey at their table. This is where they sit for nearly all their meals, and colouring etc.
B & J Tarrant
This is my fourth project using plans from Buildeazy. I built these child size picnic tables entirely out of recycled wooden pallets that I picked up from a local store. The pallets came from a furniture store and the wood was in good condition, probably only used once. They seemed to have been used to transport something like a sofa. One pallet built one table with enough scraps to start another table. Start to finish came out to about two hours. That includes dismantling the pallets, removing nails, measure, cut, build and rough sanding. Tables came out very strong and can hold my weight (280 pounds) sitting on the tabletop without even creaking. Thanks Buildeazy!
Hector Berrios