Contents
Introduction
This garden chair is an extremely simple design and is probably one of the easier chairs to construct.
Building this garden chair merely requires that you cut and drill all the pieces (of wood) according to the detailed plans provided and then assemble all the pieces.
Once all the wood pieces have been cut and the holes marked and drilled, simply line up the holes in the various pieces (according to plan), place the bolts in the holes and the chair frame will take shape automatically!
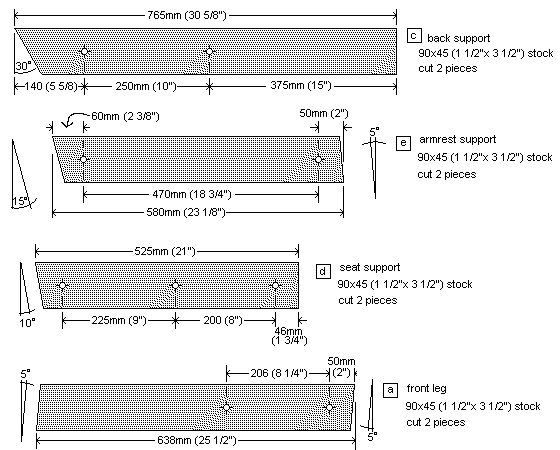
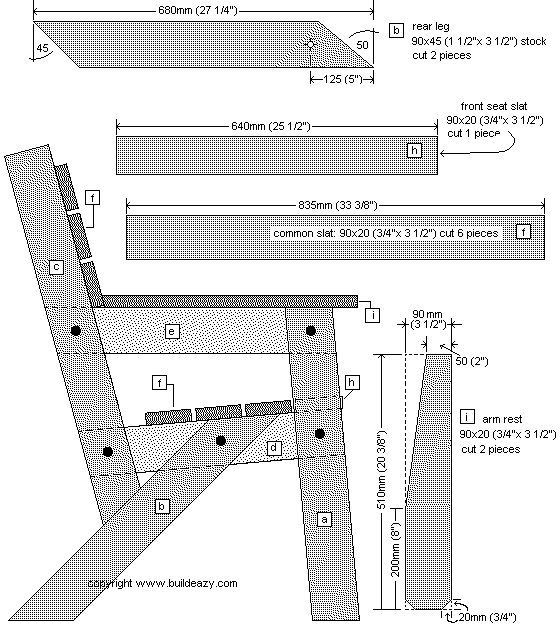
On the next page is a drawing of every different piece of wood used in this project and a cross-section drawing showing all the pieces in place. Each drawing shows angle cuts, dimensions and the placement of any bolt holes.
Simple Garden Chair
$5.00To help you even further, the drawings are followed by further explanation, information about wood sizes and notes regarding measurements.
Plans
Part identification and stock sizes are on the following page.
Part identification
[a] Front leg. 90 mm x 45 mm (1 ½”x 3 ½”) stock. Cut 2 pieces as per plan drawings on the previous page.
b] Rear leg. 90 mm x 45 mm (1 ½”x 3 ½”) stock. Cut 2 pieces as per plan drawings on the previous page.
[c] Back support. 90 mm x 45 mm (1 ½”x 3 ½”) stock. Cut 2 pieces as per plan drawings on the previous page.
[d] Seat support. 90 mm x 45 mm (1 ½”x 3 ½”) stock. Cut 2 pieces as per plan drawings on the previous page.
[e] Armrest support. 90 mm x 45 mm (1 ½”x 3 ½”) stock. Cut 2 pieces as per plan drawings on the previous page.
[f] Common slats. 90 mm x 20 mm (¾”x 3 ½”) stock. Cut 6 pieces as per plan drawings on the previous page.
[h] Front seat slat. 90 mm x 20 mm (¾”x 3 ½”) stock. Cut 1 piece as per plan drawings on the previous page.
[i] Arm rest. 90 mm x 20 mm (¾”x 3 ½”) stock. Cut 2 pieces as per plan drawings on the previous page.
Altogether you will need 6.6 meters (22ft) of 90 mm x 45 mm (1 ½”x 3 ½”) stock and 6 meters (20ft) of 90 mm x 20 mm (¾”x 3 ½”) stock.
You will also need 10 galvanized carriage bolts 10 mm (⅜”) diameter x 100 mm (4″) long, with nuts and washers, and 40 wood screws that are 50 mm (2″) long.
Plans sectional
About the wood stock sizes
Only two common stock sizes (widths and thicknesses) are required for this project.
They are dressed or surfaced 100 mm x 50 mm (2″x4″) and 100 mm x 25 mm (1″x4″).
- When 100 mm x 50 mm (2″x4″) wood is dressed or surfaced, the size becomes approximately 90 mm x 45 mm (1 ½”x 3 ½”) which is called the ‘actual size’.
- When 100 mm x 25 mm (1″x4″) wood is dressed or surfaced, the size becomes approximately 90 mm x 20 mm (¾”x 3 ½”) which is called the ‘actual size’.
All the measurements referred to in this project are the ‘actual sizes’.
Use a wood that is suitable for exterior use.
Dimensions for this project are given in both metric and imperial. All measurements are given in millimeters first, followed by feet and/or inches in brackets ( ). The metric sizes are not an exact match to the equivalent imperial sizes. A chair built using the metric measurements will be approximately 1.6% smaller than a chair built using the imperial (ft and in) measurements. The imperial measurements are more suited to North America. The metric measurements are more suited to Australasia.
Instructions – Making the side frames
This garden chair is constructed solely from 100 mm x 50 mm (2×4) and 100 mm x 25 mm (1×4) wood. Both are common stock sizes and can be obtained from most wood stores.
Note that when wood is dressed or surfaced, the finished (actual) size (width and thickness) is less than the nominal size. The sizes referred to in this project are the actual sizes.
There is further information on wood and sizes on the previous page along with detailed drawings of every part showing dimensions, angle cuts and exact placement of required bolt holes.
Step 1.
- Cut all the individual pieces to the sizes and shapes according to the plans on page 2.
Step 2.
- Mark and drill 10 mm (⅜”) bolt holes where required according to the plans on page 2.
Step 3.
- Assemble the two side frames.
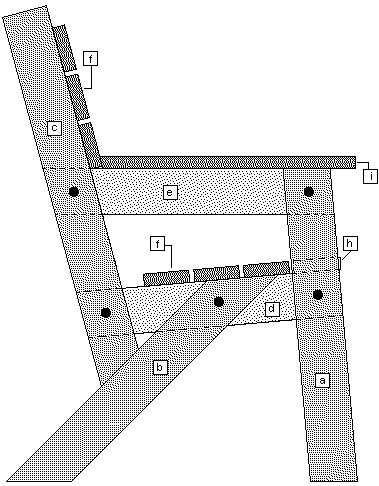
- Lay members [e] and [d] on even ground or bench and then lay members [a],[b] and [c] on top with the bolt holes aligned. Then bolt the members together.
- Screw the bottom of member [c] to member [b].
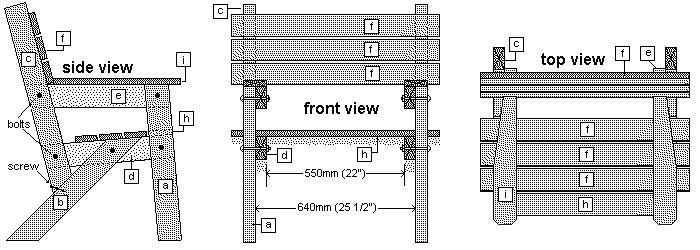
- Refer to the side view plan (page 4) if you need to.
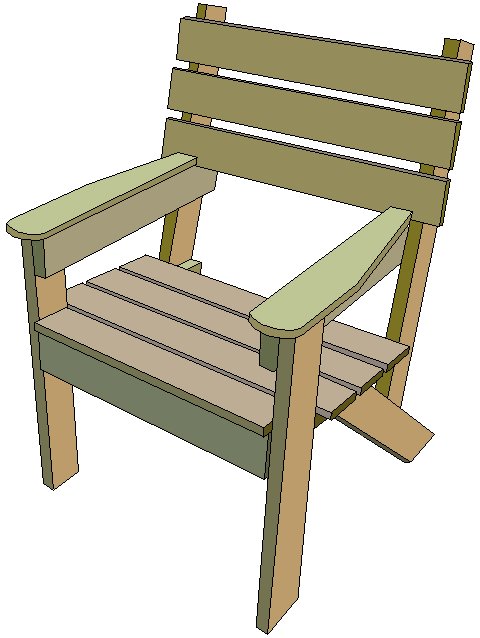
- Note that the two side frames will be a mirror image of each other. See fig.1 below.

Instructions – Adding the seat and back slats
Step 4.
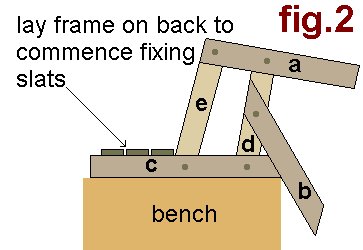
- Lay the frames on their backs to commence fixing the slats. See fig.2 above.
- Space the side frames 640mm (25 ½”) apart and ensure that they are parallel.
- Pre-drill screw holes through the slats (two at each meeting) and then screw the slats in place to members [c]. See the front view plan on page 4 for placement.
Step 5.
- Stand the chair frames upright ensuring members [d] are parallel.
- Pre-drill screw holes through the seat slats (two at each meeting) and then screw the slats in place.
- See the top view plan on page 4 for placement.
Step 6.
- Pre-drill screw holes through the two arm rests [i] and then screw them in place to the arm rest supports [e].


This chair that I modified from the plans for “How to build a simple garden chair” was made to go with a patio table that I had built with cedar.
The width was adjusted to suit the table. I now will build 3 mote. I did not use bolts and nuts as in the plans. I used deck screws and glue and a kreg jig for the back and seat boards.
I did not want screws on the seat and back boards.
James Gabrielson
Thanks for the plan, I used scrap woods to build this garden chair.
Jial
I used your plans and made a few changes and wanted to let you see what i have done very easy still. Also made an end table to go with it to.
S. Sharp
Hi There,
Just Luuuv your plans. And they are easy. My very first attempt at any type of woodwork. Made 4 benches, 2 chairs and 2 tables all from recycled pine pallets.
Sealed them with “woodoc” marine sealer and they are permanently outside.
Veronica Richards Bay, KwaZulu Natal, South Africa
Some of the chairs I made from your plans.
Terry Thompson Spokane, WA
I like the design of the chair but I had some boards that were long enough to make a bench so that’s what I did.
Thanks,
Alvin Schrock
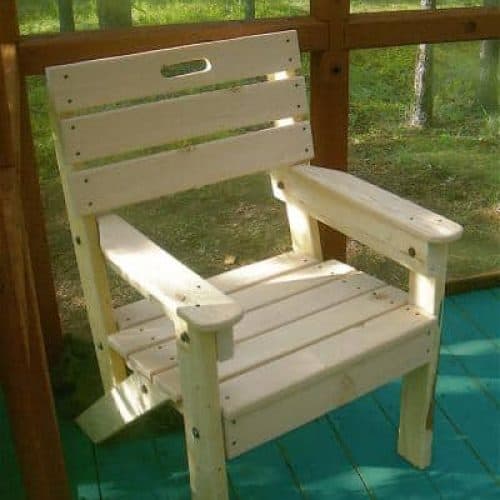
I made two of these ‘simple garden chairs’ last summer and find them to be a good sturdy design, and a fun project to build.
I especially like the support structure of the frame, the way the legs, seat and back go together.
I cut a hand-hold into the top back slat, partly functional, mostly decorative.
However I found that the design of the back is a little uncomfortable, and I may take the backs apart for modifications.
I plan to curve the leading edge of the back support, so the bottom slat doesn’t dig into the sitter’s back quite so much.
Perhaps work out a way to attach the armrests to the outside frame of the back also, enabling lower slats.
Other than that, I like the chairs really well.
I built them out of locally milled white spruce and they grace our home-built screenhouse in the woods just off our yard where we sleep in summer.
I plan to build a garden bench with the same design, modifying the back and arms as described.
Thank you for this wonderful chair plan,
Kt Ak
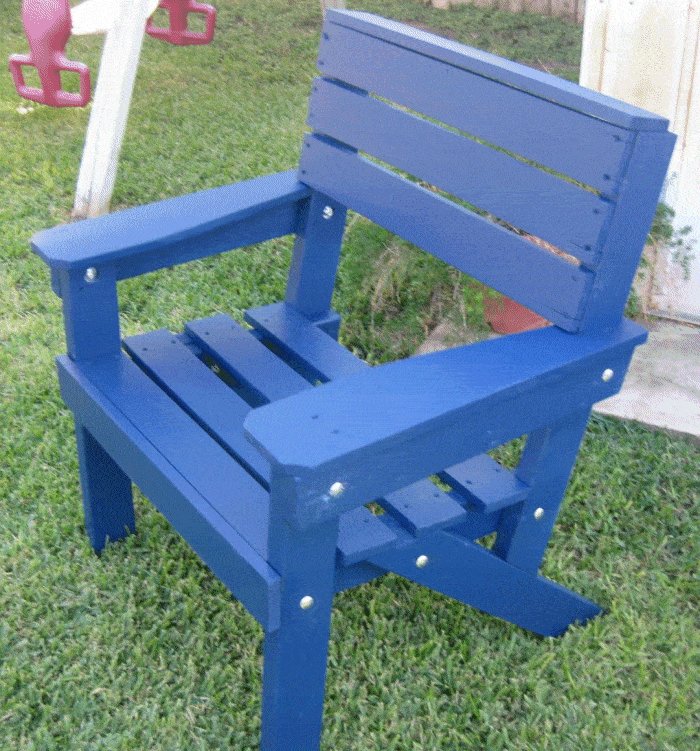
Here is a photo of my simple garden chair with some minor changes, I moved the armrest to the outside and added a front and top slat. Also, I used 3.5 inch bolts and recessed the nuts into the sides.
J Buentello
Your design built a solid, handsome chair. I made some adjustments to the design with more slats, some cross bracing, and shifted the position of the arm support. This one sits in an outdoor pool and spa shop here in Dallas. And there are 2 more in my yard.
Thanks for the Idea
P. Hunt Texas
That was a great plan. I used it as a basis for a special project, and I am very pleased with the results.
I modified it to make an umpire chair of sorts, to be used at our local gun club for scoring the trap competitions.
See attached.
Thanks for the great design idea.
Michael
Great plan, and thanks also to others who posted photos because they were really helpful. We also moved the arm supports to the outside, and changed the back supports to be vertical, as well as recessing the bolts at the front of the arm support; because we weren’t confident of being able to replicate curves, we did everything with straight cuts. We used macrocarpa (Monterey Cypress); here in New Zealand it doesn’t need any treatment and will just weather down to a nice grey. Thanks to Buildeazy for providing this great website!
Dave and Teresa, Auckland, New Zealand