Contents
Introduction and about the lumber and sizes
Introduction

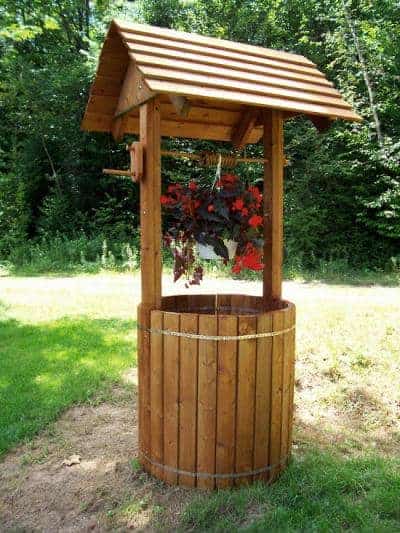
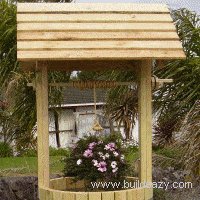
Wishing well project.
This wooden wishing well is relatively easy to construct using common size lumber and will be the feature in any garden or yard.
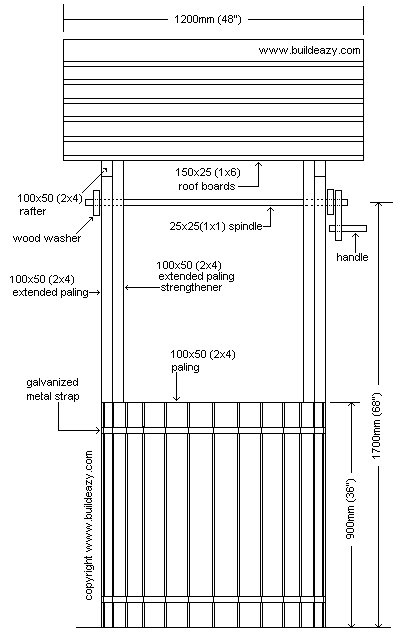
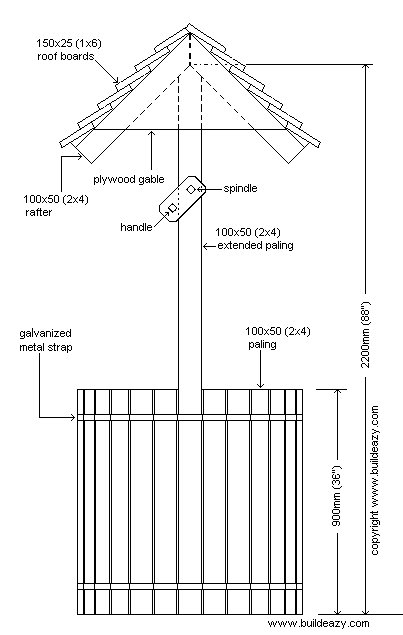
The wishing well is almost 900mm (3ft)in diameter and stands almost 2400mm (8ft) high. Most of the well is constructed out of surfaced (dressed) 100×50 (2×4) lumber. The exceptions are the roof boards which are from 150×25 (1×6) stock, and the spindle/handle and washers/handle arm which are from 25×25 (1×1) and 100×25 (1×4) stock respectively.
The diameter and height of the well can easily be changed if so required.
The diameter (well width) can made bigger or smaller by simply adding or subtracting the number of palings (vertical wall members) around the cylindrical base.
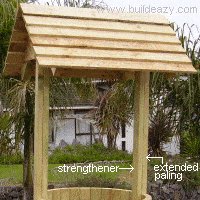
The height can be altered by making the two extended palings (roof supports) either longer or shorter.
Dimensions for this project are both metric and imperial. All measurements are given in millimeters first, followed by feet and/or inches in brackets ( ). The metric sizes are not an exact match to the equivalent imperial sizes. A wishing well built using the metric measurements will be approximately 1.6% smaller than a wishing well built using the imperial (ft and in) measurements. The imperial measurements are more suited to North America. The metric measurements are more suited to Australasia.

Garden wishing well
$5.00- Pay online by credit card, debit card, or Paypal using Secure Server Paypal. You do not need a Paypal account if paying by credit or …
|
About the lumber and sizes
Use treated lumber or other stock that is suitable for exterior use.
The lumber used for the well base and the roof frame is all surfaced (dressed) 100×50 (2×4) lumber.
When lumber is dressed, the size (width and thickness) becomes less.
Dressed 100×50 (2×4) lumber finishes approximately 90×45 (1 1/2″x 3 1/2″).
100×50 (2×4) is the nominal size, whereas 90×45 (1 1/2″x 3 1/2″) is the actual size.
The rest of the lumber used in this project is sawn or rough-sawn. This means that the wood is not dressed (surfaced) and therefore the actual size is the same as the nominal size.
Sizes do vary from place to place but that will not have any impact on this project.
The plans and materials list
Wishing well plans
Cutting list
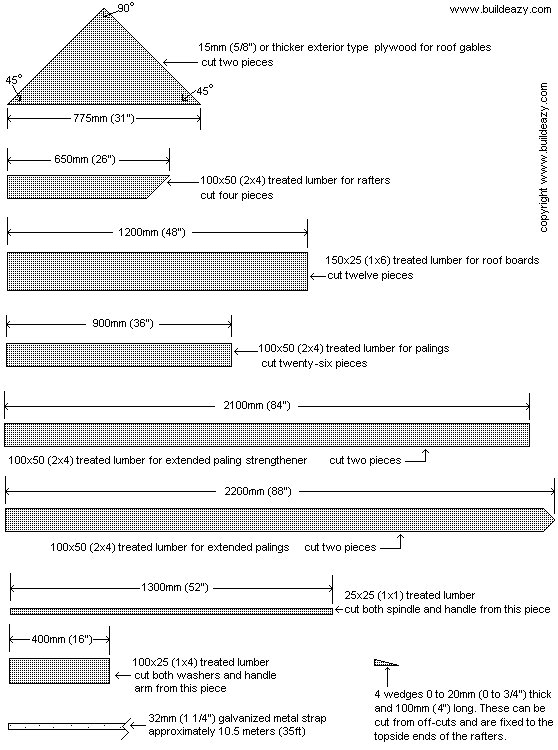
Cutting list with all the individual pieces
What you will need altogether
- 36 meters (120ft) of 100×50 (2×4) dressed (surfaced) treated lumber : for the palings and roof frame.
- 14.4 meters (48ft) of 150×25 (1×6) rough-sawn treated lumber : for the roof boards.
- 1.3 meters (52″) of 25×25 (1×1) rough-sawn treated lumber : for the spindle and handle.
- 400mm (16″) of 100×25 (1×4) rough-sawn treated lumber : for the washers and arm.
- 900mm x 900mm (3ft x 3ft) square piece of 15mm (5/8) thick exterior type plywood : for the plywood circle and roof gable ends.
- 10.5 meters (35ft) of 32mm (1 1/4″) galvanized metal strap : to wrap and hold the well sides together.
- 30 stainless steel 50mm (2″) long screws : for roof boards (middle) and washers and arm.
- Two 10mm (3/8″) galvanized carriage bolts 120mm (5″) long : to hold the extended paling and strengthener together.
- Six 10mm (3/8″) galvanized carriage bolts 110mm (4 1/2″) long : to hold the extended paling and strengthener together.
- 750gm (1 1/2 lb) of 40mm (1 1/2″) galvanized flathead nails : to fix the galvanized strap.
- 30 of 50mm (2″) galvanized flathead nails : to fix the plywood gable.
- 30 of 75mm (3″) galvanized flathead nails : to fix the roof boards to the rafters.
- 600mm (24″) of chain : to prevent the spindle from turning.
- Some rope and a bucket.
About the galvanized strap
Galvanized metal strap can be obtained from some building supply stores. In some areas galvanized band can be obtained from packaging companies. If you are unable to get any strap, another option is to use galvanized fencing wire. If you use fencing wire, however, on the outside of the palings fencing wire would need to be lapped three times and fastened firmly with staples every lap. To ensure stability it is important that the wire is unable to slide between the staples.
Image below
If wire is preferred instead of galvanized strap, use three strands of wire to replace each strap and fastened firmly with staples every lap to eliminate any slip. secure the wishing well with wire wishing well staples

Instructions – Steps 1 to 3
Step 1. Familiarize yourself
- Familiarize yourself with the plans, lumber and lumber sizes.
- All the plans, materials list and cutting list can be seen on page 2 along with a drawing of every piece of lumber.
- There is a bit of information about lumber sizes on page 1 which explains the difference between the sizes of rough (nominal size) and dressed or surfaced (actual size) lumber.
Step 2. Cut the members
- Cut all the pieces according to the cutting list. Cut the longest members first to minimize wastage.
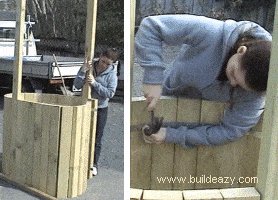
Step 3. Mark and join the palings together
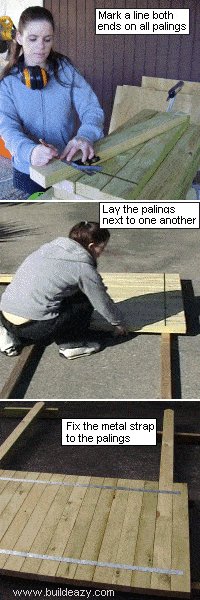
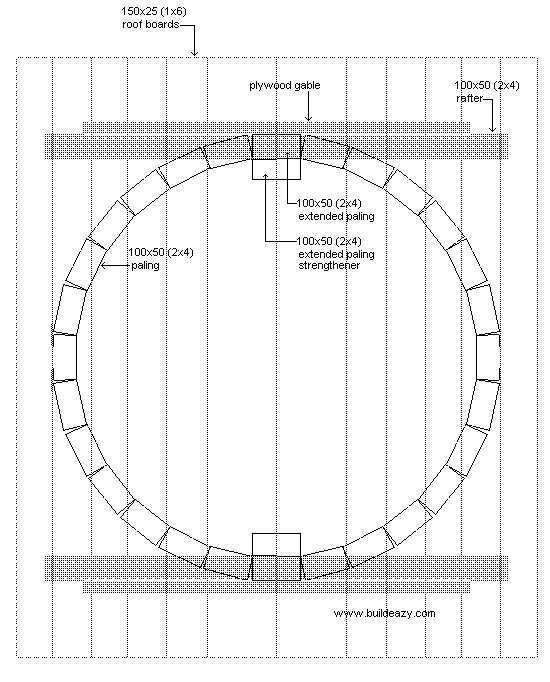
- The palings are the vertical 100×50 (2×4) members that form the wishing well sides.
- There are 26 palings which are 900mm (36″) long and 2 extended palings which are 2200mm (88″)long.
- Measure 100mm (4″) down from the top and the same amount up from the bottom of all 26 palings and mark a line.
Also mark corresponding lines on the 2 extended palings, making a total of 28 marked pieces altogether.
Lay all the palings and extended palings next to one another on top of a couple of runners placed on an even surface.
The runners should be directly under the marked lines and can be any size lumber such as 50×50 (2×2) or 75×50 (2×3).
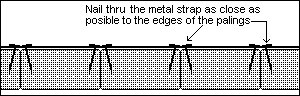
Ensure that there are 13 palings in between the 2 extended palings and that the first and last palings are parallel. - Nail two galvanized metal straps to the palings along the marked lines which are positioned 100mm (4″) down from the tops of the palings and 100mm (4″) up from the bottoms.
- Start the galvanized strap from halfway on the first paling and run it approximately 40mm (1 1/2″) past the last paling.
- Use 40mm (1 1/2″) galvanized flat head nails and fix as close as possible to the edge of each paling.
Important note:
Measure the overall length of the 26 palings and the 2 extended palings for later reference. For example, if each paling is 90mm (3 1/2″) wide, then the overall length will be 2520mm (98″).
Steps 4 to 7
Step 4. Make a plywood circle.
- Make a circle out of plywood with a diameter slightly smaller than the inside diameter of the wishing well.
- The plywood circle is to be placed temporarily inside the wishing well with the purpose of holding the wishing well sides in a circular shape until the galvanized strap has been fixed firmly in place.
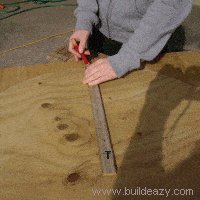
- How to make the circle…..
Using a narrow piece of wood (pivot stick), nail one end to the middle of the plywood sheet (axis point) allowing the wood piece to turn in a full circle.
making a circle
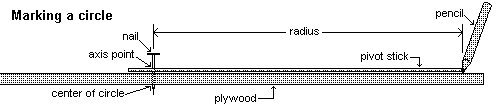
Make the length of the pivot stick from the nail to the end (the radius) according to the equation below.
The idea of the plywood circle is to ensure that the wishing well will keep its circular shape while the galvanized straps are being fixed in place.
The equation:
What size should the plywood circle be?
- The diameter of the plywood circle should be slightly less than the diameter of the inside of the wishing well.
- Measure the overall length of the 26 palings and the 2 extended palings and divide that by 3.17.
For example: if each paling is 90mm (3 1/2″) wide, then the overall length will be 2520mm (98″).
Therefore, the required diameter of the plywood circle will be 2520mm (98″) divided by 3.17 = 795mm (31″) thus the radius will be 397.5mm (15 1/2″) which is half of the diameter.
The diameter is the distance from one side of a circle to the other side across the middle.
The radius is the distance from the side of a circle to the center.
So, in this case, the length of the pivot stick from the nail to the end should be 397.5mm (15 1/2″) long.
IN SHORT: Divide the length of the wall by 3.17 and then divide that by 2 to find the required radius.
- For your information: the approximate diameter of a circle can be found by dividing the circumference (outside edge) by 3.14.
The exact diameter of a circle can be found by dividing the circumference by pi. Pi = 3.14159265…..on and on forever. - The shape of this wishing well is not a true circle. It is really a polygon with 28 sides called a icosikaioctagon. In other words, sort of a circle.
- When the pivot stick is the right length and the axis point is fixed, hold a pencil at the end of it, rotate and mark a circle (see pictures above).
Then cut the circle out with a jig-saw.
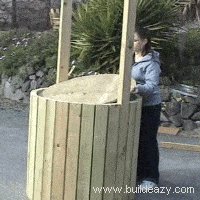
Step 5. Stand the well and form a circle
- Stand the well upright and form an approximate circle.
Join the first and last palings together and fix by nailing through the galvanized strap. - Partially hammer three or four temporary nails around the inside of the well, just above the galvanized metal strap to prevent the plywood circle from falling in.
- Position the plywood circle on top of the temporary nails inside the wishing well.
- The plywood circle will hold the wishing well in shape until the galvanized strap has been fixed in place.
Step 6. Strap the top of the outside
- The galvanized strap can now be fixed in place around the well 100mm (4″) down from the top.
- Nail firstly all the way around with one nail in the middle of each paling and then add another two nails as close as possible to the edges of each paling.
- Use 40mm (1 1/2″) galvanized flathead nails.
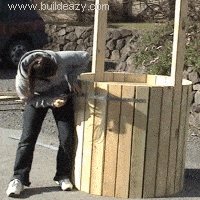
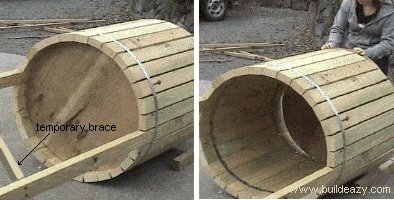
Step 7. Strap the bottom of the outside
- Measure, cut and fit a temporary brace in between the extended palings (see picture below).
- Kick the plywood circle out from the top of the well and fit it in the bottom. It may take a bit of wiggling and rolling to get it in.
- The galvanized strap can now be fixed in place around the well 100mm (4″) up from the bottom. Roll the well as needed and nail in the same manner as explained in step 6.
Steps 8 to 11
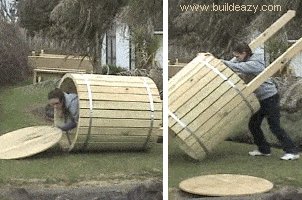
Step 8. Stand the well
- Roll the wishing well to its intended destination.
- Kick the plywood circle out and stand the wishing well upright.
Step 9. Cut the roof gables

- Cut the roof gables out of the plywood circle.
- Then make up the two end roof frames comprising of plywood roof gables and rafters.
Step 10: Make the roof
- Place the two end roof frames parallel on a flat work area. The distance between the two roof frames should be exactly the same as the distance between the two extended palings in the wishing well.
- Nail the first (lower) roof board to the rafters and then work upwards. Nail through the boards where they overlap and ensure the roof boards are evenly spaced. Place a wedge under the first board to raise the pitch similar to the others.
- Use 75mm (3″) galvanized nails to fix the roof boards to the rafters and then screw the middle of the boards where they lap with 50mm (2″) stainless steel screws.
Step 11. Add the roof
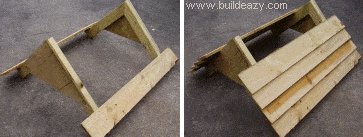
- This step requires two people, one to lift each end of the roof. It’s just simply a matter of picking the roof up and placing it on top of the extended palings.
- Now bolt the two extended paling strengtheners to the extended palings. Position the extended paling strengtheners as high as possible and fix each strengthener to the extended paling with four 10mm (3/8″) galvanized coach bolts spread evenly apart with the top bolt also going through the plywood gable.
Steps 12 to 14
Step 12. The spindle, washers, arm and handle
- Drill two holes through the extended palings and the strengtheners 1700mm (68″) up from the bottom.
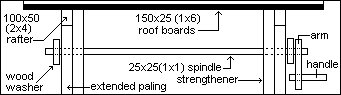

- Make the hole size 35mm (1 3/8″) or big enough so that the spindle can easily go through it and turn. We have chosen treated 25×25 (1×1) square lumber for the spindle because it is more readily available and easier to obtain than treated doweling (round rod).
- Make up two washers using 100x25x100mm long (1″x4″x4″ long) wood. First drill a starter hole through the center of each washer and then cut a square 25×25 (1″x1″) hole with a jig-saw.
- The outside edge of the washer can be rounded or just left square-shaped.
- In a similar fashion, make up the handle arm using a piece of 100x25x 200mm long (1″x4″x8″ long) wood. Make a 25×25 (1″x 1″) square hole each end.
Now put the spindle, washers, arm and handle together.
Thread the spindle through the holes in the extended palings and strengtheners. Slide a washer on at each end and then put a screw through each washer, fastening it to the spindle. Next, slide the handle arm along the spindle until it is against the washer and fasten to the spindle with a screw.
Fit the handle into the arm hole and fasten with a screw.
Note 1: Pre-drill all shank holes first to avoid splitting.
Note 2: The corners of the washers and arm can be rounded, angled or just left square-shaped.
Step 13. The spindle lock
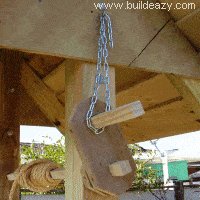
- Approximately 350mm (14″) above the spindle, screw in a hook or partially hammer in a nail and bend it up in a hook shape.
Hang a 600mm (24″) length of light chain from the hook. When the handle needs to be locked in place, the chain can be wrapped around the handle and back over the hook. - This is ideal to hold the bucket in the ‘wound up’ position.
Step 14. The rope and bucket
- Tie one end of a length of rope to the spindle, the other end to the bucket handle and that’s about it.
Don’t forget to throw in a coin and make a wish!
All done. Eazy with a “Z”!


Olivia Redding in Sophia N.C
Hi, I build the wishing well following your plan to hide the real artesian well head. Thanks for the free plans, it turned out nice and was easy. Use the photos as you wish.
Jean Labelle, Quebec, Canada
My son and i have just built two wishing well’s.
Look’s great, very easy to make, instruction’s very easy to follow.
What a wonderful wesite, thank’s Buildeazy looking forward to more job’s from this website. GREAT!!!!!!!!.
Clare and Ray
Thanks so the plans, with the help of them we created this beautiful wishing well. It cover our septic tank cover and is easy to move if need be.
Margaret
Nelson BC
I wanted to cover the pipes from our well so I used your plans as a guide.
I sawed our aerator tank in half and placed that over the pipes so I could use it as a backing for my left over fence boards.
All I needed to buy were screws and strapping. Everything else was left from the fence.
I used a 5-gal paint bucket for the backing of my wooden bucket and PVC pipe for the crank.
I really like my wishing well. Thanks for great instructions, even though I improvised. Here are my pictures.
Beverly from Naples, FL
Thanks for the wishing well plans !!! It was a fun and easy project !! I changed the roof design a little by using cedar shingles.
Phill
New Hampshire
We had never built anything before, but we found the plans for the wishing well and gave it a try.
We were so happy with the outcome that we scaled down the plans and made two small wells for our mothers for Mother’s Day.
Clark, USA
I recently built your Wishing Well and Bucket, here is a picture of it in my front yard. I would have a couple of suggestions….#1 – I would cut the inside paling so it reaches from the ground to the point inside the roof #2 – for those who have trouble getting the circle to go inside the bottom, lifting it with a hydraulic jack with a short 2 x 4 inside helps.
I’m also curious as to how the lady on the video, just picked it up off the ground and wrapped it around all by herself…..I could lift it about 4 inches off the ground…..she had to be super sonic!!!
Any way I enjoyed the project.
Thanks, Shirley Adams
Dear Buildeazy
Here is a picture of the wishing well planter that I built from your free project plans.
I have made a few changes to fit my taste, but it is your plan that I built it by.
Thanks for the plan, You may use any of the following photos (if you wish) to show my finished product.
Rick Hopes Eureka,Utah
dear buildeazy
have enclosed photo of wishing well i built for our patio in burntwood uk
using your plans
it was quite easy to follow plans and instructions