Contents
About the lumber: plans and instructions
About the lumber and dimensions
All dimensions are in both Metric (mm) and Imperial (inches).
The size (width and thickness) of the lumber referred to throughout this project is the nominal size. That is the size of the lumber before it has been dressed, planed and/or seasoned. When the lumber has been dressed, planed and/or seasoned it is then called the ‘actual size’ which is the true size. The actual size of lumber is smaller than the nominal size. For example: 150×50 (2×6) nominal size when dressed may become 140×45 (1 1/2″x 5 1/2″) actual size and 100×50 (2×4) when dressed may become 90×45 (1 1/2″x 3 1/2″) actual size.
Most Countries that use the Metric system generally put the bigger numeral first such as 100×50 (mm), whereas those that use the Imperial system generally put the smaller numeral first such as 2×4 (inches).
The ‘actual size’ of the lumber can vary slightly from place to place but that should not have any effect on the dimensions given throughout this project. What will vary, depending on the actual size of the lumber, is the gap between each row of tabletop boards and seat boards which does not really impact on the finished product.
Project update – The gap between the boards
If you are going to use stock that measures 150mm x 50mm (2 x 6), which is usually lumber that has not been dressed, planed and/or seasoned, go to the plan drawings below.
However… If you are going to use stock that has been dressed, planed and/or seasoned and has a finished size of approximately 140mm x 45mm (1 1/2″x 5 1/2″), then go to the Revised plans (Page 3).
Why?
Because if you use the drawings below and use 140mm x 45mm (1 1/2″x 5 1/2″) stock, you will end up with a gap of around 13mm (1/2″) between each tabletop and seat board.
But, if you use the Revised plans (Page 3) and use the same stock size, you will end up with a smaller gap, about 6mm (1/4″) between each tabletop and seat board.
Instructions and drawings
For 150mm x 50mm (2 x 6) stock size.
The cutting list
Seat and tabletop boards
- Use lumber that is suitable for exterior use.
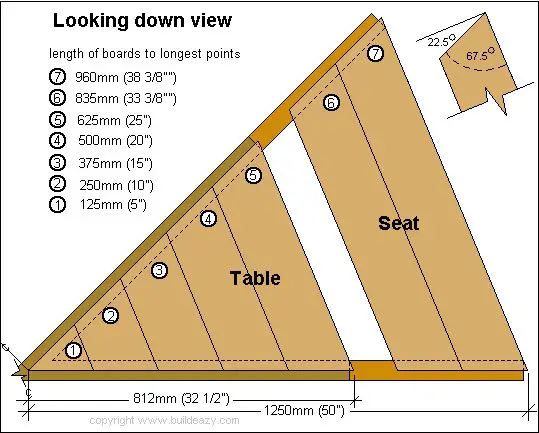
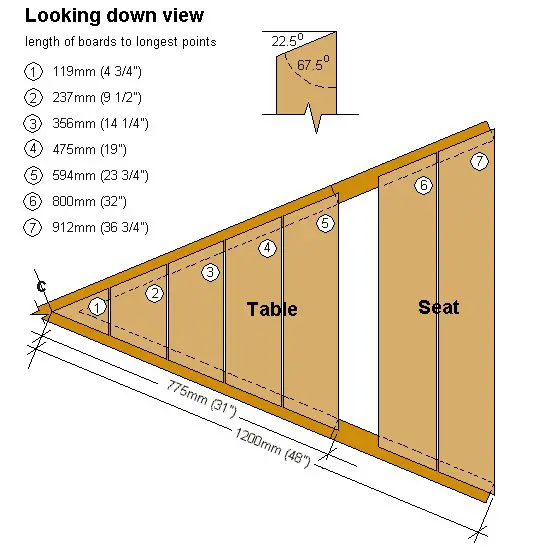
- Cut all the seat and tabletop boards to the dimensions as shown in the drawing below. The lumber used for the seat and tabletop boards is 150×50 (2×6) stock. Cut eight pieces of each length, making 56 pieces in all. Cut the longer pieces first to minimize wastage.
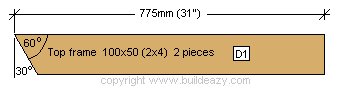
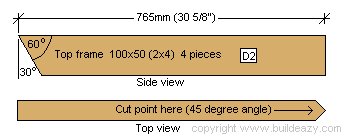
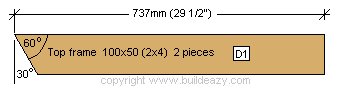
The lumber cutting list: Table frame
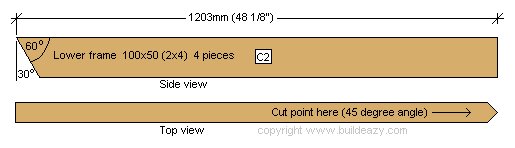
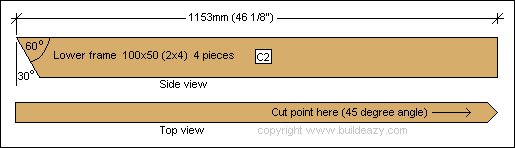
- Cut all the table frame members to the dimensions as shown in the drawing below. The lumber used for the table frame members is 100×50 (2×4) stock.


Plans and instructions continued, materials list
Instructions: Upper and lower frames
- Make up both the tabletop support upper frame (d, d1, d2) and the seat support lower frame (c, c1, c2), on flat ground using the lumber in the cutting list above.
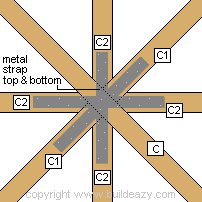
- The center of both frames should be fixed as shown in drawing below, and the end outer points of the frames (8 each frame) should be equal distances apart.
- Nail three metal galvanized strap plates to the top side and to the underside of both frames where they meet in the center (12 strap plates in all). See drawing below.

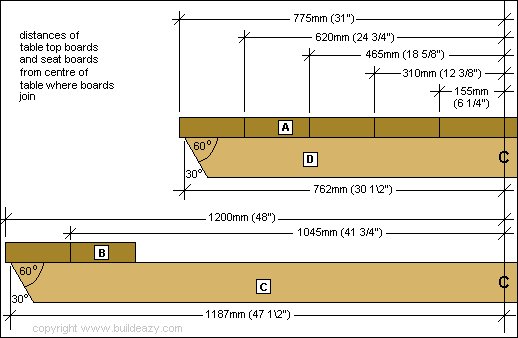
Instructions: Seat and table top boards
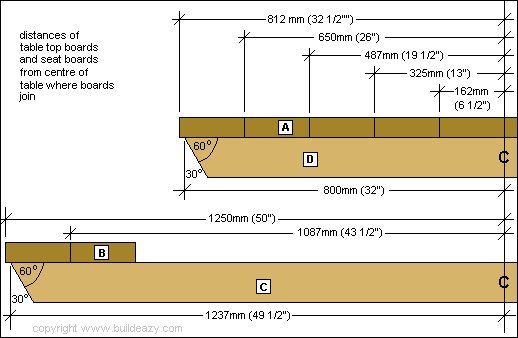
- Mark out from the center of both frames (measurements shown in diagram below) along every arm of the two frames. These are used as guides for placing the boards. Nail the cut tabletop boards (A’s) to the upper frame (D’s) beginning with the outer boards (longest boards).
- Ensure the joins are in the middle of the frame arms and equal distance from the center point of the frame. Continue around the frame with the next longest board and so on, until the table top is complete.
- Do the lower (seat) frame (C’s) in the same way using the cut seat boards (B’s).
- Use 100mm (4″) galvanized flathead nails to fix the boards to the frame. Drill nail holes first to keep lumber from splitting.
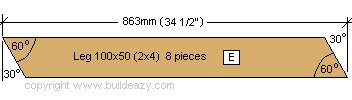
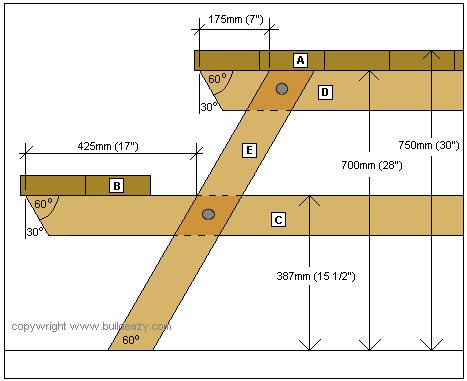
Instructions: The legs
- Lay the finished table top upside down on even ground. Position the finished seat frame upside down above the tabletop.
- Place packers or blocks under the seat frame until the seat frame sits at the appropriate height above the tabletop frame. Position the legs in place as per below drawing. Hold with clamps, drill and bolt.
Eazy with a Z!
| MATERIAL | USED FOR | AMOUNT |
| 150×50 (2×6) stock | tabletop boards and seat boards | 32 meters (110 ft) |
| 100×50 (2×4) stock | frame and legs | 24 meters (80 ft) |
| 10mm x 110mm (3/8″x 4 1/2″) galvanized carriage bolts | bolting legs to frame | 16 |
| 4″ galvanized flathead nails | 2kg (4.5lb) | |
| 300mm x 25mm (12″ long x 1″ wide ) galvanized strap | Top and underside of frame centers | 12 |
Revised plans
These project drawings call for 140mm x 45mm (1 1/2″x 5 1/2″) lumber to be used for the seat and tabletop boards.
If the true size of the lumber that you are going to use is approximately 150mm x 50mm ( 2 x 6″), which is usually lumber before it has been dressed, planed and/or seasoned, then go see picnic table project (Page 1).
For building instructions, materials list and a bit more about lumber sizes, go see instructions (Page 1).
Plans for picnic table using 140mm x 45mm (1 1/2″x 5 1/2″) stock


Hi, My father asked for an octagonal picnic table for Christmas and when we saw how expensive they were, we decided to make one ourselves. We followed your DIY picnic table instructions and are so happy with the way it turned out!!
IT cost around 200 US dollars, and it took us two days to make. Genius! Thanks so much.
Jennifer
Thank You for the wonderful Table Plans.
My father and I put together this table in one weekend. We used all redwood, and it came out great. You may use any of these photos you want if needed.
Carol and Shannon
The octagonal picnic table plans were great and very easy to follow! As you can see on the picture, I made several changes. Borrowing a suggestion from another reader, I doubled up the legs.
Since I used 5/4″ deck boards for both the table top and the seats, I also added some cleats under the seats for additional support. I added @ 5 1/2″ to the leg lengths for a taller picnic table.
I also used the revised plans for the table top, but the slightly longer original plans for the seat to give some additional room.
Lastly, I counter sunk and filled/sanded all the screw holes, and bored 1 1/2″ dia. pockets so that all the carriage bolt heads and nuts would be recessed and flush with the board surfaces. Applied 2 coats of weatherproof solid stain, and we are ready for outdoor entertaining!
Thanks! Brian S. Gardner
Dear Build Eazy,
I was looking for a clever design for a picnic table, and found this one.
Great design, and even more helpful were the user submissions and photos, so I’m sharing what I did.
I used rough cut white cedar, which made it pricier, but it turned out beautifully.
I also made a few modifications.
The original design with the attached benches was going to be much too big for what we needed, so I made 4 basic separate benches (two pictured).
Eight legs seemed like they would make it harder to sit at, so I made 4 legs bolted into the spokes.
Also, I also had a request from my wife for a hole in the middle for an umbrella.
In the original design this would have made the center joint completely unstable.
So instead of the metal straps along the 2×4 spokes, I used a 1ft square piece of 1/8″ sheet metal centered underneath the table (see photo), and I also used a single octagon for the center piece instead of the 8 triangles.
Eventually I’ll drill a hole through both for the umbrella (but for now I love the center octagon too much to drill a hole in it!).
Gerald
Last weekend I Googled for picnic table plans and found your site. I chose to try building the octagonal table pictured below. It was a little more work than the standard table, but very easy to do with the plans you provided. I think it turned out pretty well and my wife loves it!
Thank you for a great site!
Wjd
Friends-
My Dad and I just finished building an octagonal picnic table after your excellent plans. A picture is attached. As you can see, we modified the plan slightly by doubling up on the legs at each vertex. The finished table goes excellently well with our new gazebo, which itself is on an octagonal floorplan.
Thanks for providing this awesome free resource!
Cheers-
Sean Ragan
Austin, TX
Hello BuildEazy, Another summer project successfully completed thanks to your great plans! Our table is large, solid, and reasonably quick to make. And SO much cheaper than buying one!
As a suggestion, I would suggest cutting the wood for the seats & table tops as you go. That way, any inaccuracies in your frames can be compensated for! Cheers, Callum.
Dear Sirs, I wanted to let you know that I built your 8-sided picnic table, from the free plans that you posted on your web site. It worked great! I made it a little smaller, and cut the boards to fit as I went, but other than that, I followed your plans to the letter. Thanks a million! Here is a picture of the finished product.
Sincerely, Scott Acton Boulder, Colorado
P. S. I used rough-cut cedar, and sanded the appropriate surfaces after the fact. I finished it with a clear varnish, to preserve the color of the wood.
Hi, I had wrote questioning about placing a 1 1/4 hole in the center of a octagon table without causing a weak structure where the metal straps cross.
I figured it out and would like to pass along the information for the next person who might build the table and want to place a umbrella on it.
Go to a hardware store and get a 1 1/4″ galv. floor flange and bolt it to the center of the table and then add a 12″ X 1 1/4″ nipple. Eliminate the 1 1/2″ pole that comes with the umbrella and place the 1 1/4″ pole into the 12 ” nipple. The table is heavy enough to hold the umbrella. You may have to drill the steel plates before securing it with a lag bolt. I don’t do carpenters work but I found the plans very easy to follow and here is a picture of my table.
Thank you very much. You made my wife very happy. Ha Ha
BluLightfoot
I recently built a hexagonal BBQ/Picnic Table. Seems most have problems with the 60 degree cuts on the framing. Here is what I did and it worked beautifully.
I took a piece of scrap 2X4 I had cut off the end and screwed it to my miter saw with 2 wood screws. Using the 30 degree angle as a guide, I then cut the 60 degree angle by simply leaving my saw set at 30 degrees. My tale turned out so beautiful our oldest daughter wanted it so I immediately built a Octagonal table for our youngest daughter and her family. The Octagonal table was somewhat harder to build since I doubled up on the legs all the way around.. Next table, hopefully, to stay at our house will be another hexagonal using the doubled up legs and one other mod. I am going to attempt to countersink the nuts and washer in the legs at seat height. Yep, I’m retired. Thank you for this site. It has been wonderful for me to have access to so many great projects.
William Simpson, Lucedale, MS
I am wanting to build an octagon picnic table with attached seats and the ability to have an umbrella. This table is what I would like but can the underside support structure be modified to allow for the attached benches and unbrella?