Contents
Introduction – Plans
Introduction (scroll down for Plans)
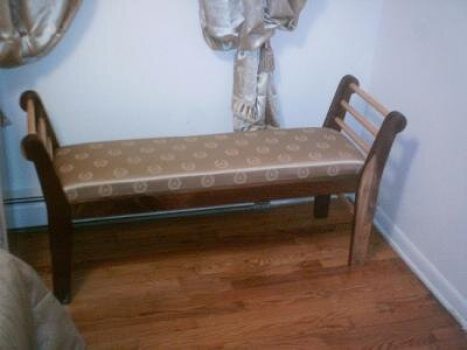
This type of bench seat is generally put at the end of a bed, against a wall in a wide hall or in a house entrance area. This plan is purpose-made for the latter; simply somewhere to sit while putting on and taking off shoes, and I guess that it’s a hint age is creeping up, to need such a bench for that reason.
This hall bench has a drop-in padded seat.
The Plans
Materials list – Tool requirements
Materials list – Tool requirements
Materials list for Hall Bench frame and seat base.
Note 1: Some pieces below are given as ‘approximate’ lengths. They will need to be measured more precisely on the job.
Note 2: Total amounts given (where applicable) allow for a bit of wastage.
Note 3: The stock sizes given are the actual sizes; that is the finished size once the wood has been surfaced and dressed. These sizes may vary slightly from place to place.
Note 4: Use a wood type of your choice. Your local stockist will be able to advise you on the available woods suitable for this project. We chose pine for this particular project.
| Item | Wood Size | Item Length | Used For | Total Amount Allows for a bit of wastage |
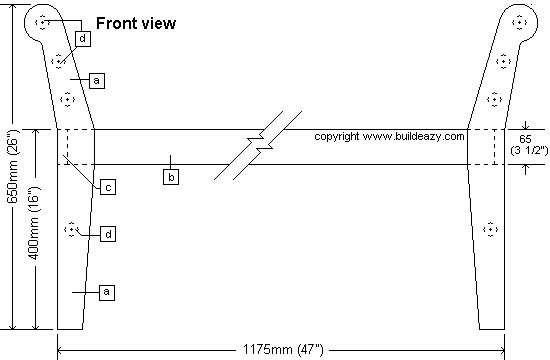
| [a]4 pieces | 140mm x 45mm (1 1/2″ x 5 1/2″) | 650mm (26″) | legs | 2800mm (112″) |
| [b]2 pieces | 65mm x 20mm (3/4″ x 2 1/2″) | 1138mm (45 1/2″) | front and rear rails | 2400mm (96″) |
| [c]2 pieces | 65mm x 20mm (3/4″ x 2 1/2″) | approximately 363mm (14 1/2″) | side rails | 800mm (32″) |
| [d]8 pieces | 25mm (1″) diameter dowel (round wood) | approximately 375mm (15″) | spacers | 3100mm (124″) |
| [e]2 pieces | 32mm x 20mm (3/4″ x 1 1/4″) | 1138mm (45 1/2″) | front and rear seat support | 2400mm (96″) |
| [f]1 piece | 20mm (3/4″) MDF board or plywood | approximately 319mm x 1132mm (12 3/4″ x 45 1/4″) | seat base | |
| [g]1 piece | card | 650mm x 140mm (5 1/2″ x 26″) | making leg pattern | 2800mm (112″) |
You will also need a few wood screws to suit and some wood glue.
Materials list for seat padding.
- 50mm (2″) thick foam approximately 319mm x 1132mm (12 3/4″ x 45 1/4″)
NOTE: A thinner piece of foam down to a minimum of 32mm (1 1/4″) thick will also do. - Cotton batting or polyester batting or similar fibrous material approximately 550mm x 1350mm (22″ x 54″)
- Calico, denim or similar, approximately 550mm x 1350mm (22″ x 54″) plus (optional) a piece to line the underside of the seat as well.
- Covering fabric approximately 550mm x 1350mm (22″ x 54″)
- Spray on glue
Tool requirements
Minimum tool requirements to make the Hall Bench are…
- Tape measure
- Screwdriver
- Pencil
- Hammer
- Square
- Electric drill
- Electric drill press
- 4mm (1/4″) and 25mm (1″) drill bits
- Circular saw
- Sand paper
Note: A band saw and chop saw would be make the job a little easier, but not essential.
Additional tool requirements for the upholstery
- Staple gun
- Fabric scissors
- Craft knife
Instructions (steps 1 to 4)
Step 1.Cut the members to length and shape
- Cut the front and back rails 1138mm (45 1/2″) long. Refer to the materials list and plans for stock sizes.
- Cut the four leg pieces 650mm (26″) long.
- Cut 8 pieces of dowel 375mm (15″) long.
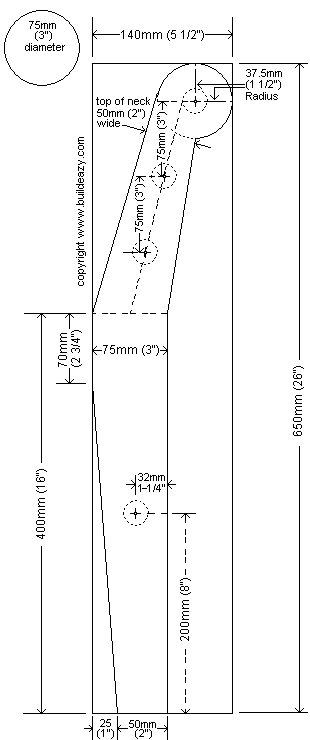
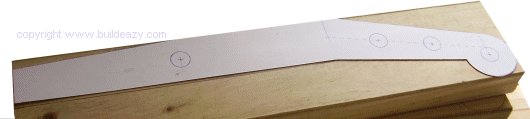
- Make a pattern out of cardboard for the legs. Refer to the plans for dimensions.
- Place the pattern on each leg piece, then mark the pattern outline on the leg piece and also mark the positions of the holes.
- Cut the legs to shape. A band saw would make the task easier but they can still be cut to shape using a circular saw and a jig-saw.
Dimensions for this project are both metric and imperial. All measurements are given in millimeters first, followed by feet and/or inches in brackets ( ). The metric sizes are not an exact match to the equivalent imperial sizes. A project built using the metric measurements will be approximately 1.6% smaller than the same project built using the imperial (ft and in) measurements. The imperial measurements are more suited to North America. The metric measurements are more suited to Australasia.
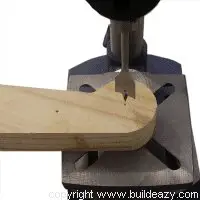
Step 2. Drill the holes for the dowel
- Mark where the holes are to go using the card pattern.
IMPORTANT NOTE: Mark the holes on two leg pieces with the pattern and then turn the pattern upside down to mark the other two.
One pair of legs should be a mirror image of the other pair. See picture in ‘step 4’ below.
- Drill 25mm (1″) diameter holes 25mm (1″) deep using a drill press.
- There should be four holes in each leg. A total of 16 holes altogether.
Step 3. Notch the legs to house the rails
- Make a notch in each leg to house the front and rear rails.
Refer to the plans for position. - Cut the notch 20mm (3/4″) deep and the same width as the front and rear rails.
- The notching is best done by making multiple cuts using a circular saw with the blade set to a depth of 20mm (3/4″) and then by cleaning out with a sharp chisel.

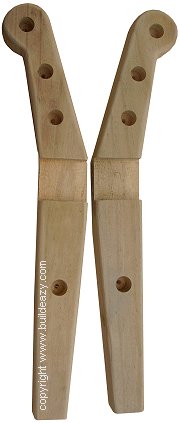
Step 4. A bit of sanding
- This can be done by hand using two or three different grades of sandpaper, and both flexible and rigid sanding blocks.
- Begin with a reasonably coarse sand paper and finish with a fine grade.
- A little bit of elbow-grease and the legs should look something like in the picture to the right.
Instructions continued (steps 5 to 7)
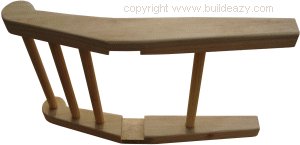
Step 5. Assemble the two ends
- Lay a leg on a flat, even surface or a work bench.
- Apply wood glue to the holes in the leg and around the ends of the dowel pieces which are to be inserted into the holes.
- Insert the dowel pieces into the holes.
- Apply more wood glue to the other ends of the dowel pieces and also to the holes of the opposite leg.
- Align the opposite leg above the dowel pieces and gently hammer into place using a block of wood as a buffer so as not to damage the leg.
- That is one end done. Repeat the process for the other end.
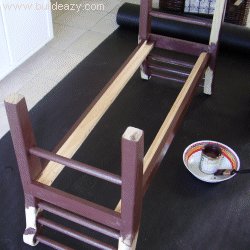
Step 6. Fix the front and back rails in place
- Lay the two end assemblies on edge on a flat, even surface, opposing one another.
- Apply glue to the notches and the ends of a front or back rail.
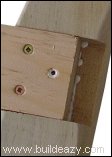
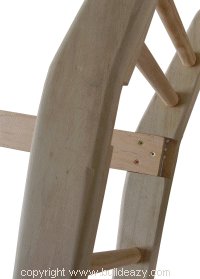
- Position the rail into the notches so that the ends of the rail are in 20mm (3/4″) from the outside edge of each notch. See pictures.
- Fasten with three screws each end.
Note: Pre-drill the holes for the screws in the rails prior to fastening.
- Flip the unit over and repeat the same action on the other side.
Step 7. Fix the end rails in place
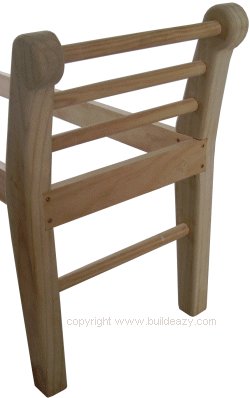
- Stand the unit upright.
- Measure from notch to notch for the required length of the end rails.
- Cut the end rails to length.
- Apply wood glue and screw the two end rails in place.
Note: Pre-drill the holes for the screws in the end rails prior to fastening.
Instructions continued (steps 8 to 9)
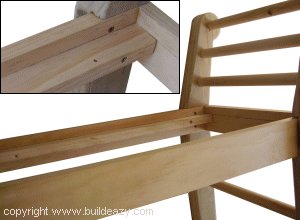
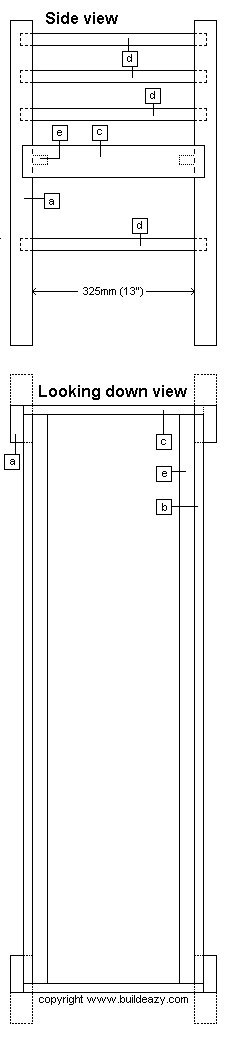
Step 8. Seat support strips
- From 32mm x 20mm (3/4″ x 1 1/4″)stock, cut two pieces to length to fit between the two end rails.
- Screw them to the front and back rails 22mm (7/8″) down from the top.
That is slightly more than the thickness of the seat board. - The seat support strips are solely to support the drop-in seat.
Step 9. A bit of paint
- We used high gloss enamel paint and applied three coats over three days giving a slight sand before each new coat.
- You might want to do something different, such as stain and polyurethane.
- It all comes down to what sort of finish you want and what sort of wood you use.


Thank you for the plans for the bed end bench. I have finished two benches. Here are pictures of both.
Steve Meriweather
love this bench
I wanna build me one for my place