
Contents
Introduction
The Wendy House
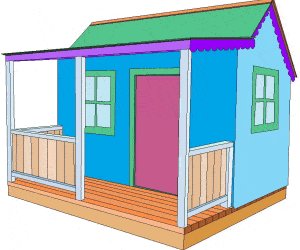
A Wendy house is basically a playhouse with a few feminine touches added. With a little imagination, customized touches can be added to your Wendy house to create a unique and special environment that can provide children with hours of enjoyment!
Standard (ft and inch) version:
This house stands 78″ high, is 92″ long and 48″ wide with an additional 28″ wide deck along the front.
Metric version:
This house stands 2 metres high, is 2.3 metres long and 1.2 metres wide with a 700mm wide deck along the front.
Wendy house
$5.00
|
Explanation of timber sizes
The timber sizes referred to in this project are the finished or ‘actual’ sizes. For example: If you went along to the timber yard and asked for a piece of 75mm x 50mm dressed framing timber, the actual timber size would not be 75mm x 50mm, but rather 65mm x 46mm (or there abouts).
Confused? Well 75mm x 50mm was the approximate size of the timber before it was planed, dressed or gauged and is still referred to in timber yards as 75mm x 50mm, even though the finished size is 65mm x 46mm, give or take a mil. Hence the term used here ‘ex 75mm x 50mm’.
About the lumber.
Standard (ft and inch) version:
The lumber sizes referred to in this project are the finished or ‘actual’ sizes.
The floor base is constructed of 1 1/2″x 5 1/2″ treated lumber. The floor is 3/4″x 3 1/2″ deck boards.
Explanation of timber sizes
The timber sizes referred to in this project are the finished or ‘actual’ sizes. For example: If you went along to the timber yard and asked for a piece of 75mm x 50mm dressed framing timber, the actual timber size would not be 75mm x 50mm, but rather 65mm x 46mm (or there abouts).
Confused? Well 75mm x 50mm was the approximate size of the timber before it was planed, dressed or gauged and is still referred to in timber yards as 75mm x 50mm, even though the finished size is 65mm x 46mm, give or take a mil. Hence the term used here ‘ex 75mm x 50mm’.
All the framing is 1 1/2″x 2 1/2″ lumber (ex 2×3) with the exception of the ridge beam which is 1 1/2″x 3 1/2″ (ex 2×4). The posts also are 1 1/2″x 2 1/2″ lumber.
Note: Alternative size framing lumber. All the framing lumber referred to in this project is 1 1/2″x 2 1/2″ lumber which is dressed (surfaced) 2×3. If this stock size is not available in your area, then use 1 1/2″x 3 1/2″ (ex 2×4) lumber but make any necessary measurement adjustments.
Alternatively rip 1 1/2″x 5 1/2″ (ex 2×6) lumber in half to obtain the 1 1/2″x 2 1/2″ stock.
Metric version:
All timbers used for the construction of the Wendy house are readily available at most timber merchants or building suppliers.
The floor base is constructed of 145mm x 46mm (ex 150mm x 50mm) treated dressed (gauged, smooth finish) covered with standard 90mm x 32mm pine decking.
All the framing stock is 65mm x 46mm (ex 75mm x 50mm) with the exception of the ridge beam which is 90mm x 46mm (ex 100mm x 50mm) and the posts which are 65mm x 46mm (ex 75mm x 50mm) treated for outside use.
The plans: Side and front elevation
Standard (ft and inch) version:
The Elevation Plans (side)
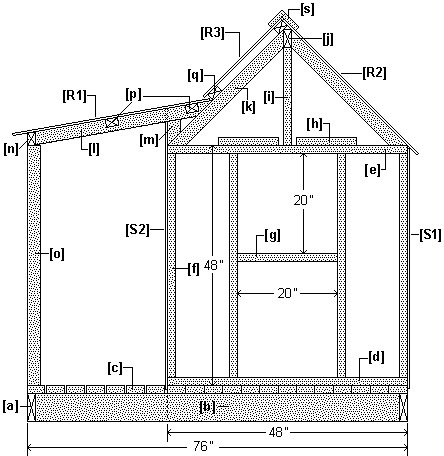
The Elevation Plans (front)
Metric version:
The Elevation Plans (side)

The Elevation Plans (front)
The Floor, Frame Cutting List and Instructions
The Floor and Frame Cutting List.
Standard (ft and inch) version:
[a] 1 1/2″ x 5 1/2″: edge joist; 2 @ 92″ long.
[b] 1 1/2″ x 5 1/2″: common joist; 5 @ 73″ long.
[c] 3/4″ x 3 1/2″: decking boards; (random 175ft of).
[d] 1 1/2″ x 2 1/2″: bottom plate; 2 @ 87″ and 2 @ 48″.
[e] 1 1/2″ x 2 1/2″: top plate; 2 @ 87″ and 2 @ 48″.
[f] 1 1/2″ x 2 1/2″: stud; 18 @ 45″.
[g,h] 1 1/2″ x 2 1/2″: blocking and misc; (random 50ft of).
[i] 1 1/2″ x 2 1/2″: ridge beam support; 2 @ 19 1/4″.
[j] 1 1/2″ x 3 1/2″: ridge beam; 1 @ 92″.
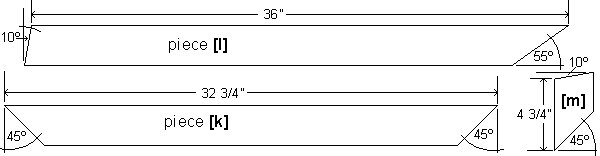
[k] 1 1/2″ x 2 1/2″: common rafter; 10 @ 32 3/4″.
[l] 1 1/2″ x 2 1/2″: lean-to rafter; 5 @ 36″.
[m] 1 1/2″ x 2 1/2″: lean-to rafter support; 5 @ 5 3/8″.
[n] 1 1/2″ x 2 1/2″: lean-to beam; 1 @ 92″.
[o] 1 1/2″ x 2 1/2″: post; 3 @ 48″
Metric version:
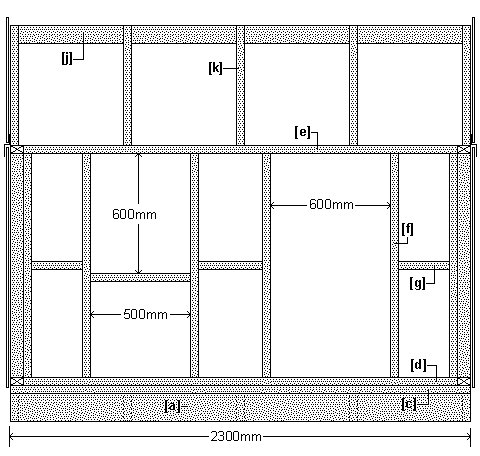
[a] 145mm x 46mm: edge joist – 2 @ 2300mm long.
[b] 145mm x 46mm: common joist – 5 @ 1808mm long.
[c] 90mm x 32mm: decking boards – (random 53m of).
[d] 65mm x 46mm: bottom plate – 2 @ 2170mm and 2 @ 1200mm.
[e] 65mm x 46mm: top plate – 2 @ 2170mm and 2 @ 1200mm.
[f] 65mm x 46mm: stud – 18 @ 1108mm.
[g,h] 65mm x 46mm: blocking and misc – (random 15m of).
[i] 65mm x 46mm: ridge beam support – 2 @ 480mm.
[j] 90mm x 46mm: ridge beam – 1 @ 2300mm.
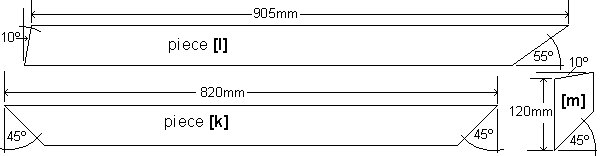
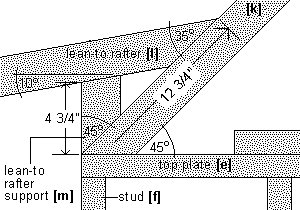
[k] 65mm x 46mm: common rafter – 10 @ 820mm.
[l] 65mm x 46mm: lean-to rafter – 5 @ 905mm.
[m] 65mm x 46mm: lean-to rafter support – 5 @ 135mm.
[n] 65mm x 46mm: lean-to beam – 1 @ 2300mm.
[o] 65mm x 46mm: post – 3 @ 1200mm
The Instructions
Step one: The pieces
- Cut all the pieces to the lengths as given in the cutting list above.
- The common rafters [k] have a 45° cut at each end.
- The lean-to rafters [l] have a 10° cut at one end and a 55° (off square) cut at the other end.
- The lean-to rafters supports [m] have a 10° cut at one end and a 45° cut at the other end.
- All the other pieces are square cut.
Standard (ft and inch) version:
Metric version:
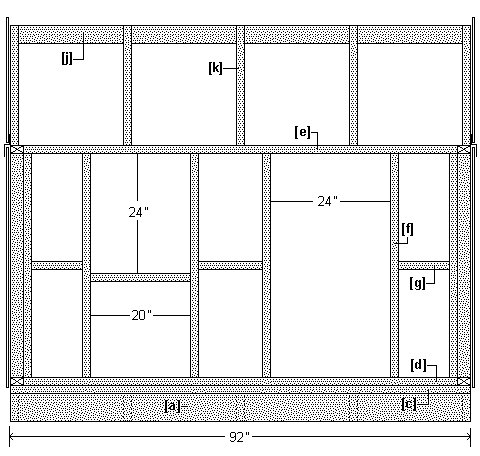
The base, the floor and the floor plan
Step two: The base and floor
- On a level, flat piece of ground make a rectangle by nailing the two edge (longer) joists [a] to two of the common (shorter) joists [b].
- Nail another three intermediate common joists [b] in place evenly spaced (see floor frame plan below).
Standard (ft and inch) version:
- Use 4″ galvanized nails.
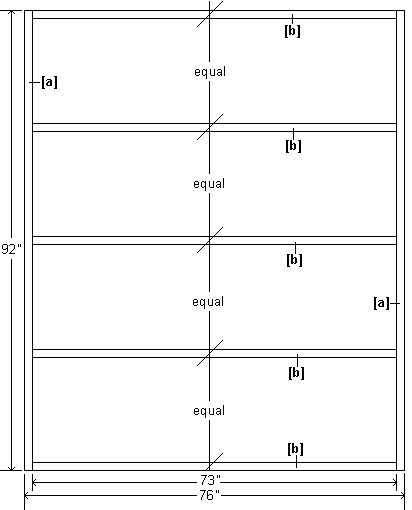
- Check that the floor base is square by measuring diagonally from corner to corner. When the diagonals are equal, then the base is square.
- Cut as many of the decking boards as possible to the full deck length of 92″ and lay and fix them to the floor frame.
Any shorter lengths or off-cuts must join over a joist.
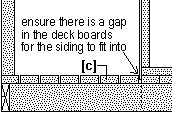
Important! When laying the decking boards, ensure that there will be a 3/8″ gap (between the decking boards) along the front of the wall frame to take the bottom of the cladding (siding). See the image.
Metric version:
- Use 90mm or 100mm galvanized nails.
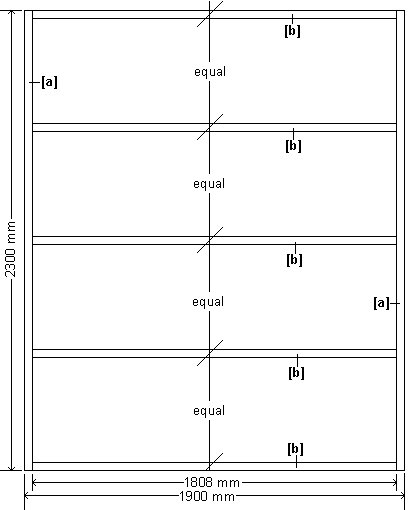
- Check that the floor base is square by measuring diagonally from corner to corner. When the diagonals are equal, then the base is square.
- Cut as many of the decking boards as possible to the full deck length of 2300mm and lay and fix them to the floor frame.
Any shorter lengths or off-cuts must join over a joist.
Important! When laying the decking boards, ensure that there will be a 10mm gap (between the decking boards) along the front of the wall frame to take the bottom of the cladding (siding). See the image.
The wall frames and the stud layout plan
Step three: The wall frames
Standard (ft and inch) version:
- Lay out the bottom plates [d] flat on the floor to form a rectangle 48″ x 92″. Lay the top plates [e] on top of the bottom plates and mark the stud positions on the edge of both plates (see the plate and stud layout diagram below).

- Separate the plates [d] & [e] and lay the studs [f] in place. Cut and fix blocking [g] between studs [f] as shown in ‘the plans’ diagram.
Nail the wall frame together.
There will be four wall frames in all, the two end frames and the front and back frame. - Stand the frames up in place and nail together. Ensure the bottom plates are straight and fix to the floor.
- Check all corners are vertical (plumb) and fix temporary diagonal braces to the insides of the wall frames.
Metric version:
- Lay out the bottom plates [d] flat on the floor to form a rectangle 2300mm x 1200mm. Lay the top plates [e] on top of the bottom plates and mark the stud positions on the edge of both plates (see the plate and stud layout diagram below).
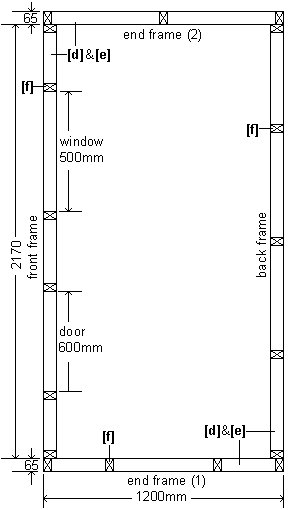
- Separate the plates [d] & [e] and lay the studs [f] in place. Cut and fix blocking [g] between studs [f] as shown in ‘the plans’ diagram.
Nail the wall frame together.
There will be four wall frames in all, the two end frames and the front and back frame. - Stand the frames up in place and nail together. Ensure the bottom plates are straight and fix to the floor.
- Check all corners are vertical (plumb) and fix temporary diagonal braces to the insides of the wall frames.
The roof frame and roof detail plan
Step four: The roof frame
- Centralize the two ridge supports [i] on top of the two end frames and fix in an upright position.
- Balance the ridge beam [j] on top of the ridge supports [i] and fix in place with nails skewed (angled) through the ends of the ridge beam into the supports.
- Fix the 10 common rafters [k] in place (5 each side) beginning with the end rafters and then the intermediates.
- Fix the lean-to rafter supports [m] in place at the lower end of the top rafters [k]. (See diagram below.)
Standard (ft and inch) version:
- Fix the lean-to rafters [l] in place on top of the lower rafter supports [m], and so that the top of the lean-to rafters [l] are at a point 12 3/4″ up from the bottoms of the top rafters [k]. (See diagram below.)
Metric version:
- Fix the lean-to rafters [l] in place on top of the lower rafter supports [m], and so that the top of the lean-to rafters [l] are at a point 320mm up from the bottoms of the top rafters [k]. (See diagram below.)

- Nail the beam [n] to the end of the lower rafters.
- Fix three posts [o] plumb under the beam [n]. One post in the middle and one at each end.
The roof blocking, detail plan and legend
The cladding (siding) and fascia
Step five: Blocking and purlins
Standard (ft and inch) version:
- From 1 1/2″ x 2 1/2″ lumber, measure, cut and fix two rows of blocking [p] between the lean-to rafters [l], one row across the top and one row across the middle as shown in diagram below.
- Also using 1 1/2″ x 2 1/2″ lumber, fix two rows of purlins [q] on top of the front common rafters [k]. Position as shown in diagram below, with one row at the apex and one row just above the lean-to rafters [l].
Metric version:
- From 65mm x 46mm timber, measure, cut and fix two rows of blocking [p] between the lean-to rafters [l], one row across the top and one row across the middle as shown in diagram below.
- Also using 65mm x 46mm timber, fix two rows of purlins [q] on top of the front upper rafters [k]. Position as shown in diagram below, with one row at the apex and one row just above the lean-to rafters [l].
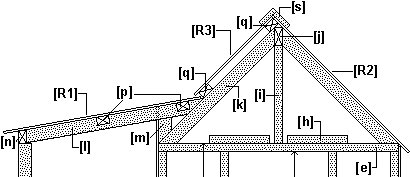
LEGEND: (see the cutting list for timber sizes).
a: joists
b: joists
c: decking
d: bottom plates
e: top plates f: studs
g: blocking
h: blocking
i: beam support
j: ridge beam k: rafters
l: lower rafters
m: rafter support
n: lean-to beam
o: posts p: blocking
q: purlins
s: ridge capping
S1: rear & side wall cladding R1: lean-to roof cladding
S2: front wall cladding
R2: back roof cladding
R3: front roof cladding
S3: gable wall cladding
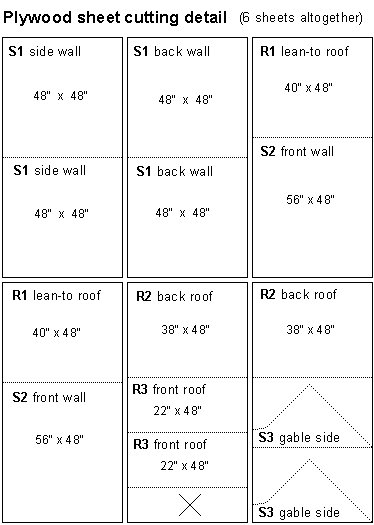
The covering, detail plan and cutting pattern
Step six: The wall cladding
Standard (ft and inch) version:
- From six full 48″ x 96″ x 9/32″ sheets of plywood cut the individual pieces required to cover the walls and roof.
- Refer to the ‘Plywood sheet cutting detail’ image for the size of the individual pieces.
Note: You can use 3/8″ thick plywood if you want something a bit more substantial.
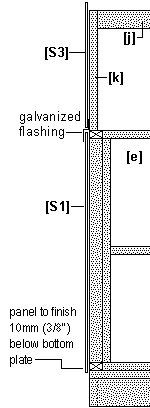
- Fix the wall panels in place so that the bottoms finish 3/8″ below the bottom plate. The front panels will need to be checked (marked and cut) around the lower rafters [l]. Mark and cut out any windows (you might want to do a fancy shape here), doors or overhanging edges. Nail with 2″ flathead galvanized nails. Keep the door cutout intact, as this will later become the door.
- Next hold the gable side panel [S3] in place on top of the sidewall panel [S1], mark to the triangular shape of the gable, cut and fix in place. Insert a length of galvanized horizontal weather-strip flashing so it tucks under the bottom of the gable side panel [S3], and over the top of the sidewall panel [S1]. See diagram.
Step seven: The roof cladding
The roof plywood panels [R1], [R2] and [R1] can be fixed in the same way as the wall panels.
The roof panels will overhang the perimeter (front, back and sides) by approximately 2″.
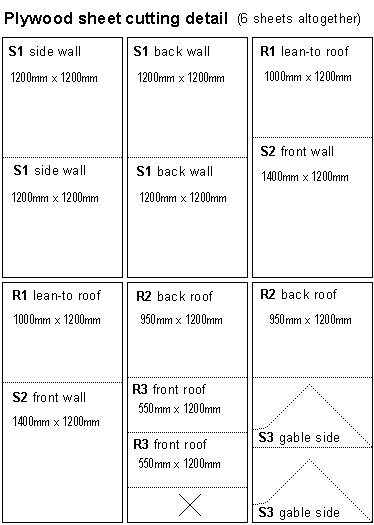
Metric version:
From six full 2400mm x 1200mm x 7mm sheets of plywood cut the individual pieces required to cover the walls and roof.
Refer to the ‘Plywood sheet cutting detail’ image for the size of the individual pieces.
Note: You can use 10mm thick plywood if you want something a bit more substantial.
- Fix the wall panels in place so that the bottoms finish 10mm below the bottom plate. The front panels will need to be checked (marked and cut) around the lower rafters [l]. Mark and cut out any windows (you might want to do a fancy shape here), doors or overhanging edges. Nail with 40mm or 50mm flathead galvanized nails. Keep the door cutout intact, as this will later become the door.
- Next hold the gable side panel [S3] in place on top of the sidewall panel [S1], mark to the triangular shape of the gable, cut and fix in place. Insert a length of galvanized horizontal weather-strip flashing so it tucks under the bottom of the gable side panel [S3], and over the top of the sidewall panel [S1]. See diagram.
The roof trim and the door
Step eight: The ridge capping, fascia and barge board
Standard (ft and inch) version:
The ridge capping, fascia and barge board are (in this case) all the same type of timber, namely 1″ x 4″ sawn (rough sawn) treated lumber.
The ridge capping is the board on the ridge of the roof and its purpose is for waterproofing. The fascia and barge board are the boards encompassing the house at the top of the walls tucked under the roof cladding overhang.
The board along the front and back of the house is called the fascia board and the board running up the gable on the sides of the house is called the barge board (rake board).
Fix all with 3″ galvanized nails.
A pattern can be cut into the fascia and barge board and the shape used is solely a matter of personal preference.

A pattern like this can be made on the fascia and barge boards by using the bottom of a paint tin (or similar) as a template to mark the rounds and then by cutting out with a jigsaw.
Metric version:
The ridge capping, fascia and barge board are (in this case) all the same type of timber, namely 100mm x 25mm sawn (rough sawn) treated pine.
The ridge capping is the board on the ridge of the roof and its purpose is for waterproofing. The fascia and barge board are the boards encompassing the house at the top of the walls tucked under the roof cladding overhang.
The board along the front and back of the house is called the fascia board and the board running up the gable on the sides of the house is called the barge board (rake board).
Fix all with 75mm galvanized jolt head nails.
A pattern can be cut into the fascia and barge board and the shape used is solely a matter of personal preference.
A pattern like this can be made on the fascia and barge boards by using the bottom of a paint tin (or similar) as a template to mark the rounds and then by cutting out with a jigsaw.
Step nine: The door
Standard (ft and inch) version:
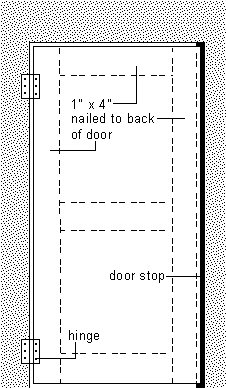
- The cut-out piece of plywood saved from the door hole can now be made into the door. Trim the bottom edge (about 3/4″) to ensure the door will easily open, and sand the edges. There should be about 1/4″ clearance both sides of the door.
Reinforce the door with 1″ x 4″ wood nailed to the back. - Hold the door in place with packers and wedges and screw on the hinges. See diagram.
- Nail a piece of doorstop (1″x 1″) down the doorjamb stud, 1 9/32″ (the thickness of the door) in from the outside. This acts as both a doorstop and wind and weather seal.
- A preferred door handle / lock / or latch can be fitted.
Metric version:
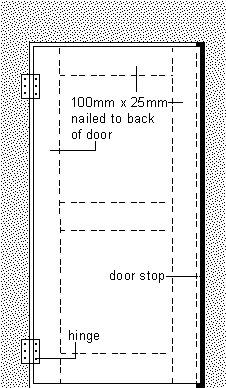
- The cut-out piece of plywood saved from the door hole can now be made into the door. Trim the bottom edge (about 20mm) to ensure the door will easily open and sand the edges. There should be about 5mm clearance both sides of the door.
Reinforce the door with 100mm x 25mm wood nailed to the back. - Hold the door in place with packers and wedges and screw on the hinges. See diagram.
- Nail a piece of doorstop (25mm x 25mm) down the doorjamb stud 32mm in from the outside (the thickness of the door). This acts as both a doorstop and wind and weather seal.
- A preferred door handle / lock / or latch can be fitted.
The window and the handrail
Step ten: The windows
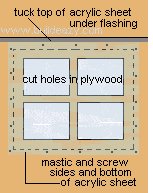
- Draw a window pattern such as an oblong, heart or 4 squares (keeping within the perimeters of the window frame) and cut out with a jigsaw. First drill a hole through the plywood using a drill bit large enough to make a hole that will accept the jigsaw blade.
- Once the windows are cut out, cover with an oblong piece of 1/8″ acrylic sheet (plastic glass). Ensure the acrylic sheet is larger than the window holes to allow for waterproof mastic sealant and screwing.
- The tops of the acrylic sheet on the sidewalls should tuck under the existing flashing.
- A trim can be fixed around the window.
Step eleven: The handrail
Standard (ft and inch) version:
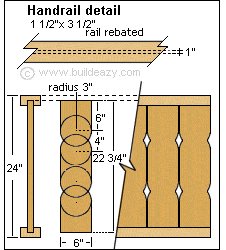
- Cut the 1 1/2″ x 3 1/2″ top and bottom rails to length (to fit between the posts) and rebate them (cut a channel along the centre of each piece).
- On one side only, pencil two lines 1″ apart along the length in the centre of the rails.(See handrail detail diagram). Set the blade on your circular saw to a depth of 3/4″ and do repeated cuts along and between the two pencil lines.
Clean out with a chisel.
This will give you a rebated groove 1″ wide x 3/4″ deep along the centre of the rails. - Cut 1×6 lumber into 22 1/2″ lengths and implement a pattern of your choice.
The pattern shown in the handrail detail diagram is just one idea.
Make the pattern on one piece of board and use that as a template to do the rest. - Fit the boards into the rebated grooves in the top and bottom rails.
This is best done by laying the top and bottom rails on the ground and then inserting the boards into the grooves.
If the number of boards does not work out exactly, one of them will need to be marked and ripped (cut) lengthwise.
When one section is finished, tie a rope around each end so the boards will not fall out while that section is being installed.
Nail each section in, and fix the rails to the posts with 4″ galvanized nails.
Do this to all 3 sections. All Done. Eazy with a z. Have fun!
Metric version:

- Cut the 90mm x 46mm top and bottom rails to length (to fit between the posts) and rebate them (cut a channel along the centre of each piece)..
- On one side only, pencil two lines 25mm apart along the length in the centre of the rails.(See handrail detail diagram). Set the blade on your circular saw to a depth of 20mm and do repeated cuts along and between the two pencil lines.
Clean out with a chisel.
This will give you a rebated groove 25mm wide x 20mm deep along the centre of the rails. - Cut 150mm x 25mm timber (standard fence palings ) into 540mm lengths and implement a pattern of your choice.
The pattern shown in the handrail detail diagram is just one idea.
Make the pattern on one piece of paling and use that as a template to do the rest. - Fit the palings into the rebated grooves in the top and bottom rails.
This is best done by laying the top and bottom rails on the ground and then inserting the palings into the grooves.
If the number of palings does not work out exactly, one of the palings will need to be marked and ripped (cut) lengthwise.
When one section is finished, tie a rope around each end so the palings will not fall out while that section is being installed.
Nail each section in, and fix the rails to the posts with 90mm galvanized jolt head nails.
Do this to all 3 sections. All Done. Eazy with a z. Have fun!
The materials list
Standard (ft and inch) version:
● 1 1/2″x 5 1/2″ stock for floor joists. 60ft of
● 3/4″x 3 1/2″ stock for decking. 165ft of
● 1 1/2″x 2 1/2″ stock for framing. 365ft of
● 1 1/2″x 2 1/2″ treated stock for posts. 14ft of
● 1 1/2″x 3 1/2″ stock for ridge beam. 8ft of
● 1 1/2″x 3 1/2″ treated stock for handrail. 20ft of
● 1×6 treated stock for handrail. 65ft of
● 1×4 stock for fascia, barge board, ridge capping and door backing. 60ft of
● Galvanized horizontal weather strip flashing. 8ft of
● 1/8″ thick acrylic sheet (plastic glass) for windows. 16 sq ft of
● Assorted nails, mastic sealant, hinges, door handle.
Metric version:
● 145×46 (ex 150×50) stock for floor joists. 15m of
● 90×32 (ex 100×40) stock for decking. 50m of
● 65×46 (ex 75×50) stock for framing. 80m of
● 65×46 (ex 75×50) treated stock for posts. 4m of
● 90×46 (ex 100×50) stock for ridge beam. 2.4m of
● 90×46 (ex 100×50) treated stock for handrail. 6m of
● 150×25 treated stock for handrail. 20m of
● 100×25 stock for fascia, barge board, ridge capping and door backing. 18m of
● Galvanized horizontal weather strip flashing. 2.4m of
● 3mm thick acrylic sheet (plastic glass) for windows. 1.2 sq m of
● Assorted nails, mastic sealant, hinges, door handle.


Hi, Love the plans which worked a treat.
I made this during the 1st year of my daughter’s life in 2009 and I highly recommend it for any new Dad. It’s one of the most enjoyable things I’ve ever done and I had nearly zero building experience.
Edie absolutely loves it too and gets more use out of it as each year passes.
Thanks for making it available on your site.
Thanks to BuildEazy for the great plans for this Wendy house.
It took a week of sawing and fitting, a day of treating wood and a day to put up, My niece loves it.
Can’t wait to start another project.
Are these plans still available? I want to download them but not sure if this site is still active?
Hi April, these plans are still available! You can download them here: https://www.buildeazy.com/plans/wendy-house/
Thank you so much for the plans!
I have two girls who will get years of fun out of this cubby house!
I also got a great boost finding out that I can actually take on a project like this!
I made a few alterations to get a little more detail!! Love it! The plans were awesome!
Charissa Marwick York, Western Australia
I just wanted to thank you for your free download plans regarding the Wendy playhouse. I modified the plans a little and wanted to share pictures with your website. thanks again
For the Wendy house project.
Found these plans very useful as were the user photos from which I got a few of the alternative ideas. Really enjoyed building it. Thanks!
Thank you for the plans for the Wendy House. We modified the plans so they ended up 7 foot x 5 foot and 5 foot high. The colourbond roof and the plywood cladding were recycled and we put flashing under the colourbond to make it cooler. The cubby house is 4 foot off the ground with a drawbridge and chain bridge to connect it to the lawn. We built it for our 2 and 4 year olds as a Christmas present. The 4 year old requested the cubby house be painted to match our house and for her birthday has requested a doorbell and a letterbox. kind regards
Bronwyn Davey
I just want to thank you for the plans to build the Wendy playhouse.
I made a few changes to make it a little taller and left off the covered porch.
My little girls love it, once again thanks again.
Daniel Dillard, Broken Arrow, OK
Prevention PLUS YouthBuild students built 2 Wendy Houses.
We made only minor changes in the plans. Great activity!
Students learned a lot and 2 of the houses they built were donated to Veterans.
Hi, I built this for my twin grandsons Ethan and Elliot (2 years old and very active) as a Christmas present.
Have to thank you for use of your plans. They were straightforward and easy to follow. A great help. I adjusted numerous sizes to suit the timber I was using and strengthened the roof trusses to cope with the concrete tiles (two rows front and three at rear).
But overall it followed your design and the boys are having great fun in it (Nearly as much fun as their mum gets from it!)
Ronnie Reardon – Balloch, Scotland.
Hi Ronnie, what was the material cost for the project
I modified your plans to use 2 x 4 lumber, I deleted the porch roof and also added an additional plate upon which the roof rests in order to make the final house portable.
It was built in our driveway and I was able to disassemble the house for its move to the cutest little granddaughter ever.
It has since been named “Baby’s House.” Saw the idea of the painted garden on the porch railing and had to use it. It was an easy project thanks to your plans.
Thank you for the Wendy House plans. I followed the same basic idea, but made it bigger (6×9 plus porch, and 9 feet high).
Ok, I went completely overboard, building it on a concrete footing with block paver porch, insulated and finished interior walls, full electric, carpet, air conditioning.
David Lambert
I have 4 of my 5 nieces are in one family, and are very grateful!
It was the first time I have built something like this and the project was a success, largely due to sensible and easy to follow instructions.
Some things future builders might want to consider.
1) Moving the WH. I built off site. With hindsight, I should have attached casters to the floor joists.
2) Invest in a good drop saw (or Compound Miter Saw). I can’t believe how much I used it.
3) We painted 3 blackboards internally (on the back of the plywood walls). Nieces 4 loved this.
4) For internal light, might want to use clear plastic roofing materials.
Again, thanks.
Just wanted to share a picture of the “Wendy House” (now called Sydney’s House) that I’d recently completed using your free plans. Had to do a few minor adjustments to make up for using all 2×4 lumber, but it went together very smoothly and in about a month and a half of nights and weekends.
It was a present for my daughter’s 2nd birthday and she’s had a blast through the entire project. Windows are 18″x27″ double hung vinyls for the front and side with a small slider in the back. The home is painted and shingled to match our family home. Her other presents included a kitchen, table and chairs, along with everything else she should need to make this her perfect little home.
Just wanted to share the picture and say thank you for the plans!
Chad C. Joplin, Missouri
What was approximate price paid for materials?
I just want to thank you guys so much for the FREE plans to the wendy playhouse.
My husband and I built this for our two young boys and we are sure that it will last for our grandchildren.
We added a few things on the way with the color steel roof, spouting and steps Inside the playhouse is a kitchen a tool bench and a couch. We started building in September and finished on the 24th of December.(just in time for Christmas)
All of our spare time was taken up but in the end it was worth it. THANK YOU SO MUCH.
Trina and Scott Severinsen
Christmas present from Granddad.
Just wanted to show you a photo of the finished product of your Wendy House plan.
Mr father Dennis Brookes of Summerland Point NSW built the majority of this from scrap materials, even the bright paint was donated by a neighbour who had several left over part tins of different colors.
As you can see – you can achieve anything if you try – he only had to spend $50 on materials that he could not find as scrap.
He even added a small cut down kitchen and bench top which my girls love to “cook in”.
He worked very hard over many weekends to complete it just in time for Christmas last year.
What a fantastic Christmas present and legacy he left his two grand children.
Nikola, Summerland Point, NSW
I was tired of looking at the area under our deck being washed out and nothing would grow under it, so I decided to turn it into a playground for our 2yr old.
I modified your prints to make it 4 x 6ft with an 2 1/2ft deck and I went with 5ft sidewalls which gives us 6 1/2ft headroom at the peak (so parents don’t have to be slumped over inside). Thank-you for the design idea, we love it and all the neighborhood kids love playing in it.
This picture is another picture of our daughter and friend enjoying playhouse.
Tony Fischer
Hi , we are absolutely thrilled with our house we made from your plans.
We have made it for our boxer dog so he is one very spoiled doggy.
We have a split door so we can just leave the bottom half open for our dog. Awesome plans , so easy to follow.
We would love it if you put our photos on your site. Its so great to look at all the different ways people have done theres and what countries have used your plan.
Now I’m addicted to your site , and working out what we can make next !
Many thanks
Grant and Julie Walker
Inglewood
Taranaki, New Zealand.
Hello!
I started off with the intention of making the Wendy house that you provide plans for, but along the way things developed and I’ve nearly finished building this Dutch-barn style playhouse.
Though it might not be obvious the basic frame is based on your Wendy and it has plywood cladding as well.
The deck is the same structure and dimensions as in your original plan but raised using six posts variously bolted and nailed into place.
The roof has a plywood base covered with roofing felt.
The shingles are cut from discarded shipping pallets and the apex uses feathered fencing boards.
I certainly wouldn’t have started this project if I hadn’t had your Wendy plan to get me started.
Many thanks
Peter Jump
England
Hi,
here is a few photos of my version of the Wendy House.
Thanks for plans and inspiration, the kids love playing in it and I enjoyed building it.
Carsten Sorensen
Markskellet 80
7190 Billund
Denmark
Thanks for the ideas for the Wendy’s house. I didn’t follow the plans at all. The playhouse ended up being 6 feet by 8 feet, and has a 2 foot deck. Our three kids just love the playhouse.
Wade
Coldstream, B.C. Canada
Thanks for your plans to build the Wendy house. I changed some things but the plans made it much easier to build. This one has interior/exterior lighting and a/c since we live in Arizona. I finished the interior with bead board and painted hard board. We made the sink from plans from another website. Here is the one I built.
Thanks again, David
Hi There
Attached is a version of the Wendy house. I used your template then changed the scale to an 8X8 house with a wrap around deck.
My daughter Loves it. Thanks for the help.
Scott Wells
Hi! Would anyone mind sharing what the cost of this ended up being for you? I have zero woodworking experience and am going to tackle this for my children. It would be nice to have a general idea as to how much something like this costs! Thank you.
I recently found your website and printed the Wendy House plans. I built it entirely with used materials with the exception of the roofing and nails.
Here is my photo. Looking to paint it as soon as the rain stops here in the Northwest. The siding I used came off a house remodel and was already painted.
The grandkids will love it. Thanks
Ron Herbig
Hi!
I’m new on woodworking and I needed to understand a detail about blocking.
There is a blocking piece marked with the letter “h”.
Waht is it for? Where do I place it? It only appears in one view.
Thanks in advance! It’s a great plan!