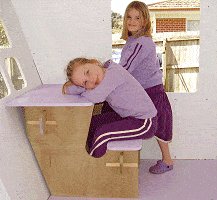
Introduction
This kid’s desk uses a tongue, slot and wedge system to hold most of it together.
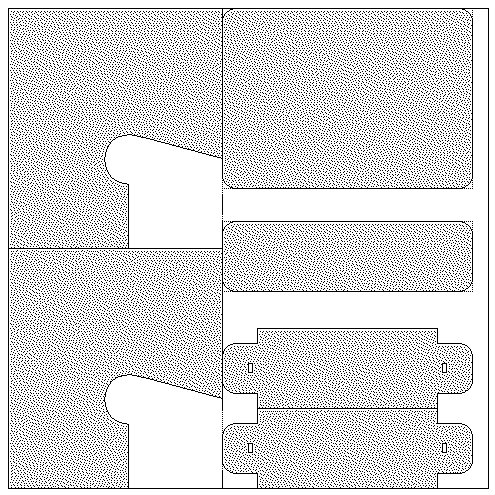
The desk frame is made up of interlocking 3/4″(18mm) thick plywood panels: spacer panels and side panels.
The spacer panels have tongues that go into slots in the side panels. The spacer and side panels are then locked together by wedges that are inserted into ‘wedge slots’ in the tongues of the spacer panels.
The desktop and seat are held in place with angle brackets that are screwed to the undersides of the desktop and seat, and the side panels.
Once made, the desk can easily be dismantled.
All the desk panels can be cut out of a 4ft x 4ft (1200mm x 1200mm) sheet of plywood, which is half of a standard size sheet.
Scroll down to see how.
You will need…
- Apart from the plywood as shown in the plans below, you will also need 4 wedges that are 3/4″ (18mm) wide and about 5″ (125mm) long, tapering from 3/4″ (18mm) down to nothing, plus 8 small angle brackets to fix the seat and desktop to the sides.
- Below are the plans with cutting detail for every piece.
- The instructions are on the next page.
- Scroll down to see how the panels can be cut from a 4ft x 4ft (1200mm x 1200mm) sheet of plywood, which is half a standard size sheet.

- How to cut the panels from a 4ft x 4ft (1200mm x 1200mm) sheet of plywood, which is half a standard size sheet.
Cutting and assembling the desk
Step 1.
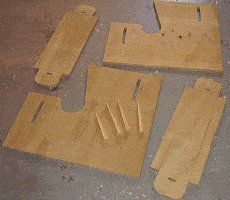
- Cut the pieces.
- Cut all the panels out of 3/4″(18mm) thick plywood to the dimensions given in the plans on the previous page. Then cut four wedges 3/4″ (18mm) wide and about 5″ (125mm) long, tapering from 3/4″ (18mm) down to nothing.
- To see how to cut all the panels from half a standard size sheet.
- Using a drill and a jig-saw, cut out the slots in the side panels to the dimensions given in the plans.
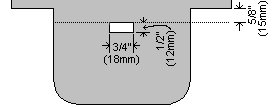
- Using a drill and a jig-saw, cut out the wedge slots in the tongues to the dimensions shown in the drawing below.
Step 2.
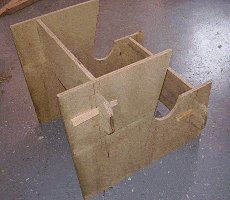
- Assemble the spacers and side panels.
- Insert the tongues on the spacer panels into the slots in the side panels, and then insert the wedges into the wedge slots in the tongues to make secure.
Step 3.
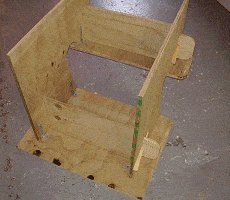
- The desktop.
- Put the desktop panel in place and fix it to the side panels with two angle brackets at each side. (This is best done with everything in the upside-down position.)
- Fix the seat in the same way as you fixed the desktop.

Step 4. Finished.

- All done but for the paint.
- A good going over with paint is advisable, as it’s then much easier to clean off pencil marks, chalk marks, crayon marks and all other inevitable marks.
- The desk can easily be dismantled when it is not needed and stored away using minimal space.


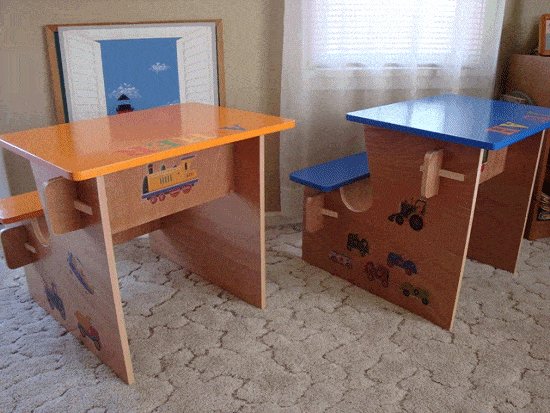
Dear BuildEazy,
I was looking over your site last month and came across the “kids desk” plans.
I thought it was an excellent design and since my son’s birthdays were coming up I called up my dad to see if he would be interested in building them, since he’s the carpenter in the family.
He was delighted and jumped right in. He used mahogany paint grade plywood, added some edge banding, painted the tops and seats my son’s favorite colors and then finished it with a clear coat of spray shellac First they tried a water based clear coat over the water based paint, but the paint wrinkled so they had to sand it all off and start over.
The paint did wrinkle a little bit with the shellac, so they think maybe next time (when my daughter is old enough for her own desk) they will try verathane. Then he and my mom put some decals on to finish them off. My sons were delighted with their gifts. Please enjoy and feel free to use all of the included pictures.
Sincerely,
Sarah Adamo