Contents
Introduction and lumber requirements
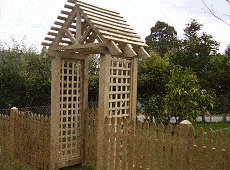
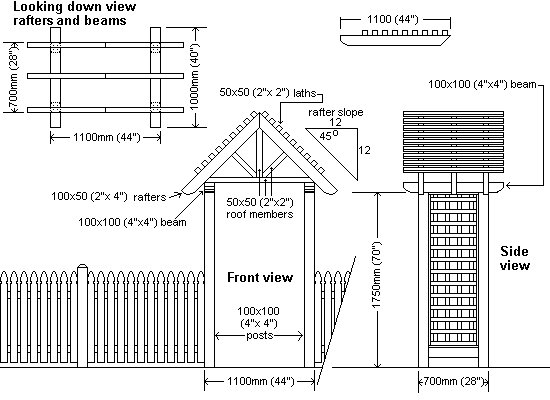
This arbor is a solid construction with 100×100 (4×4) posts concreted into the ground, 100×50 (2×4) rafters, 50×50 (2×2) roof frame members and 50×50 (2×2) laths.
The overall height is approximately 2600mm (104″) although that can be changed to suit, and the footprint is 1100mm (44″) x 700mm (28″).
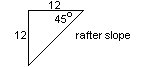
The pitch (angle, slope) of the rafters (off horizontal) is 45°.
That is: a rise of 1 in 1 (or 1/1), which means that the rafters rise 1 unit of measurement for every 1 unit of measurement along the horizontal plane (run).
In the United States the pitch is given in inches, with the run (horizontal plane) being 12 inches and the rise being a ratio of that. The slope of the rafters would be given as 12″ of rise over 12″ of run, which is still the same thing as a rise of 1 in 1 or 45°.
Note: This arbor has a relatively steep top. If you prefer an arbor that doesn’t have such a steep top, there is a similar arbor plan with a 18.4° pitch which is a rise of 1 in 3. To see click here.
Lumber requirements
Use lumber suitable for exterior use. Either smooth (dressed, surfaced) or rough wood can be used according to your own personal preference.
- You will need….4 of: 100mm x 100mm (4″x4″) posts 2400mm (8ft) long.
- 2 of: 100mm x 100mm (4″x4″) beams 1000mm (40″) long.
- 2 of: 100mm x 100mm (4″x4″) blocks 500mm (20″) long.
- 6 of: 100mm x 50m (2″x4″) rafters 1100mm (44″) long.
- 3 of: 50mm x 50mm (2″x2″) horizontal roof members 1100mm (44″) long.
- 6 of: 50mm x 50mm (2″x2″) diagonal roof members 350mm (14″) long.
- 3 of: 50mm x 50mm (2″x2″) vertical roof members 500mm (20″) long.
- 18 of: 50mm x 50mm (2″x2″) laths 1000mm (40″) long.
- 16.5m (55ft) of 25mm x 25mm (1″x1″) square stop to hold the lattice panel in.
- 2 lattice panels approximately 1550mm x 500mm (62″x20″).
The plans
Peaked top arbor plans
Building instructions
Stand the arbor posts
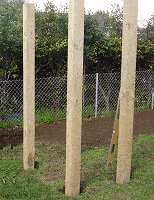
- Did the holes for the arbor posts. For reasonably firm ground make the holes 350mm (14″) square by 600mm (24″) deep.
- Refer to the arbor plan for dimensions.
- Concrete the 100mm x 100mm (4″x 4″) posts in place.
- At this stage the posts are more than the required length.
- Wait until the next day for the concrete to harden a bit before cutting the tops of the posts to the required height.
- For an excellent description of how to set out (position) the posts, mix and pour the concrete, stand the posts and trim the post tops, go to the Garden pergola construction article.
Mark the curves on the beams
- Cut two beams 1000mm (40″) long out of 100mm x 100mm (4″x4″) stock.
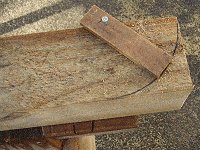
- Mark a 100mm (4″) radius arch at the ends of both beams.
- This can be done by making a rotatable arm out of a strip of 120mm (5″) long wood.
Hammer a small nail into the arm 100mm (4″) up from the end until it protrudes out the other side. - Tap the protruding part of the nail into the beam 100mm (4″) up from the end and slightly in from the edge. (See the picture.) The arm should be able to rotate using the nail as the axis. Hold a pencil at the end of the rotatable arm to mark the curve. Do this to both ends of both beams.
Cut the curves on the beams
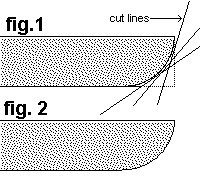
- Cut the curves.
- If you do not have a band saw, then you can use a miter saw to cut the curve by making a number of straight cuts at different angles around the curved line (see fig.1) and then completing the rounding process with sand paper and a sanding block.
- If you do not have a miter saw, then the same result can be achieved with a handsaw – albeit a bit of extra work is required!
Mark and cut the arbor rafters
- Cut six 1100mm (44″) rafters out of 100×50 (2″x4″) stock.
- Make one end of each rafter curved and make a 45° angle cut at the other end.
- Refer to the arbor plan for dimensions if necessary.
- Mark and cut the curved ends in exactly the same way as the beam ends were cut. See fig.1 above.
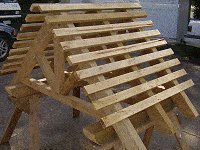
Make up the arbor top
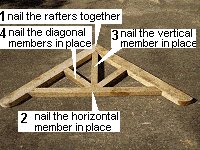
- On an even surface nail the rafters together.
- Cut the horizontal members 1100m (44″) long with 45° angle cuts at both ends. fix the horizontal members in place.
- Measure, cut and fix the vertical members in place.
- Measure, cut and fix the diagonal members in place.
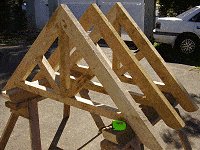
- Lay out the complete arbor top frame including the beams on top of a couple of work stools.
- Refer to the plans for placement.
- Ensure that all parts are in their rightful positions and secure with nails.
Building instructions continued
Fix the laths to the rafters
- Nail the 50mm x 50mm (2″x2″) laths to the rafters.
- Begin the first lath 30mm (1 1/4″) down from the tops of the rafters and space all the rest 100mm (4″) from center to center.
- Ensure the laths’ overhang is the same at both ends.
Fix the arbor top in place
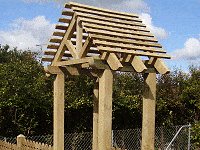
- Now it’s just simply a matter of lifting the arbor top onto the posts.
- It is reasonably heavy so it will probably take at least two people to lift it up to the posts and position it correctly.
- Once positioned, it can be nailed in place.
Make the frame for the lattice
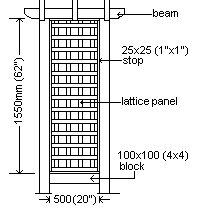
- The lattice frames (one each side of the arbor) comprise the posts, the beams and the lower blocks.
- Complete the lattice frames by fixing a 100mm x 100mm (4″x4″) block approximately 1550mm (62″) below each beam.
Fit the Lattice
- The objective is to sandwich the lattice between two pieces of wood (stops) that are fixed to the frame.
- The frame is the posts, beam and lower block.
- 25mm x 25mm (1″x1″) square stops are used in this project.
- Firstly, fix the stops around the inside of the frame to one side only.
- Insert the lattice.
- Fix the stops against the lattice on the other side (see drawing).

Finished!
- There is a detailed account of how to install lattice here.


