Introduction
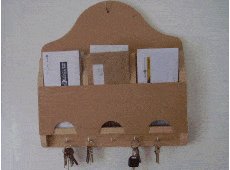
A letter holder is not only practical but can also adorn a passage, entry or other suitable wall and it is relatively easy to make.
This letter holder allows letters from the mailbox to be sorted and stored into individual pockets awaiting collection from different family members. As well, car key hooks along the bottom of the letter holder will help ensure that the letters will be seen by the people they are intended for.
Below is a Materials List and required tools list.
On subsequent pages there are step-by-step instructions accompanied by photos and detailed plans.
Materials list
- 1 of 600mm x 600mm (2ft x 2ft) Sheet of 4.5mm (3/16″) thick mdf, plywood or similar type panel board. (Specifications allow for a bit of wastage.)
- 1 of 2000mm (80″) length of 45mm x 19mm (3/4″x 1 1/2″) wood. (Specifications allow for a bit of wastage.)
- 50 panel pins (i.e. small thin nails 25mm (1″) long.)
- 15 wood screws 38mm (1 1/2″) long.
- 5 key hooks.
- A bit of PVA wood glue and some sandpaper.
- A drawing of all the parts can be seen (page 4)
Required tools
- Hammer
- Hand saw
- Jig-saw
- Carpenter’s pencil
- Measuring tape
- Drill
- Drill bit (slightly thicker than the screw shank)
Instructions – Steps 1 to 4:
Step 1. How to shape the wood for a letter rack
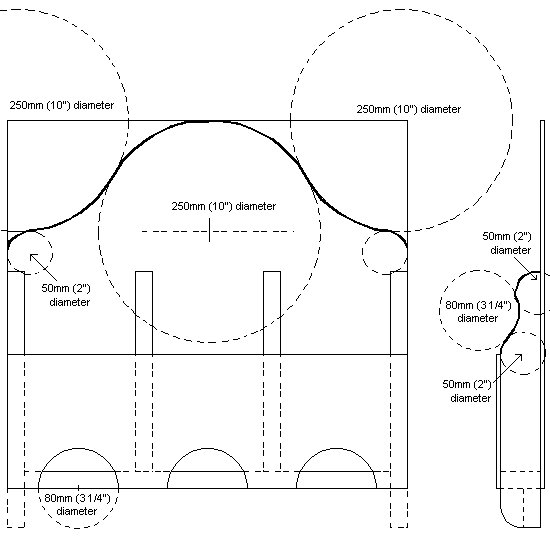
Measure and mark all the pieces to be cut according to the plans (page 4). Use plates and cups as templates to mark the curves (see the curved shapes (page 4)).
Step 2. Parts for a wooden letter holder
Cut all the pieces (page 4) and drill the screw holes in parts [c] and [e]. The positions of the holes are shown in the parts plan (page 4).
Step 3. Wooden letter holder: assemble parts [d] and [e]
Screw member [e] to members [d].
Step 4. Wooden letter holder: assemble parts [e] and [f]
Screw member [e] to member [f].
Instructions continued – Steps 5 to 8:
Step 5. Wooden letter holder: assemble parts [d] and [e]
Screw members [c] to members [e and f].
Step 6. Wooden letter holder assemble: add part [b]
Glue and nail the front piece [b] to members [c, d and e].
Step 7. Wooden letter holder assemble: add part [a]
Turn the unit over then glue and nail the back piece [a] to members [c, d and e].
Step 8. Wooden letter assemble: add the key hooks
Drill a hole (to allow for hanging) at the top of the back piece [a] and add key hooks to member [f].
Plans
This page has three drawings. Scroll down to see them all.
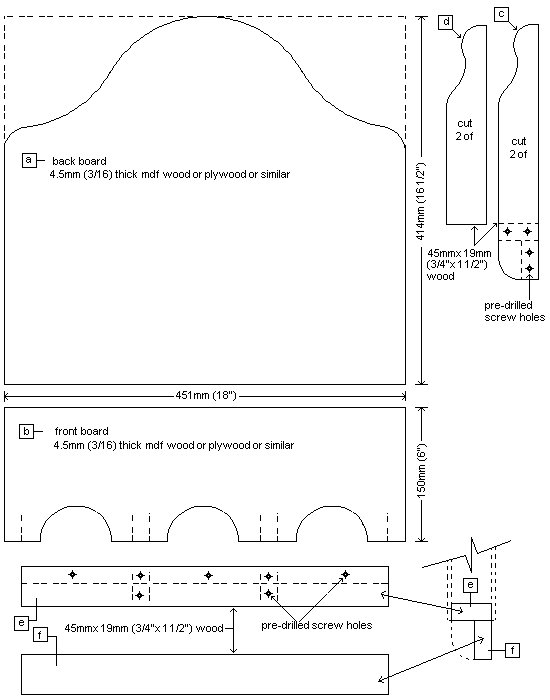
(1). Firstly, the plan with all the dimensions.
(2). Secondly, a drawing of all the parts also showing where to drill the screw holes.
(3). Thirdly, a drawing showing how to make the curved shapes.

The parts
[a] Back board
[b] Front board
[c] End vertical members also showing the positions of the screw holes
[d] Intermediate vertical members
[e] Bottom upper horizontal member also showing the positions of the screw holes
[f] Bottom lower horizontal member
The curved shapes
Below is a drawing explaining how to make the curved shapes. Plates and cups can be used as patterns.