
Greenhouse
$5.00
This is a $5 (USD) downloadable PDF file.
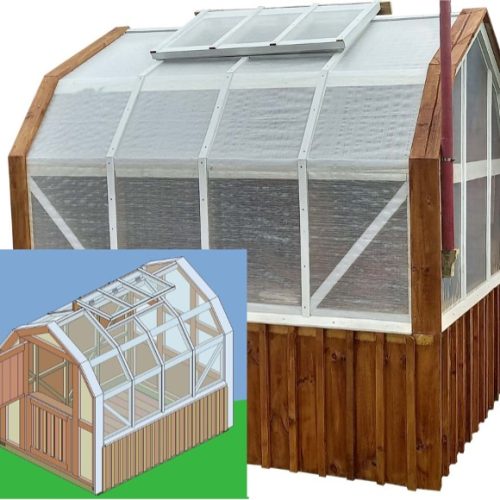
Plans for a greenhouse that is 8ft (2400 mm) wide by 10ft (3000 mm) and stands 8′ 6″ (2550 mm) off the ground at the highest point.
This is a very popular plan and been utilized by many users.
The greenhouse frame is constructed mainly out of 2″ x 4″ (100 mm x 50 mm) which is a common stock.
This greenhouse consists of a wooden frame suitable for a cover such as a clear UV-resistant polythene film.
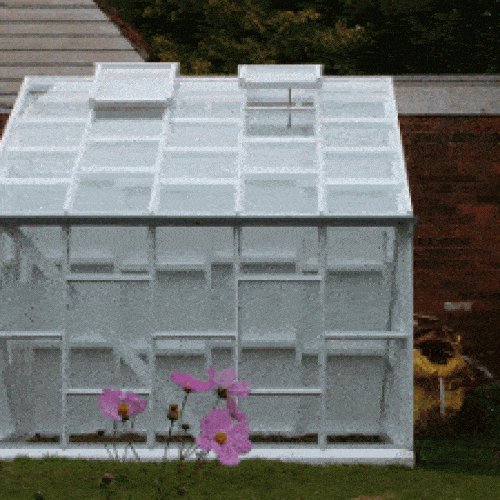
There are two opening windows that span along the very top of the greenhouse and a door at either end (optional).
The greenhouse basically sits on the ground and is held in place by a few stakes around the bottom that are hammered into the ground and nailed to sides of the base.
It could be fixed more permanently if required without too much ado, and would probably need to be, if positioned anywhere other than a sheltered area.
It is ideal for areas that have just enough winter frosts to be annoying
Specification: Greenhouse
|
16 reviews for Greenhouse
Add a review
Related Products
Janet –
Summer of 09 we built my greenhouse from the plans on this site. We modified a bit for the height and made it fit the foundation that was in place. It was a lot of work but it came out so good, I have it filled with plants now and loving my time inside. Thanks for posting the plans
Janet
Louis –
I Would like to give you credit for your greenhouse plans. I built one that is 10′ X 16′ . I enclosed it with Solex panels. My wife and grandmother just love it.
Again I would like to thank you for your free site.
Thank you for your site, Louis Jones Townville, SC USA
Kevin –
I just wanted to send along pictures of two recent Buildeazy projects that I completed.
My wife and I love to spent time outside in our ever expanding garden so we thought a greenhouse, using your plans, would be a great addition to our planting hobby.
The greenhouse plan was simple, well laid out and easy to understand. I am sure that we will enjoy it for many years to come.
The second project was a pair of adirondack chairs.
I searched the web and viewed many different styles of adirondack chairs, yours however was most like the chairs that I remember from years ago at a family lake house.
I used several pieces of 1x12x12 cedar that I had in storage to complete these chairs and side table.
After finishing with 3 coats of clear satin spar varnish they are not only good looking but will hold up to the elements for years to come.
We are currently searching your plans for our next project. Thank you for providing such a great website!
Kevin and Valerie Cowan Upstate South Carolina
Alex –
Hi there
Here is a couple of pics of realized projects from your great site,(I’m sure it wont be the last)!!! The swing-seat is a great shady place to relax and enjoy a nice and cool Bavarian Beer on a hot summer day.
Also a picture of our Greenhouse. It works really good.
Costs were around 160,- Euro.
Thanx Alex & Stefan
Walchsing, Bavaria.
ANDREW –
Hi
Just a few photos of the greenhouse I built according to your plans last fall. Only modification was to add 6 inches to the wall height. Did not have treated lumber for 2 by 3’s so stained it with a green preservative (copper napthenate). I covered it with a clear (translucent) woven poly.
cheers,
Andrew
MARK –
I saw the picture of the garden bridge, so I thought I would send in two pictures of my greenhouse I built with your plans.
I am in America, so I had to convert to English measurements. Thanks for the inspiration. We love it!
Mark Hathaway Austin, TX, USA
Ken –
I have just completed a greenhouse from you plan, and I am very happy with the results,
I used PVC panels rather than Poly. Photo attached,
Ken Taylor
ROB –
Many thanks for the greenhouse plans, pictures, and suggestions on your website.
I modified the size of the greenhouse to 8′ by 8′, and installed only one door. We’ll see how that works out.
If necessary to increase air circulation, I may have to install a window or two on the opposite side from the door.
It was an enjoyable project, and once again, thanks for laying out the plans and procedures for the untrained!
Rod Partee Rochester, Washington, USA
Amber –
Thank you for the wonderful greenhouse plan! Since I live in the northern states, I stepped it up and insulated the base and used twin wall polycarbonate for the windows.
This should extend my growing season for all but the two coldest months.
I also extended the length to twelve feet, but left the width at 8 feet.
I extended the rafter tails so I can add eaves to collect rain water.
There is a double window on the end opposite the door for ventilation.
I appreciate your site. Thank you so much.
Amber Christenson Strandburg, SD
Jim –
2011 was the year for this project. Thank you for this green house idea. This was really fun to build and we enjoy it very much. We are going to try to grow spinach and lettuce in the rain gutters I’ve attached to the side walls.
If any one else trys this, note that I stapled a piece of plastic to the 2X4’s where the plants may come in contact with the treated wood.
Thanks again,
Jim Morris Fremont, Michigan.
Jim –
To buildeazy
I enjoyed building the greenhouse. I changed things up a little by making 12′ by 8′ and adding some gutters to catch the rain.
Jim – Victoria, B.C.
Cortland –
Greetings guys,
Here is a photo of my greenhouse project. I considered this mostly an easy build! Although, I’m moderately experienced with construction in general. I built this entirely by myself, with zero (0) assistance from any other person, so it truly can be done solo. The plans are very simple to follow. I spent just under $500 (USD) with all new material (USA Feb 2015).
The house is built to almost exact original dimension in all respect, with the exception of the door. I installed only one door. I used non-treated lumber, but did use Olympic porch and deck stain & preservative before covering. This wood treatment will last the length of the plastic covering, and we will reapply when we recover in 5 years. We used 1/2 gallon of product. The poly is UV rated greenhouse film (don’t skimp here).
A couple of builder’s notes: If you build this solo, make sure to the erect the sidewalls and roof on a calm day. Use 8″ C-clamps to holds things in place as you screw them down. Think it all through before you tackle each step. I used two ladders to stabilize the sidewalls as I screwed them down to the foundation boards. You will have no problems if you go slow and think it all through.
Once you cover the greenhouse, you need to secure the plastic permanently with wooden “battens.” You can do this really cheaply by purchasing a single 4 by 8 foot piece of pressure treated plywood .75 inch thick. You can cut approximately 32 each 1.4 inch wide strips that are 8 foot long. I say 1.4 inch because if you start at 1.5 you end up about 1.4 after the width of the saw-blade eats up part of that 1.5 inch. I recommend you use “lath” screws, as they have an extra wide head that holds the battens down well.
You will notice a steel barrel in my photo. This is actually a water-filled solar heat-sink. Here in Indiana USA, the sun’s angle to the earth in Feb, Mar, and April is such that the side of the barrel absorbs lots of light at day, and the heat is released back into the greenhouse at night to smooth out the temperature swings.
During the summer, the sun’s angle is much higher above the horizon, and most of the barrel is blocked off from the sun’s light by the shelf that is now built over it. The barrel does not absorb very much excess heat in the summer. The barrel weighs 400 pounds filled with water and so we bolted it to the frame of the greenhouse and it makes a wonderful house anchor as well!
This entire project only took me about 30 hours, which included the earth work. I had to haul in 3750 pounds of gravel, about 1000 pounds of dirt, and about 400 pounds of wood chips.
It was a fun project!
Cortland Carrington, Bloomington Indiana, USA
Kevin –
Here is the finished product!! I can honestly say this is the first wooden structure I’ve ever built !!!
I would say it turned out pretty good
Kevin H.
Matt –
We built the greenhouse with some modifications. We doubled the length and made it 8′ x 20′. We also only put a door on the front and in place of the windows at the peak, took the palruf roofing halfway up, leaving the other half screened for ventilation. We made a rain barrel system inside to catch the water coming off the barn roof. Our plants are growing wonderfully!! Thanks.
Matt Burrier – Berlin, Maryland
Bill –
This is one good looking greenhouse if I do say so myself! I modified the height of the walls to 6 foot, so I could use both halves of a 12 foot sheet of Polycarbonate, and increased the overall size to 10′ x 20′. I also primed and painted all of the treated lumber, which took quite some time. Thanks for the plans!
Bill Blackett – Charlotte, NC
MIKE POWERS –
Nice plans and thanks for sharing. On the blocking below the upper window frame, instead of notching into roof line joist, does it make sense to run the block along the TOP of the joist and allow the window frame dimension to be that thickness shorter (or extend the upper roof line based on block thickness and no material change in overall window dimension). Only issue is transition of block over roof panel. I think I would rather route the under side edge of block similar to a lap joint for roof panel to lay under. Thanks again.