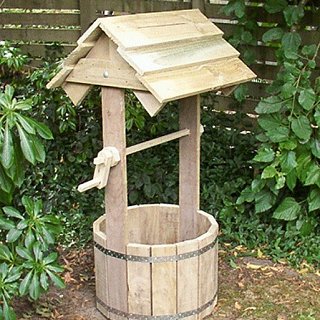
Wishing Well Plans
The well stands 1400mm (4′-8″) high and is 600mm (2ft) wide. The cutting list in the downloadable file gives a drawing of every piece of wood
$5.00
This is a downloadable PDF file. Woodworking plans for a wooden wishing well.
There are 14 pages in the downloadable file, consisting of plans, drawings, photos, and step-by-step instructions.
Great fun to build.
The well stands 1400mm (4′-8″) high and is 600mm (2ft) wide.
The cutting list in the downloadable file gives a drawing of every different piece of wood along with the dimensions.
In total you will need:
# 12 meters (40ft) of 100mm x 25mm (1×4) board;
# 5 meters (17ft) of 150mm x 25mm (1×6) board;
# 1 meter (39″) of 25mm x 25mm (1×1) wood;
# 4 meters (13.5ft) of 30mm (1 1/4″) galvanized metal strap;
# 26 exterior type 50mm (2″) long screws;
# 16 exterior type 75mm (3″) long screws for the roof boards;
# two 10mm (3/8″) galvanized bolts 60mm (2 1/2″) long, and
# around 70 of 25mm (1″) galvanized flathead nails.
The plans are written in both standard (inch) and metric (millimetre) measurements.
Any help is in the form of user-input and the URL for the user/comments page is given in the documentation in the downloadable file.
Specification: Wishing Well Plans
|


Robert –
Here is a photo of the wishing well I made this July 2016. I used pressure treated deck lumber. I’m not very handy with wood , but after promising my Wife a wishing well I finally had to do something after putting her off for 16 years. I found this quite easy to make and didn’t cost a lot of money . My Wife loves it.
The buildeazy plans were easy to follow .
Robert Almond
ROBERT –
Here is a photo of the wishing well my brother Jim built this summer 2016.
He is a better woodworker than I am.
He refined his a little but still stuck to the buildeazy plans.
He didn’t have any plans to follow for the small bucket and just made it as he went along. Looks good.
Robert Almond
Fernando –
Good afternoon. My name is Fernando, I am Brazilian.
I did the wood well.
The attached photos of my work.
Thank you.
Fernando Oliveira
Nick –
I built this wishing well using your plans using macrocarpa wood.
Best wishes
Bob –
Hello
I love your web site, My hobby is wood work and I was asked to make a wishing well for a friend�s wedding.
Your patterns were very helpful.
The large one ended up in my garden as the wife took it. Picture attached
The other 2 were used in separate weddings, both brides were very grateful.
Bob Schultz
SCOTT –
I revised the wishing well plans slightly to a smaller size to make a wishing well for my daughter’s wedding.
I also put in a bottom panel and an acrylic top. Later turned into a mid-sized planter.
Scott Laird
JOHN O’HANLEY –
From John O’Hanley
Chad –
Attached are pictures of two wishing wells that I built from your plans.
These were 6th grade auction projects at my sons’ Catholic school.
Each student ‘inked’ a wish on a trim-board and also painted a small wooden emblem to be glued to the roof.
Chad
Debbie –
Thank you for your website! The wishing well is just the first of many projects I plan to build from your plans.
Debbie Espey
Ben –
Thanks for the idea and free plans. Heres one from Florence SC.
Ben J
C.J. –
Wishing well
C.J.
Jerry –
Here is my finished Wishing Well, I followed your plans, with a few alterations. I used treated lumber, the plans were easy to follow and I already have some requests from family and friends for more.
I enjoyed this project and will probably be doing more from your web site.
Jerry Troute Thanks
Angie –
Wishing Well for Mom’s 60th Birthday.
Thank you very much for the plans. I absolutely loved making them. I modified them to use my Kreg Jig where I could, and also used 1 nails on the strapping.
Thanks again, Angie B, Southern Ca
Joe –
I built the well out of treated pine fence plank material; 5/8″ thick by 6″ wide. I ripped some of the planks to 4″, and calculated the gap to be about 1/4″. At first, the metal strapping I used was too thick; plus, the short nails I had to use pulled out of the wood. Also, the holes in the strapping were too large, and the wood pieces wouldn’t stay centered. I switched to “plumber’s tape” – thinner metal strapping – and wood screws, which were self-centering. I maintained the gap by using a bunch of carpenter’s pencils, which happened to be the right width.
When I put it together, the thin planks plus the thin metal strapping made it sort of flimsy, so I took a couple of old, rusty barrel rings; cut them and overlapped the material so that it was against the inside of the circle of planks, and pop-riveted it to that dimension. Then, I screwed it to the planks in 4 places. I put these rings at the top and bottom. (You can see the top ring in photo #2.)
Since the well doesn’t have a bottom, and I was worried about it possibly blowing over in our Central Texas breezes, I put an “X” of boards just above the bottom barrel ring (see photo #2), and screwed it to the sides. I’ll put some rocks on those boards to make sure it stays upright.
Here’s a couple of pictures of the finished article. Joe M.
SCOTT –
Dear build easy,
I love your site . This was a really fun project for me. I am by no means a carpenter and the plans worked great. I finished it with a coat of oil based regal red.
The small trellises I found at big lots store in Tempe Arizona and the bucket at Wal-Mart.
I put this together for my very special lady friend to celebrate a 2 year anniversary of our meeting.
She loves it. As you can see in the background it goes nice with a little wheel barrel I built from wood. Thanks for the effort you put into your website.
Sincerely
Scott Redfern
Tempe Arizona
Mitch –
This is my wishing well I built from your free patterns. My friends and co-workers like it very much.
I put ornamental cabbages an pumpkins in for a fall theme. You have a great web site.
I will be building more from your plans in the future.
Mitch Webster
Jonathan –
Hello
I just finished the medium-size wishing well.
I made it from White spruce.
I’m from Quebec and that wood is very cheap here, but I wouldn’t recommend that wood for any other projects.
Since was my first ever wood building, I used cheap wood, the whole wishing well cost 10$ with screws.
I’m planning to redo it later, but with white pine for a better look.
Thank you for free plans, very good plan with detailed information, since my English is not perfect, I love images with length and angles.
Jonathan
Jeff –
Wishingwells I made from buildeazy free plans. I made them from recycled old fence material.
Thank you buildeazy!
Jeff
Declan –
| would like to take time to thank you for your web site excellent, I started and finished my first project today, the wishing well,very happy with the results. I have a photo attached
Regards,
Declan&Jackie from Galway, Ireland
Chad –
Thank you for your wishing well plan. I proposed to my wife at a wishing well and since then she’s always wanted one for the garden. Well I didn’t know that but on our 12th anniversary I got the idea to make one, found your site and made it.
I live in Papua New Guinea, and pine is not widely available here. Neither is the galvanized metal strap. But, Kwila (a very hard wood) is, as is hooping iron. The hooping iron is used in the construction of roofs here. It’s about 1/16 inches thick, and it’s about 1 inch wide. Needless to say, it was stronger metal, galvanized, and harder wood.
I had to pre-drill a lot.
ALSO the wood here is not measured in inches and feet, it’s all in millimeters and cut thus. So I had to make a few changes to your plan to get the right amount of wood, but, because you included the math on the “barrel” portion, I was able to figure it out very easily.
Here is the final results, this picture is taken in my back yard in Papua New Guinea.
Chad
ADAM –
Big thanks to your free online plans. It took me a long time to make both of these projects. In the end,it’ll be worth it big time.
wishing well:
I followed the directions accordingly and the results are what you see. The only extra touch I gave it was adding shingles to the roofing for a better fashionable look. I must say,I like what I see and i believe I did an incredibly good job! The only issue i can see from my mistake was making the gap between the boards 3/8 (which is what the directions called for if the boards is 1″ thick) which i should have made it smaller cause the metal straps look loose all the way around. If i can’t sell my wishing wells,they’ll look great in my front yard! either way,i can’t luck out You guys are awesome for posting up the plans. Much thanks here in northern Ohio,USA.
Adirondack chairs:
these baby’s are a major hit in my local area! I haven’t even finished making all 4 and people are already considering them sold! Personally,I’m really starting to enjoy these Adirondack chairs. The only problem i had was taking 1 1/2″ off the arms cause i thought they were too long. Wanted to shorten them up a bit. I should have never done that. Other than that,these chairs look and feel terrific! Once I’m done making them for other people,I’m gona make one for my own darn self for a change. Big thanks for your free online plans guys. Much thanks here in northern Ohio,USA. Thanks.
Adam, northern Ohio,USA.
Lee –
I built the wishing well from your plans for a friend as a thank you for befriending my Grandmother while she was in the nursing home. My friend was with my Grandmother when she passed away in December. The wishing well brought tears of joy and sadness. Thanks for the plan!! What a wonderful way to say thank you to a dear friend!
Lee
Mike –
Just wanted to take a moment to say thank you for the Wishing Well plans. It had taken just under 5 hours to complete with the help of my 13 year old Daughter. Once we completed it we stood back and looked at our finished product with pride. Must say the wife was equally impressed. Thanks again.
Mike Wuelfrath Sarasota, Florida
Barb –
My husband used your free wishing well plan and amended the size to 36″ so it would hide our well pump. We painted it to match our house and we love it! People are asking him to make one for them.
Thank you!
Barb Zonitch
Colin –
Hi, i really enjoyed constructing this project, great easy step by step instructions.
I built this well using left over treated pine decking boards (90 x 22 mm) , changed the roof a little, otherwise as per plans…cheers great site!!!!!
Colin
Julie –
I LOVE my wishing well! Hubby made it for me for Mother’s Day and it’s perfect; he said it was very easy and easily adapted. (He made the base a few inches taller to completely hide the well pipe that I hated having to look at.) Here’s a photo; I plan to sit flowers on the cover of the pipe and voila! It’s a planter!
Julie K., McKean PA
KARI –
With a few minor alterations here is my completed well! I made the handle useable by using a wooden closet dowel.
Later I put a plaster plant pot lined with pond fabric to make this well a water fountain. Looks great! THANKS!!!!
Kari White
Stephen –
Thank you so much for the free wishing well plans.
The cost of buying or hiring a wishing well was astronomical. We also like to make things ourselves and the gifts (bonbonniere) to our friends and our bridal party we made ourselves, including the bridesmaids’ jewellery and a friend of the family made the table decorations. So you could say our wedding was mostly ‘hand made’.
So we made our wishing well together and tucked it in the corner of the reception venue, so our guests could just post well wishes into the false top (cardboard box cut into a circle with a slit in it).
We finished it with an outdoor stain and it now sits pride of place in our garden along with the memories of building it together and our wedding day.
Thanks again
Claire and Stephen Kent
Point Cook, Australia
Nahuel –
Hello, Here’s a picture of the well I made for my mother’s back yard, Using Build Eazy plans !!
Thank you for your help
Nahuel Uria Ushuaia, Tierra del Fuego, Argentina