Contents
Red oak flooring is a popular choice for contractors and homeowners. It shows off a beautiful wood grain that matches with a great variety of furniture.
This means that you can use a dark or light colored home decor, which doesn’t always work with many other types of hardwood flooring.
But what if you want to change the color of your oak floor? Or you want to give your old wooden flooring a new look?
Then you can treat your floor with stain to improve its appearance and seal it to keep the wood protected.
In this article, we explore the pros and cons of staining, the best stain products for red oak floors and how you can stain your red oak floor in a professional way.
Can You Stain Red Oak Floors?
Yes, you can stain red oak floors in just a few steps. This being said, red oak flooring doesn’t take as well to lighter colors as other hardwood floors.
Plus, a red oak floor typically has some strong yellow and pink hues that can make it difficult to get a good color match with your stain.
Our Top 3


The Best Stain For Red Oak Flooring
If you want to change the color of your oak floors or you simply want to spruce up your red oak flooring, then you can treat your hardwood floors with stain.
We tried and tested a variety of stains, and here are the best red oak floor stain products.

When it comes to staining red oak floor, you don’t just want a product that enriches the color of your floors but it also protects your flooring from water spills and scratches.
The stain finish from Dura Seal is quick-drying. It repels chemicals and water, and protects your hardwood flooring from damage.
This makes it ideal for busy traffic areas, such as kitchen floors, hallway floors and living room floors.
As a semitransparent stain, the Dura Seal oak finish allows the natural wood grain of your floor to come through.
Dura Seal is suitable for different floor types, including a range of hardwood floors.
One of the biggest advantages with this red oak floor stain is that it dries within two hours.
This makes treating your floor fairly quick and you don’t have to wait too long to use the area again.
Plus, you just need to apply a single coat of this stain to get good cover. If you prefer a darker color, then you can choose to apply two or three coats.
While we chose to test the Golden Oak color of this product, it comes in different colors, so you can match your floors to your home decor.
We found the Golden Oak creates a natural oak look that feels warm and comforting.
If you are a DIY enthusiast, then the application is straightforward. All you need to do is prepare your floor and paint your red oak with the stain.
If you only have a small area of oak floor that you need to paint, then you can also use this stain for other wood projects, such as furniture.
Minwax is a popular stain and wood finish brand that offers a wide range of different stains.
This oil-based stain creates a vibrant color that allows the natural wood grain of your floor to shine through.
It is suitable for any interior staining projects, from red oak floors to wood doors, cabinets and furniture.
The stain is quick and easy to apply, and you get a strong color cover of your floor that looks smooth and professional.
Similar to the Dura Seal stain, this finish also dries in just two hours, so you can reuse your floor quickly again after you are done.
Plus, it means that you can complete your oak floor staining project within one day which is ideal when you want to stain a busy area in your home.
It’s important to ensure that you apply the stain in the wood grain direction. You can simply use a brush or a clean cloth for this. We found that a good brush is easier to work with.
It doesn’t take very long for the dark, rich color to appear. Depending on how dark or light you want your floor to be, you can apply a couple of coats for a richer color.
This being said, make sure that you wait for at least six hours between coats to ensure that the first coat has dried properly.
This oil-based wood stain from General Finishes comes in a variety of colors, from classic Candlelight and Warm Cherry to Mahogany and Pecan.
Thanks to the oil-based formula of this stain, it penetrates to wood and creates a uniform color and look.
However, this also means that you need to clean up your brush and any surfaces with mineral spirits.
You may also want to wear some old clothes and protective gear to ensure that you don’t stain any other surfaces.
It’s an easy-to-apply stain that doesn’t streak or blotch, so you can apply this quickly without any issues.
Just prepare your floor by sanding it down with some medium grit sandpaper. Remove any wood dust and then brush the stain in even layers across the surface.
You can apply as many coats as you like, depending on how dark you want your floor to be. If you want a darker color coverage, then apply at least two coats.
It’s a good idea to apply a top coat to the final coat of your stain to protect your floor from any water damage or scratches.
In addition, this General Finish oak stain is also suitable for other DIY staining projects, such as kitchen cabinets and wooden doors.

Whether you want to make your floors darker or lighter, this fast-drying wood stain from Varathane comes in a range of different colors.
It’s suitable for different wood painting projects, including furniture, trims, paneling, doors and flooring.
You only need to apply a single coat to get good coverage, and the stain dries in just one hour.

Typically, you will need to apply a polyurethane top coat after you finished staining your floor to protect your new stain from damage, such as water spillage and scratches.
This 2-in-1 stain from Minwax comes with the stain and the final top coat finish, so you don’t need to buy an extra top finish.
This does not just save you money but also a lot of time for your DIY flooring project.
You only apply a coat of PolyShades without unnecessary drying time between your stain coat and the top coat.
Depending on how dark you want your floor to be, you can apply only one coat for a lighter oak finish and a couple of coats for a darker oak floor.

If you don’t want to paint your entire floor area but just need to touch up a few spots, then this stain marker does the trick.
You can cover scratches and small nicks with this stain pen. Plus, it is also suitable for other wood craft projects. You can even use it to add decorative touches.
In addition, this wood stain pen is so small that you can keep it in your tool box for covering any scratches.
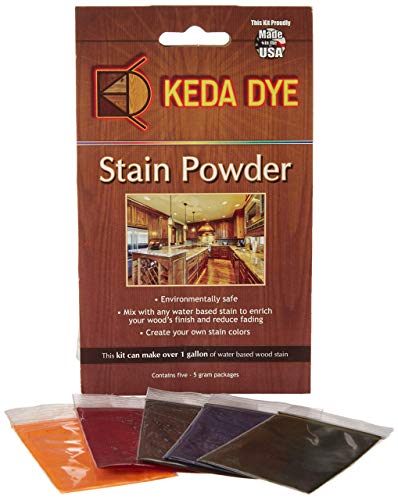
This wood stain kit contains five different wood dye. Ground into powder, you can cover 100 to 150 square feet of surface area with one bag of wood dye stain.
You simply mix different dye colors in the kit together to create the exact red oak floor match you need for your hardwood floor.
This allows you to create a fully customized stain that works for your flooring and home decor.
This being said, you can also use the five primary dye colors in this kit individually to spruce up any of your wooden cabinets or other furniture.
You will need a bucket and water to mix the different colors together to create a water-based stain.
Cleaning up is easier than with oil-based stain, as you just wipe and wash any surfaces with water.
The wood stain kit comes with instructions on how to apply the stain, how you mix it and what stain ratios you need for a good color match.
How To Choose Stain For Red Oak Floors
Whether you want to change the color of your existing red oak floor or you simply want to spruce up old, tired flooring, you will need to choose the right stain for the job.
There are a number of good reasons why you need to pick the right type of stain. For example, you will see your new stain color regularly, so you should be happy with it.
In addition, a color change of your hardwood flooring can have an impact on the appearance of your home decor.
Not everything that matches with red oak floors also works with other colors, such as walnut or white.
Plus, if you change your mind about your chosen stain, then it can be difficult and costly to remove and reapply a new stain.
That’s why, it is essential that you choose the stain for your red oak floors carefully. Here are some of the important things you need to look out for when deciding on a stain product.
Take A Close Look At Your Floor’s Wood Grain
Before you purchase any stain, it’s a good idea to take a closer look at your floor. Typically, red oak flooring shows a classic wood grain.
You will need to consider if you want to maintain the wood grain, or if you prefer to hide the grain with a darker stain.
Keep in mind that all stains change their color slightly over time. Most wood stains turn a warmer color after a while of us.
This means that you may want to consider choosing a slightly cooler color than your existing red oak, and allow the floor to adopt a more natural wood tone over time.
Transparency Of The Stain
Floor stains come in a variety of different thicknesses and velocities. The thicker stain products cover the wood grain of your floor more than the thinner floor stains.
You need to consider whether you want to keep the natural beauty of your current wood grain. Then simply choose a transparent, thin stain.
If you want to cover up your wood stain or you want it to blend in more with your dark stain color, then it’s best to choose a thick floor stain similar to paint.
Carefully Consider The Color
One of the most important considerations for your new red oak floor stain is what color you want.
Red oak is the most natural coloring that matches many different types of flooring and home decor.
If you want to restore your existing floor to new shine and glamour, then you need to choose a red oak color that resembles your floor closely.
However, if you want to change the color, then keep in mind that lighter colors, such as white, don’t cover the original red oak finish very well.
This means that you will likely need to apply several coats of a lighter color. Alternatively, you can also choose a darker color for your red oak floor boards.
This will create a vibrant new finish and you can even preserve the natural wood grain of the oak hardwood.
Consider Your Style And Home Decor
While flooring is an important part of your home, you will also need to consider your furniture, wallpaper and the rest of your home decor.
If you plan to keep your existing furniture and just restrain your floor with the same color, then you don’t need to worry about this point.
However, if you want to change the color of your red oak floor, then make sure that you match the new coloring with your decor.
Ideally, you should choose a color that compliments your furniture. This being said, some colors, such as white, are very versatile and they combine with everything.
If you plan to buy new furniture with your new oak floor stain, then ensure that you know what home decor style you want to achieve before you buy your floor paint.
You can get some inspiration from interior design magazines or Pinterest to help you pick the right flooring.
Use A Design Board To Match The Floor With Your Furniture
One of the easiest ways to help you visualize your interior design ideas for your new red oak floor stain is by creating a design board.
Simply gather some photographs of floors and furniture that you have or plant to buy. The photos can be from magazines, blogs, Instagram, Pinterest or even a friend’s home.
Just put the photos of the different flooring types next to the photos of the furniture. You will quickly see what matches well, and what colors clash with each other.
Once you found a good combination, you can start buying your new furniture and the stain for your oak floor.
Choose Your Floor Style
The design board, also known as vision board, can help you visualize some of the different floor styles.
Whether you want to go for a more traditional or modern look, the lightness of your chosen stain can impact the appearance of your floor.
Light Wood Stains
A light stain will brighten up your room. It allows the beautiful natural wood grain to come out better. You can also make smaller rooms look bigger with a lighter stain color.
In addition, they also hide crumbs, pet hair, dust and other things that accumulate on the floor very well.
Light stains are incredibly versatile and they match many different types of furniture.
Medium Wood Stains
A medium stain between light and dark can add more depth to your floor while keeping the wood grain visible.
Medium wood stains in a warm tone typically work best with traditional wood furniture.
This being said, you can also choose medium wood stain in a cool tone to make the floor more modern.
Dark Wood Stains
Dark wood stains are a classic finish for large floor spaces. They create a fantastic contrast to light walls and furniture.
However, darker floor stains make dust, hair and other debris on your floor more visible.
Choose A Sheen Or Matt Finish
While many people just think of the color of their new red oak floor, it is also important to consider the finish of your floor.
If you choose to have a gloss or satin sheen on your floor, then this will show scruffs, pet hair and dust a lot more than matte finishes.
Flooring experts recommend glossy floors in smaller areas, while matte floor sheens are better in rooms with high traffic, such as the lounge and kitchen.
Decide On A Stain Or All-In-One Product
In addition to your stain, you will also need to apply a top coat of sealant to your floor. This will protect your hardwood from damage, such as abrasive dirt and water.
You have a couple of different options with the sealant. You can either buy your stain and sealant separately, or buy an all-in-one product that contains both stain and finish.
While this can be less expensive, it isn’t always the best option for every floor. Polyurethane sealants are often combined with stain to make them more durable.
This being said, the two-in-one stain and sealant products are typically thicker which can make them much easier to apply.
Plus, it can be difficult to get a full color match for this type of stain. You will also need to wait much longer for these products to dry.
If you are not on a deadline for your floor staining project, then this is a good option for anyone who wants to save some money.
However, usually staining and then applying a separate top coat can yield better results.
Stick To Your Budget
When it comes to buying DIY hardwood floor stain, quality is essential. Most high-quality products may be more expensive but they are also more effective.
This will reflect in the end result. If you buy a good quality stain for your red oak floor, then it is easier to apply and much smoother, creating an even finish.
This being said, it is essential that you budget enough for a good oak floor stain. Depending on the size of your floor, you can also save money by buying large stain cans.
Try A Sample On A Small Area First
Before you get started with staining your floor boards, it’s a good idea to apply some of the stain on a small wood area first.
You can either do this with a scrap piece of floor board or in a small corner that is covered by furniture later.
If you plan to paint different rooms with your new stain, then it is a good idea to try the floor stain in each room to check the different lighting.
How To Stain Red Oak Floors
Red oak floors do not just look beautiful but they are also very durable. A good quality floor made of red oak can withstand water spills and scratches.
In addition, red oak also allows any stain to be absorbed much easier than many other wooden floors. This makes red oak flooring look elegant with its beautiful grain pattern.
Once you found the right stain for your red oak floor, you can start preparing and staining the floor boards.
Here is a step-by-step tutorial on how to stain your red oak hardwood floor for a smooth and even finish.
Step 1: Prepare The Floor
First, you will need to prepare your red oak floor carefully before you can apply the stain. Take a look at your floor for any chips or cracks. Fill them in with wood filler.
Then lightly sand the floor surface with sand paper or an orbital sander. Then make sure to remove any wood dust and grime by vacuuming the floor.
Next, wipe the floor surface with a clean cloth to ensure that no dust or dirt is left.
Step 2: Prepare The Stain
Now that your floor is ready, you will need to prepare your stain. Shake the stain can properly before you open it. Then gently open the can with a flat screwdriver.
Make sure that you mix the stain with a stirring stick to ensure that all color pigments are correctly blended.
Step 3: Apply The Stain
You can use either a brush, a sponge or a clean cloth to apply the stain on your red oak wood floor.
Simply rub it onto the floor gently. It is important that you blend the paint in carefully and don’t leave any spots out. Make sure to remove any blotches or streaks with the cloth.
Depending on your chosen stain, you might need to apply several coats to create a richer color that looks darker.
Step 4: Allow The Floor Stain To Dry
Once you covered the entire floor with the stain, you will need to allow the area to dry as indicated on the can.
Most stains are dry to the touch after a few hours. However, it is a good idea to let your stain dry for at least one day before you apply the top coat sealer.
How To Stain A Red Oak Floor White
Staining any floor white is a challenge but red oak floors are the best difficult because their natural stain is much darker.
This being said, there is a way to turn your traditional red oak floor into a contemporary white floor.
The best way to achieve this is using a wood bleach that lightens your existing floor stain making it look lighter.
Here are is an easy step-by-step guide on how to stain your red oak floor boards white.
Step 1: Prepare The Floor Surface
First, you will need to prepare the surface of your floor, similar to the normal staining process. You will need to sand down the surface and remove any dust and debris.
Step 2: Mix The Wood Floor Bleach
Wood bleach usually needs to be mixed to activate it. Follow the product’s instruction until you see some bubbles. Then, the bleach is ready to be applied.
Make sure that you wear goggles and gloves when you handle the bleach as it contains harsh chemicals.
Step 3: Apply The Wood Bleach
Take a new brush and apply the wood bleach mixture evenly across the floor area that you want to turn white.
It is important that you apply the bleach in uniform coats. Don’t leave any blotches or puddles as this affects the end result.
Step 4: Allow The Wooden Surface To Dry
Once you applied the wood bleach to your floor surface, you need to let the surface dry for a minimum of three hours.
Then check if you are happy with the effect. If you want the floor to be lighter, you can apply a couple more coats of the bleach.
Step 5: Neutralize The Bleach
If you are happy with the final bleaching results, then you will need to neutralize the harsh bleach before you can apply your finish.
In order to neutralize bleach, just combine normal vinegar with some lukewarm water in equal parts.
Blend the mix properly and then apply it carefully to your floor. You may also want to wear gloves and goggles for this step.
Step 6: Allow The Stained Floor To Dry
Once you neutralized the bleached floor, you need to let the area fully dry. After the floor has dried, you will notice that the surface is rough.
That’s why, you need to sand it down with fine grit sandpaper to create a smooth and even surface.
Step7: Apply A Top Coat Finish
When your white floor is smooth, then you are ready to apply a top coat. You can choose any clear finish.
Just make sure that you choose a finish without stain to preserve the white color.
Pros And Cons Of Staining A Red Oak Floor
A nicely stained red oak floor can look beautiful and elegant. It blends in with a range of different furniture pieces.
However, red oak can look very traditional which clashes with modern home decors. That’s why, it can be an easy option to stain your red oak floor.
Here are some pros and cons of staining your hardwood floor.
Benefits Of Staining A Hardwood Floor
Although staining a floor is time-consuming and the end result isn’t always guaranteed to be beautiful, there are still plenty of advantages that come with a nicely stained oak floor.
Red oak is a warm color that stands out well with the traditional wood grain. It gives your room a natural look which works with almost any piece of furniture.
Change The Color Of Your Floor
Staining your floor allows you to change the flooring color to almost anything that you like. This being said, it is easier to stain a lighter floor to a darker color than vice versa.
A different floor color doesn’t just allow you to create a new look in your home but you can also match the color to your home decor and furniture.
Accentuate The Oak Floor Grain
One of the most beautiful aspects of red oak flooring is that it has a natural wood grain. With a stain, you can bring out the grain more and create a warmer feeling in your room.
Staining Looks Luxurious
With a good-quality stain, you can imitate the look of luxurious wood. This does not just work for red oak hardwood flooring but cherry, mahogany and other traditional woods.
In addition, you can also create a pattern and flooring design, like lattice or herringbone, much easier with stained woods.
Drawbacks Of Staining An Oak Floor
While staining your red oak floor has some decorative benefits, there are also a number of drawbacks.
It’s important that you follow the steps on how to stain a red oak floor carefully to avoid anything going wrong, as mistakes can be very time-consuming and costly.
Not All Floors Can Be Stained
While you can stain most oak floors, many other types of woods aren’t suitable for staining, including pine, birch and maple.
As these woods have a tight gain, they don’t allow color pigments to settle inside the wood. This means, that stain wouldn’t stick well to these woods.
In addition, some coniferous woods contain sticky sap which is fully stain resistant. If you try to apply stain to these woods, the end result looks messy and blotchy.
Stain Accentuates Sanding Marks And Patterns
Staining your wooden flooring is ideal for bringing out the wood grain in the floor boards. However, it also accentuates any other spots, designs and patterns in your floor.
This means that you shouldn’t stain a floor which has a herringbone pattern or other designs. You also need to carefully prepare your floor to remove any marks before staining.
Difficult To Control The Final Color
Whether you have red oak wood or any other type of wooden floor, the wood pores absorb a certain amount of your applied stain.
Once the pores are full, the wood shows stain patches that you need to wipe away with a cloth. If you don’t wipe them off quick enough, they can leave unpleasant, dark spots.
This can even happen when you apply a finish that doesn’t work with your stain. That’s why, it is essential that you use a suitable top finish.
Staining Is Time Consuming
One of the biggest issues with staining hardwood floors is that it takes a long time. You will need to allow time for the preparation of the floor, the staining process and the drying time.
Each stain coat has to be completely dry before you can add another layer or your final finish stain on top.
If the layers aren’t fully dry, then the coats either smear or peel off later. Then, you can only sand the floor down again and start the process again.
Flooring professionals recommend leaving a stain coat to dry for at least two days, depending on the air movement, temperature and humidity.
Even a small variation in these factors, and you may end up waiting for your floor to dry much longer.
This can be a long time for homeowners, especially when you are staining a busy traffic area that is used regularly.
Only when your final stain coat is fully dry can you apply the transparent finish to seal your floor. Then, you will need to wait another 48 hours for this coat to dry.
All in all, this could mean you might end up with at least a week of working on your floor.
Frequently Asked Questions
Can You Change The Color Of Oak Flooring?
Yes, you can change the color of your red oak flooring by applying colored stain to your flooring.
However, the staining process can take some time and you will need to prepare your floor carefully.
How Do You Make Red Oak Floors Look Less Red?
The best way to make your red oak flooring look less red is by applying a more neutral stain. You can either change the color of your floor completely or just paint on a more brown stain.
As it’s not easy to stain a red oak floor with a lighter color, it’s a good idea to consider painting your floor in a darker shade that still allows the wood grain to shine through.
How Do You Keep Red Oak Floors From Turning Yellow?
Low quality stains can turn yellow over time. That’s why, it is important to use a high-quality, water-based stain for your red oak floor.
Make sure that you also use a good sealer that protects your stained floor surfaces from any damage and yellowing.
What Compliments Red Oak?
A red oak floor goes well with furniture that brings out the color of your floor, such as green and brown tones.
You can also use furniture in different shades of blue that improves the look of your red floor.
Final Thoughts
There are a great variety of different stains for red oak floors. A good-quality stain brings out the beautiful wood grain of your floor, together with a vibrant, new color.


I'm your guy for any type of electrical installation or plumbing repair. I'm a jack of all trades. You name it, I can do it. I've seen it all and I'm not scared.