Contents
Painting or applying a varnish to cabinets can be a lengthy and unpleasant chore, but a good paint sprayer can make quick work of the job and leave them looking professionally finished.
Paint sprayers are often designed for a specific purpose, and one that is meant to provide a blend between application rate and precise coverage is ideal for cabinets.
I tested many paint sprayers and put together these reviews based on their ability to paint or apply varnishes to cabinets. The buyer’s guide below should help you find the best sprayer for your purposes.
Best Paint Sprayers for Cabinets – My Top Picks
BuildEazy.com may earn a commission if you purchase a product through one of our links.
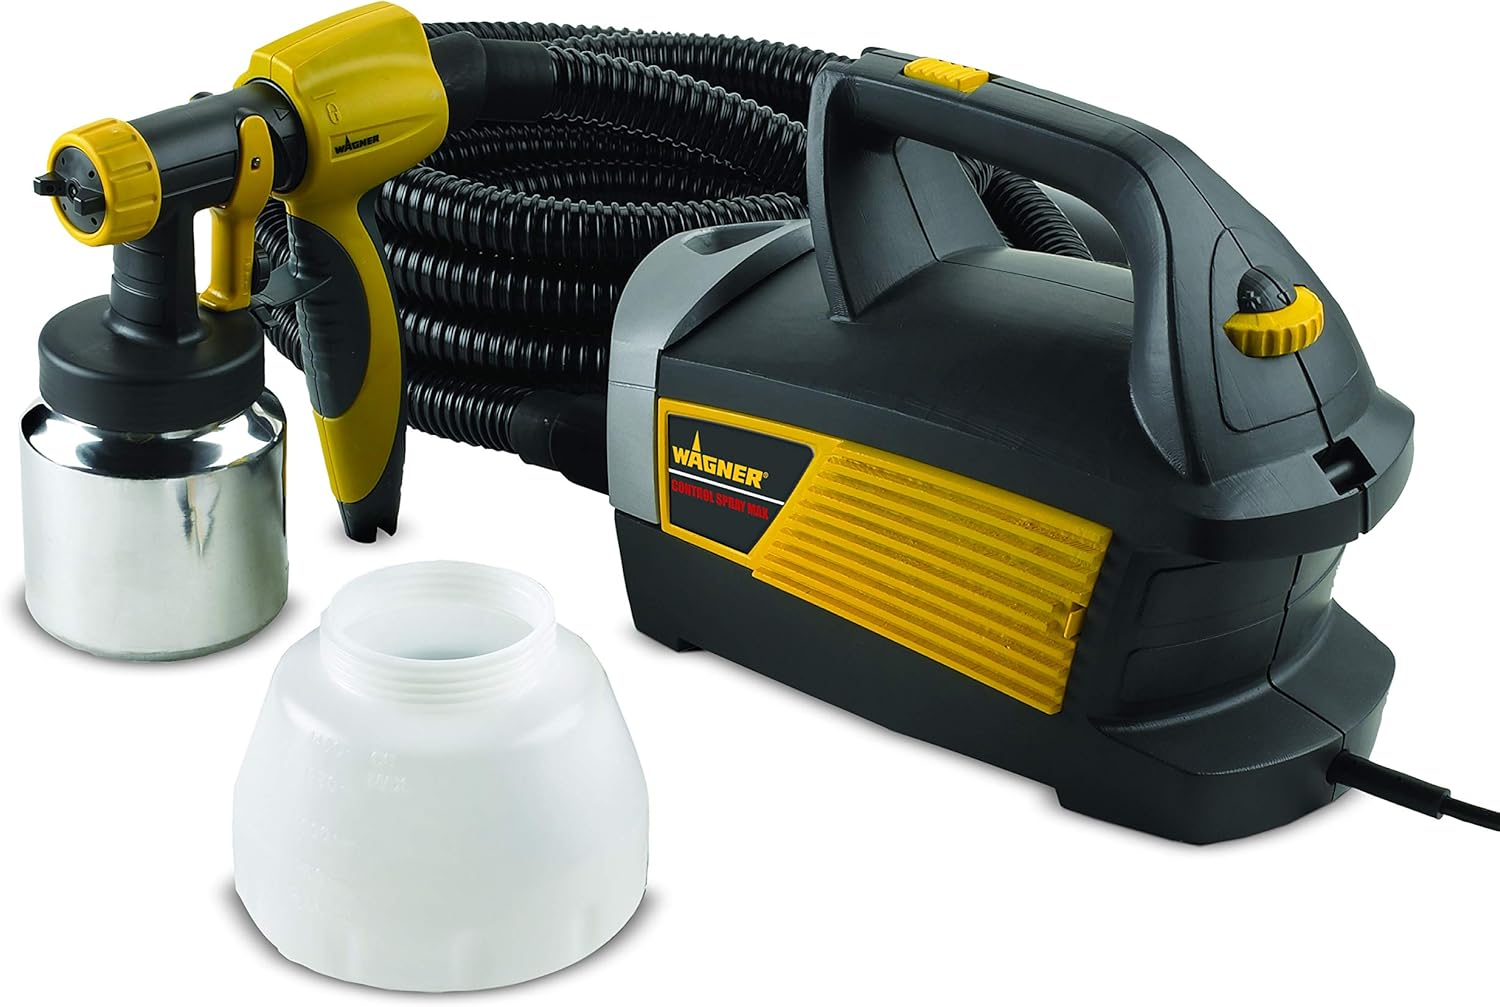

Wagner Spraytech 0518080 Control Spray Max

Wagner specializes in paint sprayers and other tools to make painting straightforward, and their expertise is evident in this tool.
This is an HVLP (high-volume, low-pressure) sprayer, which means it has a moderate flow rate. It puts out more paint than LVLP (low-volume, low-pressure) sprayers, so you’ll be able to paint cabinets with fewer coats.
It has a comparatively small overspray area. You won’t waste much paint, and it’s ideal for smaller projects like cabinets that need some precision to get a clean look.
The entire tool weighs 11.18 pounds, but the included compressor is located in the base, so the spray nozzle and the paint are effortless to maneuver around your cabinets without straining your wrist. The large handle gives you excellent control and is comfortable to hold for long periods.
The turbine in the base is robust and provides plenty of pressure for smaller jobs like kitchen or bathroom cabinets. It’s also reasonably quiet while you’re using it.
The sprayer is simple to set up and use, and it’s one of the easiest sprayers to clean.
My favorite thing about this sprayer is the adjustability. It includes a nozzle adjustment to achieve different spraying patterns for use on various projects, and you can adjust the pressure created by the compressor to suit your medium. Whether you’re applying thick paint or a thin polyurethane to your cabinets, you can tune it for optimal coverage.
This sprayer is very affordable, especially given how durable it feels. If something does break, there are replacement parts available that are also cheap.
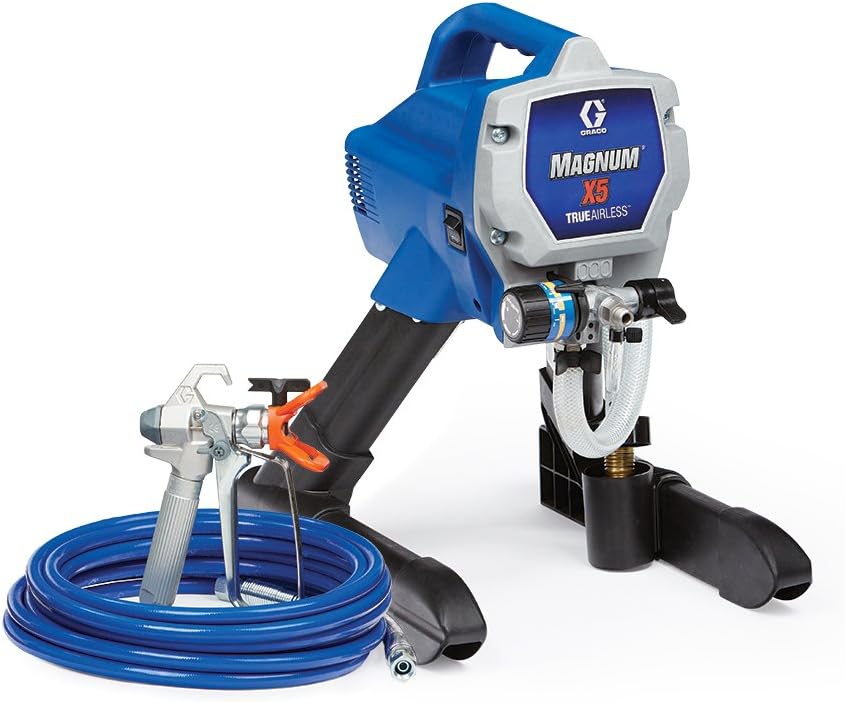
Graco Magnum 262800 X5 Stand Airless Paint Sprayer
Graco focuses their efforts entirely on paint sprayers, so they provide some of the best options for projects of all sizes.
This is an airless paint sprayer, so it’s significantly more expensive than most other types, but you won’t need to purchase or run a compressor to use it. It has a higher amount of overspray than other types and is best for larger areas, but you can alter the paint flow and the pressure to make it suitable for smaller projects like cabinets.
This sprayer weighs in at 15 pounds. It’s easy to transport around your workspace or from job to job. The bulk of the weight is in the motor, so the portion you hold while working is very light and easy to manage.
It includes a powerful electric motor that can spray unthinned paint at high pressure, so it’s more than capable of handling kitchen cabinets. You can use it with just about any medium, so it’s an excellent option for multiple cabinet projects.
You will experience some wasted paint due to overspray, but you’ll make quick work of your project and won’t need to apply as many coats as you would with lower-pressure sprayers.
It’s straightforward to use and lends itself to a quick setup, as the paint pump can be inserted directly into a paint bucket. You won’t need to pour paint or polyurethane into a separate holding tank.
You can attach it to a garden hose for a cleanup process that is quick and painless.
It’s more expensive than many other sprayers, but it’s abundantly powerful and will likely last through countless spraying projects.
Dicfeos Paint Sprayer
Dicfeos offers various tools for casual use by homeowners, which is what you can expect from this budget paint sprayer.
This is an HVLP sprayer that offers the precision you need to get a clean and professional look on your cabinets. It’s not suitable for larger jobs, but it can apply a thick layer of paint or poly that will save you time on having to add more coats.
It has minimal overspray, so you’ll have less wasted paint than with other types of sprayers.
This paint sprayer weighs 3.56 pounds, which is relatively light. The compressor and the paint are housed in the piece you’ll be holding, so it can be a bit uncomfortable to use, especially for long periods.
It includes a 700W motor that is powerful enough for small jobs. This sprayer isn’t ideal for projects bigger than cabinets. It’s relatively quiet while in use and makes about the same amount of noise as a large compressor. Although I recommend ear protection, it isn’t a requirement.
The sprayer is very straightforward to use, and instructions make adjustments and setup simple. However, you’ll have to manually wash each part of the sprayer, so cleanup can be a bit tedious.
The compressor is powerful enough to handle various mediums, so it’s a great tool whether you’re applying unthinned paint or thinner varnish to natural wood cabinets. It has adjustments for spraying direction and pressure, so you can tune everything based on the medium and your workpiece.
This sprayer feels less durable than many others I tested, so I would only recommend it for infrequent use. It is one of the most affordable sprayers available, so it’s ideal for those on a budget.
DEWALT HVLP Spray Gun – DWMT70777
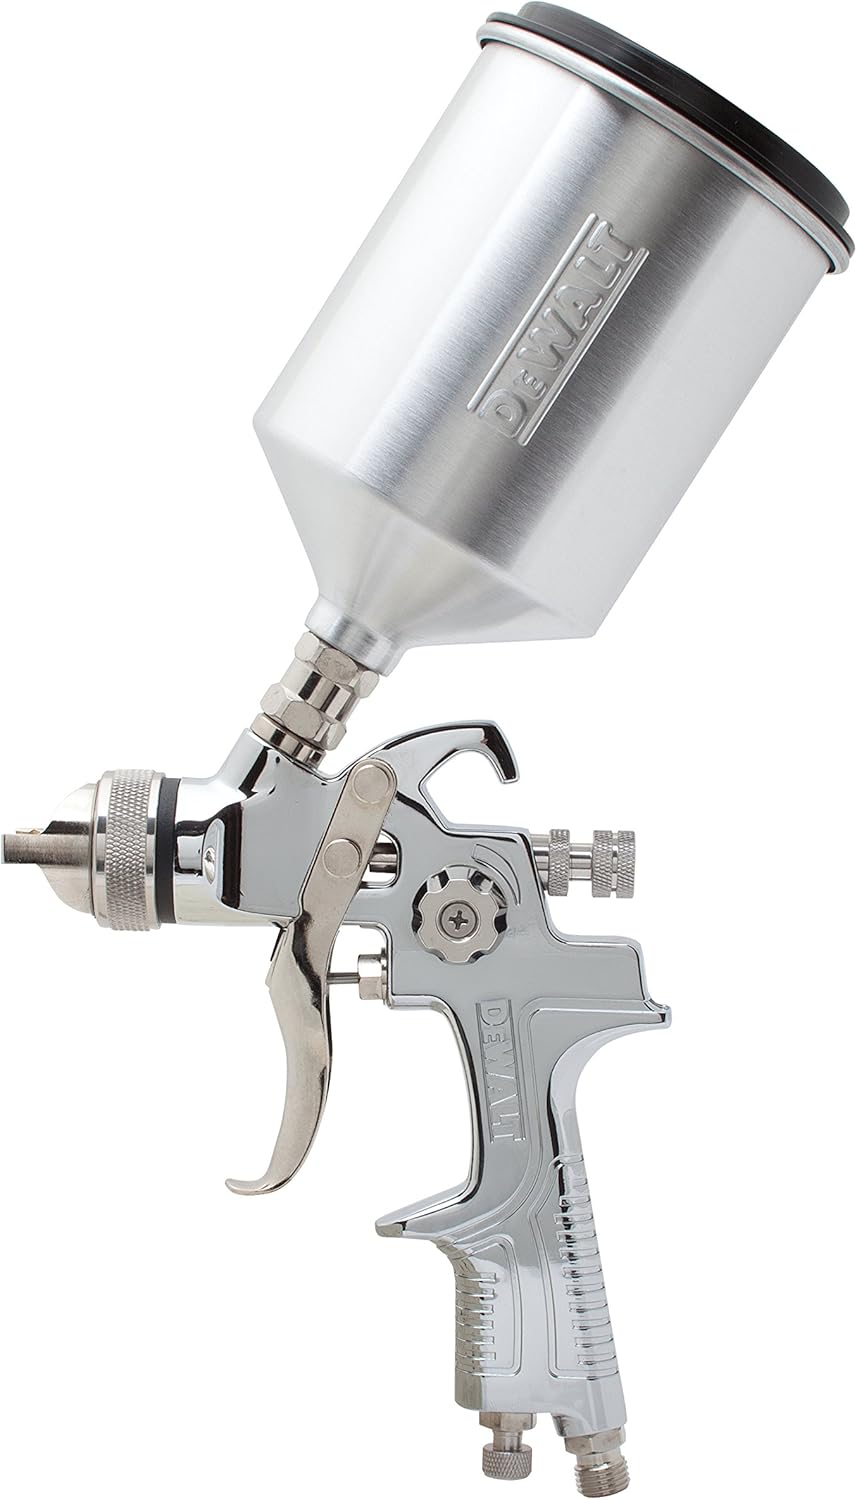
DEWALT is well-known in the woodworking industry for creating high-quality tools suitable for professionals and hobbyists alike.
This is an HVLP paint sprayer designed for efficient and detailed work on smaller projects, making it ideal for spraying cabinets. When hooked up to a compressor, it applies a thick layer of paint or varnish that prevents the need for multiple coats, saving you time on each of your cabinets. It provides an even coat with few imperfections.
You’ll waste little paint with this sprayer, as it has a small amount of overspray. However, the paint tank is reasonably small, so you’ll have to stop working more often to refill it than you would with a larger capacity tank.
It’s made of aluminum and weighs 2.4 pounds. It’s relatively easy to move around your cabinets while you work, but the gravity-feed paint tank may put some strain on your wrist if you use it for extended periods.
This sprayer doesn’t include a compressor, so you’ll need to purchase one separately. This is already a relatively expensive sprayer, so having to spend more on a compressor can quickly put this tool outside of your budget.
It’s very straightforward to use and clean. You can easily take each piece apart to soak, which is common practice to keep your gun functioning as long as possible.
When hooked up to a capable compressor, this sprayer can handle most mediums with between 15 and 30psi, including unthinned paint as well as less viscous polyurethane.
The all-metal construction makes this a very durable sprayer, and it feels like it will stand up to many uses. DEWALT backs this tool with a 3-year limited warranty that covers any defects caused by manufacturing.
Graco Magnum 257025 Project Painter Plus
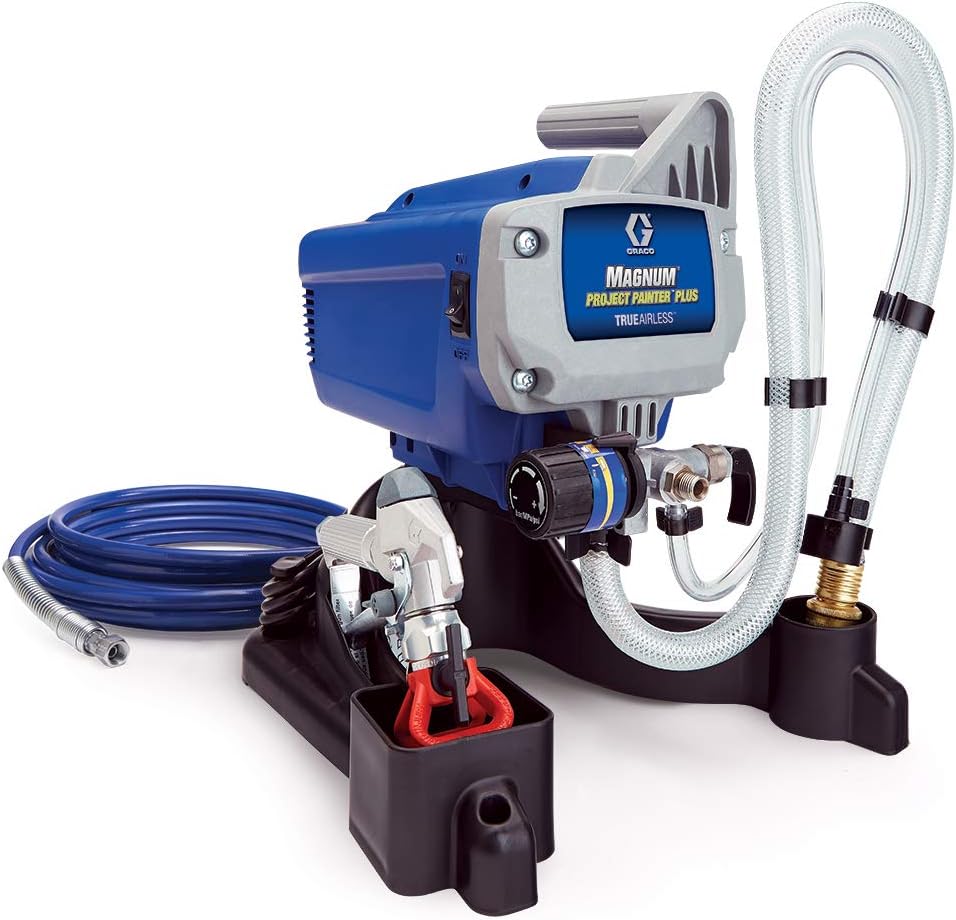
Graco specializes in paint applicators, so you can be sure that this sprayer is crafted with painting efficiency in mind.
This is an airless paint sprayer, so you won’t need to hook it up to a compressor for use. It uses a powerful electric motor to compress the paint for high-volume spraying.
This tool does have some overspray and can lead to some imprecision in your work. It’s ideal for larger projects, but you can tune the flow rate and direction to make it suitable for smaller projects like cabinets.
The tool weighs 16 pounds, so it’s not difficult to relocate during spraying or between jobs. Most of the weight is housed in the base, so the spray nozzle will be effortless to hold and maneuver around your cabinets while you paint.
The motor is plenty powerful to handle unthinned paint and still maintain high pressure. You’ll be able to use this for anything from thin, water-based polyurethane to thick paint.
It’s very straightforward to use, mainly because you won’t need to pour any paint or stop your work to refill a paint tank. You can simply put the suction hose directly into a paint can and begin spraying. The reversible nozzle makes for uninhibited spraying as well, as you can quickly dispatch clogs without stopping to clean your tool.
After you finish painting, the cleaning process is simple, as you can do most of the cleaning by hooking your sprayer up to a garden hose and running water through the tubing.
This sprayer is relatively expensive, but it feels like it’s built to last and will power through many future projects.
It comes with a detailed instruction manual to make use and adjustments for different jobs as easy as possible.
TCP Global Professional Gravity Feed HVLP Spray Gun

TCP manufactures painting tools designed for quality and consistency, and this sprayer fits nicely into their product line.
This is an HVLP sprayer. It’s not ideal for large projects, but it’s great for smaller projects like cabinets.
It has a relatively high degree of accuracy and won’t produce much overspray. You’ll be able to apply a thick and consistent coat of paint in one pass, limiting the time you’ll spend spraying. You won’t end up wasting much paint and can direct the majority of it where you want it.
The spray gun weighs just 2.84 pounds. It’s a bit heavy once the paint is added to the gravity-feed tank, especially since it comes equipped with a tank that has a 1-liter capacity. The weight can put some strain on your wrist and may not be comfortable for longer painting sessions.
It’s very straightforward to use and is a good option for beginners. It has limited adjustability, making it less versatile than other sprayers, but you’ll get used to how it works quickly and with little practice.
You will need to use this in combination with a 30psi compressor, which isn’t included. This is a relatively inexpensive sprayer, but having to purchase a compressor separately might make it prohibitively expensive for some.
With the right compressor, this sprayer can handle most mediums you’d use for cabinets, including polyurethane and paint.
It’s easy to disassemble for cleaning, so you won’t need to spend too much time scrubbing the pieces clean once you finish painting.
The sprayer is made of durable aluminum that feels like it will last through years of use.
HomeRight C800971 Paint Sprayer
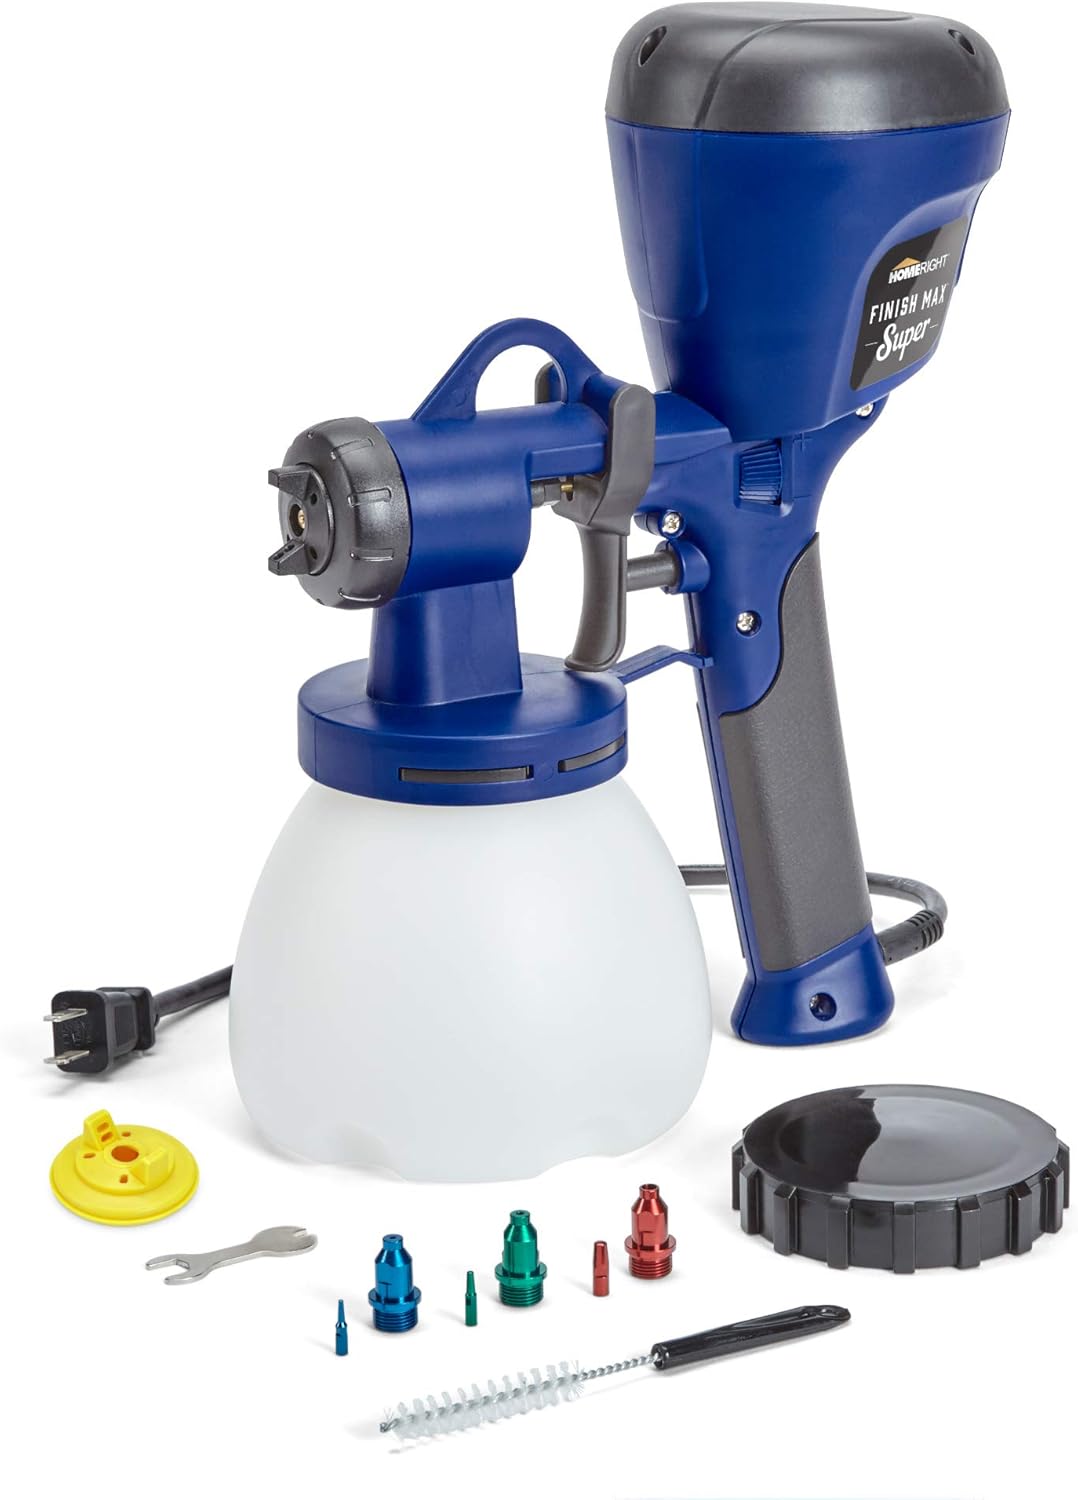
HomeRight offers various tools that are easy to operate and designed for light-duty use, so this is an excellent option for cabinet spraying.
This HVLP sprayer is best suited for smaller projects like cabinets. However, it includes multiple tips for wide-angle spraying, so you can also use it for bigger projects should the need arise.
You’ll likely experience some overspray with this tool, so you’ll need to be careful when working on your cabinets’ small surfaces or when moving around corners.
The sprayer weighs 3.3 pounds and has a relatively high-capacity paint tank. When it’s full, it is quite heavy and can be uncomfortable to hold and maneuver for extended periods.
It has a 400-watt electric motor that provides ample power for most mediums. You’ll be able to spray everything from thin, water-based varnishes to unthinned latex paint. The motor is a bit noisy during operation and will be about as loud as a large compressor. I recommend ear protection while using this sprayer.
This tool is designed for beginner use, so it’s straightforward to set up and start spraying. It includes some adjustments, like three different spray nozzles and pressure control, so you can tune it to your specific medium and cabinet size for optimal application. Adjustments are comfortable, and the included instructions make selection easy.
It’s not the easiest gun to clean, but it shouldn’t take you too long after you finish spraying.
I was very impressed by how smooth the application is from this sprayer. I was pleased with the coverage with just a single pass, and the paint looked very even and full.
This sprayer is relatively expensive. However, it feels like it will last through many projects, it’s adaptable to larger workpieces, and it includes a 2-year warranty that covers defects in construction or materials.
Fuji 2903-T70 Mini-Mite 3 HVLP Spray System
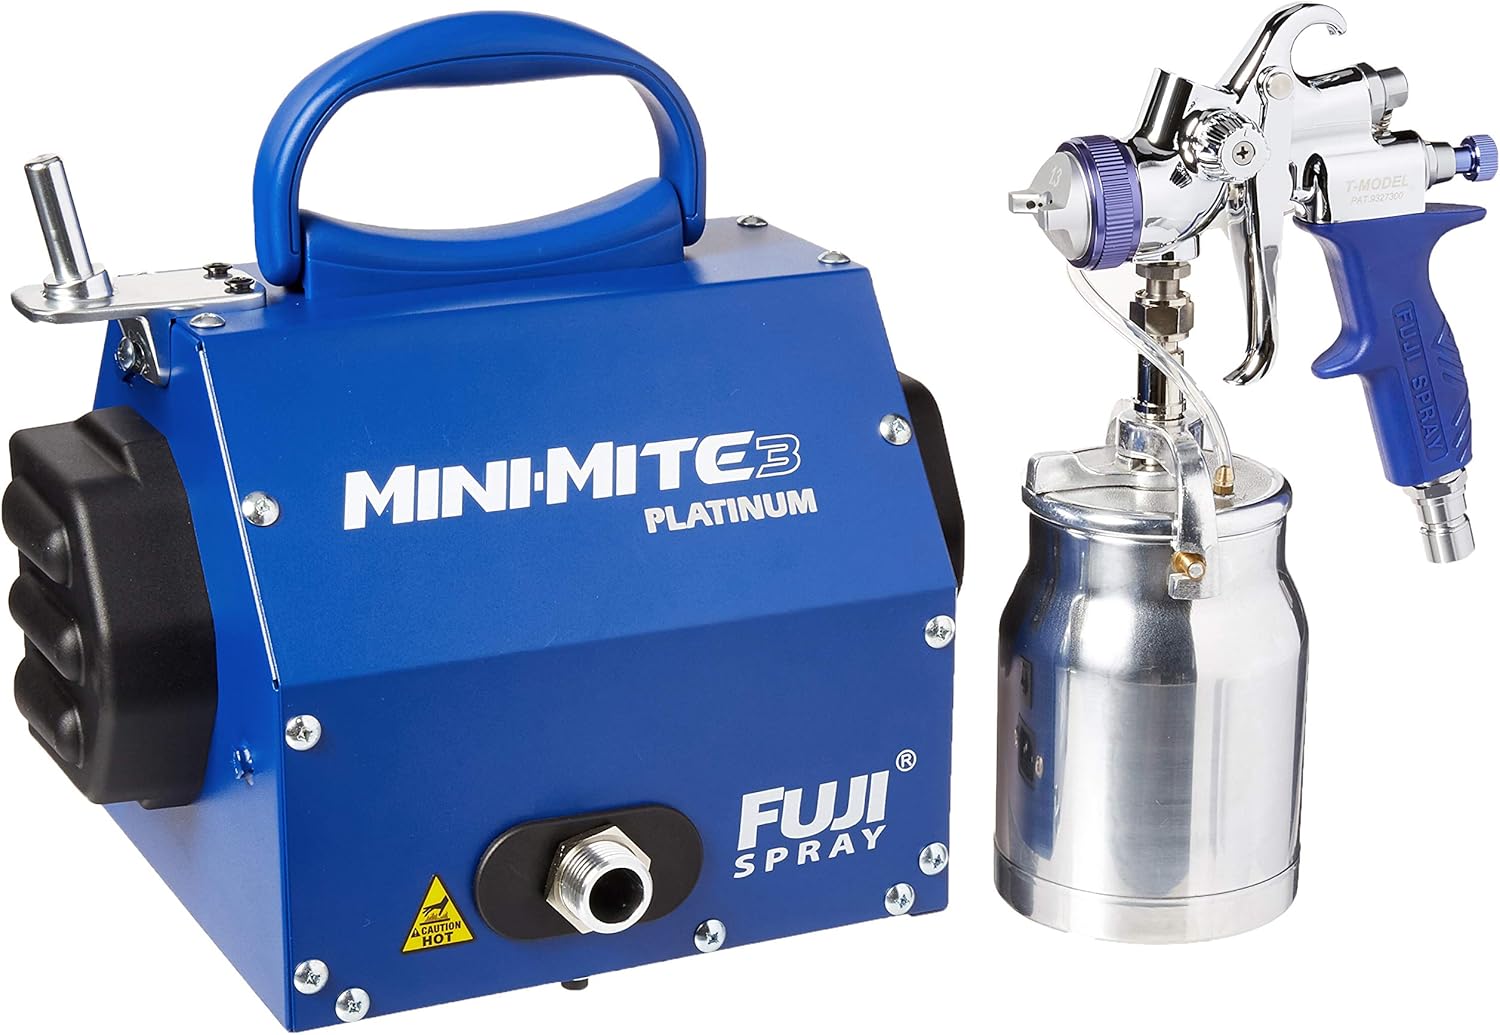
Fuji specializes in high-quality, high-performance paint sprayers suitable for professional use, and this sprayer is no exception.
This is an HVLP sprayer that allows a high degree of accuracy and precision. It’s perfect for small projects like cabinets, and you’ll experience minimal overspray.
It’s powered by a robust compressor that provides 6.5psi. This is enough pressure to spray most mediums accurately and cleanly, including water-based polyurethane and thick latex paint. You’ll be able to tackle just about any cabinet-spraying project you have with this sprayer.
It’s designed for professional use, and I was very impressed with how clean and smooth the application was. It provides dense coverage that can be problematic if you aren’t careful. However, the flow rate will limit the number of coats you need without creating globs of paint or uneven spray if you use the sprayer properly.
The kit weighs a total of 28.1 pounds, so it won’t be too challenging to move around your workspace. The gun itself is relatively lightweight and is comfortable to hold for long periods. The large, 1-quart paint tank contains plenty of paint to keep you spraying for longer, but the bottom-feed design puts minimal stress on your wrist while you work.
It’s very straightforward to use, even with a wide range of adjustability for different mediums and varying project sizes. Beginners and professionals will both find this sprayer convenient and simple.
This sprayer is one of the priciest paint sprayers I tested, and it’s likely to be prohibitively expensive for many people. However, it’s exceptionally durable, and it’s versatile enough for use on a variety of projects once you finish your cabinets. If money is no issue, I highly recommend this paint sprayer for professionals and serious DIYers.
Earlex HV5500 HVLP Spray Station

Earlex provides high-performance finishing tools for hobbyist woodworkers and professionals, and their dedication to quality is evident in this sprayer.
This is an HVLP paint sprayer that delivers precise application with little overspray. It’s powerful enough for larger projects, but the accuracy makes it ideal for small workpieces like cabinets.
This sprayer is high powered and can handle just about any medium with which you choose to work. Unthinned paint and most varnishes will be no match for the robust, 650-watt turbine motor.
I was most impressed with the professional look of the application this sprayer achieves. With just one pass, I was able to lay down a thick enough coat of paint where a second pass wasn’t necessary, and the cabinets looked smooth and clean. With some practice, you’ll be able to cut down on the total work time of your projects with this tool and get a beautiful finish on your cabinets.
It weighs 12 pounds, but the majority of the weight sits in the base. The gun is made of aluminum and is relatively light, and it remains attached to the compressor with a 13-foot air hose. The paint canister is large and can get heavy when it’s full, but it’s a bottom-feed design and puts little stress on your wrist. You’ll be able to use it comfortably even through long painting sessions.
The paint canister holds a full quart of paint, allowing you to paint for more extended periods without stopping to refill.
Despite its high power, it’s relatively silent at just 78-80 dB during operation.
This sprayer is very easy to use and is suitable for beginners. There are quite a few adjustments that can be made, including flow rate and painting direction, but the manual included makes everything clear and straightforward.
It’s on the expensive side of sprayers, but given its versatility and the professional-quality work it can handle, I think it’s worth the investment if you plan to use it on multiple projects.
Critter Spray Products 22032 Siphon Gun

Critter Spray manufactures spray-style applicators that are designed for those on a small budget.
This is an HVLP sprayer, so it applies a thick coat of medium. It’s not quite as accurate as some of the other HVLP sprayers I tested, so you will likely waste a bit of paint throughout your project due to moderate overspray.
It’s capable of applying paint in a single coat, but I got the best results when using two coats with a light sanding between them. I felt this was necessary because the sprayer leaves some uneven coverage and the occasional paint glob you’ll need to remove. It’s not the most professional-looking finish, but it will suffice as long as you’re willing to sand with a high-grit paper after the paint dries.
The gun weighs 1.6 pounds and uses a siphoning, bottom-feed design. It’s easy to maneuver around your cabinets while you work, and it won’t put too much stress on your wrist or forearm.
Instead of a proper paint canister, this gun uses a standard mason jar with a modified top to hold paint. It works just as well, and replacement canisters will be remarkably cheap if you ever need one. You can opt for a mason jar or similar glass jar.
The gun doesn’t include a compressor, so you’ll need to purchase one separately. I recommend a 3/4hp pancake compressor for the most affordable option with the best results.
It’s effortless to use and requires very little getting used to, mainly because there is only one point of adjustment at the tip. I never had an issue with the paint clogging inside the siphon tube, which means you can spend less time clearing clogs and more time getting your cabinets sprayed.
It’s one of the most comfortable guns to clean and just requires that you wash the glass jar and siphon tube.
This sprayer won’t be able to handle thick paints like those made with latex. You should have no issue with standard paint, and it will handle thinner varnishes without any problem.
This is a very affordable gun, but keep in mind that you will need to purchase a compressor as well. It’s built well and feels like it provides good quality for the money.
Buyer’s Guide
As I’m sure you can see by now, paint sprayers aren’t all equal in the jobs they can handle. To find the best sprayer for your cabinets, you’ll need to balance your budget with the features below to get the best tool you can comfortably afford.
Types of Paint
Not all sprayers can handle all types of paint. Spraying mediums range in thickness, with varnishes like water-based polyurethane being one of the thinnest and latex-based paint being one of the most dense.
Even standard paint is relatively thick and won’t be usable with all spray guns.
The thicker your medium, the more power you’ll need from the compressor you use with your sprayer. As I’ll mention more in-depth below, some high-powered HVLP sprayers can handle unthinned paint, but the best option for thicker paints is typically an airless sprayer.
Types of Paint Sprayers for Cabinets
There are four primary styles of sprayers you can choose from, each designed for a different purpose.
Conventional Sprayer/Compressed Air
A conventional paint sprayer gets attached to a compressor and uses a significant amount of pressure to apply low paint volumes. This application method results in thin coats that are very smooth and clean, leaving a highly professional look.
However, these sprayers are prohibitively expensive for most hobbyist woodworkers and require numerous coats for adequate coverage.
High-Volume Low-Pressure (HVLP)
HVLP sprayers use much less pressure than compressed air sprayers, but they apply a thick coat of paint in a single pass.
These are usually ideal for most cabinet applications because they offer precision and limit the number of coats you need to apply. However, they’re not the best for more extensive projects because they don’t have a fast coverage rate.
For tips on how to set up and use an HVLP sprayer, check out this instructional video:
Low-Volume Low-Pressure (LVLP)
LVLP sprayers tend to be less expensive than HVLP options because they require less powerful compressors.
They use a small amount of pressure to apply a small amount of medium, giving you very accurate control over the application process.
However, they don’t provide enough pressure to use most paints and thicker mediums, so they’re only suitable if you’re looking to apply thinner varnishes, like a water-based poly.
Airless
Airless sprayers use an electric turbine motor to compress paint instead of air. They’re generally more silent than other types but still produce high pressure.
They are usually ideal for larger projects because they tend to overspray and don’t offer much precision. However, some can be tuned with different tips and flow rates to be applicable for smaller workpieces like cabinets.
What to Look For in a Sprayer
Intended Use
Sprayers are designed for different jobs, so I recommend choosing one that will be applicable to the projects for which you plan to use it.
If you will only ever use yours for cabinet applications, an HVLP sprayer will be a relatively inexpensive option designed specifically for projects like cabinets.
However, if you have larger projects planned for the future, you may want to opt for an airless sprayer that can fit both needs.
If you use your sprayer professionally, a compressed air sprayer will cost the most but will lend itself to the highest-quality work, which you may need.
An LVLP sprayer will usually be the most affordable option, but it’s only suitable if you only plan to use it infrequently and for thin varnishes.
Durability
The build quality of the sprayer you choose will play a significant role in how long your tool will last.
Sprayers made with robust compressors and aluminum spray guns are more likely to last through countless projects, while cheaper options with plastic parts may last through several projects but are more prone to damage.
Project Size
The size of your cabinets or other future projects can help determine what sprayer is best for you. HVLP and LVLP sprayers are best for smaller jobs because they don’t have a large spray radius. This gives you more precision but will make larger jobs take an unnecessarily long time.
Airless sprayers are better suited for larger jobs, but you can often tune them for use on smaller projects like cabinets. Some airless options feature an adjustable flow rate and spray area for use on different workpieces.
Tip Size
Many paint sprayers include varying tips for different spray radii and shapes.
Wide-angle tips allow for fast coverage of larger surfaces, like the broad side of a cabinet, but they produce more overspray than more focused tips.
Round spray tips allow you some accuracy for cabinet fronts and doors but aren’t ideal for large areas. Purchasing a sprayer that includes multiple tips is a great way to ensure your cabinet project is as quick and efficient as possible.
Air Powered Vs. Electric
Remember that airless sprayers use electric motors to compress paint, while all other options use compressed air to spray your medium. There are some advantages to both designs.
Air-powered sprayers waste less paint because electric options will stop moving your medium through the hose once the reservoir is depleted.
You can refill and continue working, but you’ll always lose the amount of paint that sits inside the hose and the gun at the end of your work.
Air options are easier to clean as well because you can use compressed air to clear the majority of your medium out of your hose and gun.
Electric guns tend to provide cleaner coats because the air from compressors can create bubbles in the paint on your work surface.
They are quieter during operation. However, they tend to be more expensive, and they don’t have as much adjustability as air options.
Power Rating
I recommend you pay close attention to the power rating of the electric motor or the air gun you choose.
Higher-powered sprayers will generally provide faster coverage, can be used for larger projects in the future, and can handle thicker mediums, like standard or even latex paints.
However, more robust motors or guns rated for a higher psi will be more expensive, and you’ll want to make sure they’re tunable for smaller jobs, like cabinets.
Adjustable Pressure/Flow Rate
Many sprayers include the ability to adjust some settings for different painting applications. Two of the most important are pressure and flow rate.
Higher pressure can make your sprayer usable with more mediums, and it can make larger projects more manageable. Lower pressure can give you greater control over thinner mediums.
The flow rate of paint or varnish is important because it determines how thick your coat will be.
Higher flow rates don’t give you as much precision, but they can apply adequate coverage to complete your project in a single pass, cutting down on your working time.
A lower flow rate will produce thinner coats, but you can use it for better accuracy and a smoother finish.
Capacity
All sprayers include a paint reservoir either attached to the gun or a separate base. The capacity will determine how long you can continue spraying before you need to stop your work and refill the tank.
A larger capacity may seem better in all cases, but you’ll also need to consider how heavy and unwieldy a full quart of paint can be if it’s attached to the gun.
I recommend you optimize the capacity to fit enough paint to make your job as efficient as possible while maintaining your comfort during your work.
Paint Sprayers Vs. Paint Rollers
Paint sprayers might seem like an unnecessary tool because you can opt for rollers instead. Sprayers are significantly more expensive, but the ease of application and the speed at which you can work often makes them worth the investment.
In addition to finishing your work in a fraction of the time, sprayers provide a much more professional-looking finish, which is important on cabinets that you’ll use and see daily.
For a quick demonstration of the time difference and application difficulty of sprayers vs. rollers, check out this video:
Frequently Asked Questions
Can A Beginner Use A Paint Sprayer?
Yes, beginners can use a paint sprayer! While they can seem difficult to master, with just a little practice anyone can use a paint sprayer.
There are lots of different paint sprayers on the market, and plenty of them are beginner-friendly. We recommend purchasing or renting one of these sprayers and seeing how you find it.
Starting by renting a sprayer can be a good way to see if it’s the right tool for you and can help you get some practice in too!
You can often rent them at an affordable price and save you splashing out on a paint sprayer that you won’t use often.
We recommend checking out some tutorials online too, as they are often geared towards beginners and are packed with helpful tips that can make your first use of a paint sprayer a pleasant one.
Don’t forget to read the instructions that come with your paint sprayer and follow them carefully. This is how you will achieve the best results possible!
Take your time, don’t be afraid to ask for help, and we are sure that you will find a paint sprayer fairly easy to use. Just don’t be disheartened if you struggle initially, it gets easier with time!
What Is The Ratio Of Paint To Thinner For A Spray Gun?
Generally speaking, you will want to thin the paint by 10%, or for every gallon of paint, you will want a quarter cup of water or thinner.
This is what is recommended for emulsion, acrylic, and latex paint, but we always recommend checking on the label of your paint and your spray gun’s instructions, as sometimes they can suggest different quantities.
It is always best to follow the guidance on the spray gun to avoid overloading it with thick paint, as that can damage the gun and leave you with chunky paint, which no one wants!
For those using an airless sprayer, you will want to increase the water by 20 or 30%. You can do this by adding more water or thinner to the paint, increasing the ratio that we suggested above.
You will also want to consider the surface that you are spraying the paint on. If it is an absorbent surface, then you will want to add more water.
For example, if you are using acrylic on an absorbent surface, you could add 50% water to thin the paint.
For other surfaces, you will want to keep it below 30% as we suggested earlier.
You will want to carefully consider the type of paint you are using and the surface that you are painting to ensure that you get the ratio correct.
If you run into any issues, we recommend speaking to a professional who can offer you more tailored advice.
How Do You Prepare A Spray Gun For Painting?
Before using your spray gun for painting, you will want to clean the gun to ensure that any paint residue from last time is removed.
You don’t want anything in the gun that could mix with the paint and ruin the task you are about to complete! Allow the gun to dry completely before you fill it with your mix.
Fill it with the mix just before you begin painting to avoid it settling in the canister. You will want to have prepared the room or area you are painting beforehand.
Be sure to cover the floor and mask areas you don’t want to get paint on with plastic and tape. You can remove this easily from your doors, windows, and other frames then once you are done.
Before spraying the paint, take some time to familiarize yourself with the nozzles and practice adjusting them. If you don’t have an adjustable nozzle, then be sure you can reach all the areas that you intend to paint.
Here, you can also adjust the flow pattern if you wish to ensure that it is appropriate for your task. You can find out how to do this in your user manual.
Spray guns don’t require too much prep before you use them, all you need to do is know how it works and put the paint in!
We do suggest that you check your instructions carefully beforehand to make sure that the manufacturer doesn’t suggest any extra preparation steps. If they do, be sure to follow them for best results!
How Do I Get A Smooth Finish With A Paint Sprayer?
To get a smooth finish with a paint sprayer, you can sand down the paint in between coats. Doing so will remove any rough parts of paint that would make the surface seem rough or uneven.
For best results, use light grit sandpaper and only do this by hand.
Not only will it remove small lumps of paint, but it can help to seal pores in the wood to create a glassy and smooth surface. When using your sandpaper, work parallel to the grains with long strokes.
Once sanded, be sure to dust off any debris or dirt before spraying another coat on top. This helps to ensure that the paint is applied to a smooth surface and will dry smooth and evenly.
You will also want to keep your arm straight when spraying your paint so that the lines apply uniform and evenly. This also helps to keep the paint smooth and should result in the desired finish!
Don’t forget to check the user manual for your spray gun too, to see if the manufacturer has any extra tips or advice that you can use to achieve a smooth result!
Wrapping Up: My Favorite Paint Sprayer
Paint sprayers will make painting or applying a varnish to cabinets significantly more manageable than any other application method, but getting the right sprayer for the job is important.
Optimizing flow rate, pressure, adjustability, and sprayer type can lead to an effortless application and professional finish quality.
My top pick for spraying cabinets is the Wagner Spraytech 0518080 Control Spray Max. It gives you control over your application, makes quick work of small projects like cabinets, and offers some adjustability for use on larger projects in the future.


Dan's interest in woodworking began while watching his dad build furniture in a pieced-together home workshop. He inherited old but reliable tools from his father and quickly became enamored with the ability to make something out of nothing. Starting with a simple picture frame and moving onto building all the furniture for his house, he's proud to have begun his own home workshop, built a stronger relationship with his dad through the craft, and developed a love of all things woodworking.