
Contents
A method of laying decking boards straight
Assuming the joists are fixed in place. If not go to How to Build a Deck
This is an ideal method of how to lay decking boards straight and is most suitable for extra long decks. It involves ‘pinging’ a chalkline where every third decking board is to go, giving a perfectly straight line of where to fix that decking board to.
Step 1.
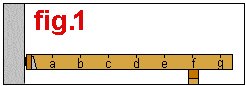
Along the two end joists, mark the outside edge of every third decking board. Start out from the building the deck is attached to e.g. If a decking board is 90mm (3 1/2″) wide plus a gap of 5mm (3/16″), then three decking boards including the gap would equal 285mm (11 1/16″). Therefore mark along the two end joists, out from the building, increments of 285mm (11 1/16″). See fig.1 .
Step 2.
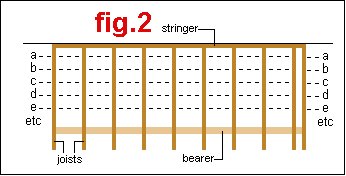
Mark a straight line, using a chalkline, from one end joist to the other end joist, from A to A, B to B, C to C etc. See fig 2
Step 3.
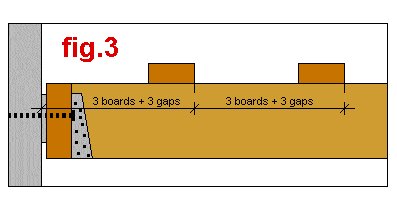
Lay and nail every third row of decking board on the building side of the chalklines. See fig.3. Make sure any necessary joins are made on joists. Let the decking overhang the end joists.
What a chalkline?
A chalkline is a builders stringline (a piece of string) saturated with powdered chalk, usually colored. The line is held taut at two points and then ‘pinged’ (in a bow and arrow type motion). The chalk flicks on to the lumber or material that the chalkline is ‘pinged’ against and leaves a perfectly straight line. Chalklines can be purchased from any building supplier and are relatively inexpensive.
Step 4.
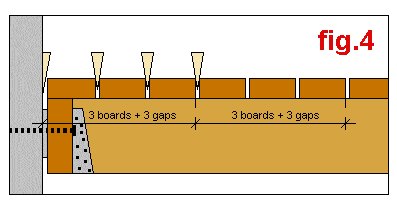
Lay the intermediate decking boards in-between the fixed decking boards and make the gaps even, using wedges to adjust where needed. This is done by eye. Nail the deck boards to the joists. Some hardwoods should be drilled before nailing to avoid splitting. Ensure any joins are staggered between rows (no two joins should be next to each other). see fig.4
Let the decking overhang both end joists while laying, and then trim them flush with the outside of the end joists.
Step 5.
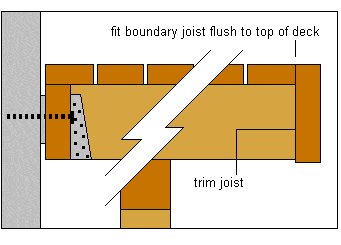
Cut the joist ends vertical and flush with the outside edge of the last decking board.
Nail the boundary joist around the perimeter of the deck making sure the top of the boundary joist is flush with the top of the decking. See diagram below.


Just made the table/bench and the Stick chairs with my daughter. Great projects, great instructions, and Great results.
Thanks, Thanks, Thanks.
Graham.
England.
p.s We used crimp ferrules on the ends of the wire.
Can I ask or can you explain (laying a straight deck article) why you lay every third row first, and then fill in the others by eye. What is better about doing it that way just curious.