
This project explains how to make a pebble path using 100×75 (3″x4″) treated lumber for the edgings, 20mm (3/4″) graded base course metal and a choice of a number of topings (pebbles, bark, shell, chip etc.).
A pebble path is easier and cheaper to construct than a paving stone path although regular raking can sometimes be necessary.
For this project we are assuming the ground is moderate to firm, if not, soft ground will need to be excavated deeper and replaced by base course metal.
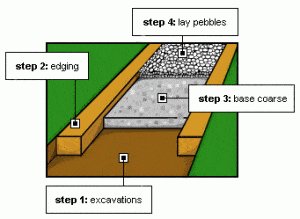
Step 1: Excavations: Dig out the proposed pathway to a depth of 75mm (3″) below finished path height (usually existing ground level) and the required path width.
Step 2: Putting down the edging: Lay the 100×75 (3×4) treated lumber edge boards into place so the top of the edge boards are at the required path finished height. Retain them in place with stakes nailed to the outside and trim the stakes off 20mm (3/4″) below the top of the edging board. (see drawing below)
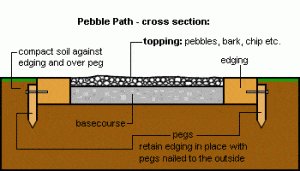
Step 3: Base course: Add a layer of 20mm (3/4″) graded base course metal in between the edging boards. 20mm (3/4″) graded means the metal is graded to 20mm (3/4″), and everything below this size is included in the product. Add and compact the base course with a mechanical plate vibrator until the finished height is 30mm down from the top of the edge boards. At the same time compact the soil against the outside of the edge boards thus ensuring
Step 4: Lay pebbles: Lay pebbles on top of the base course and flush with the top of the edge boards. Other preferences to pebbles might be garden bark, gravel, shells, white chip etc.


