Contents
A step-by-step example of how to make a concrete slab floor
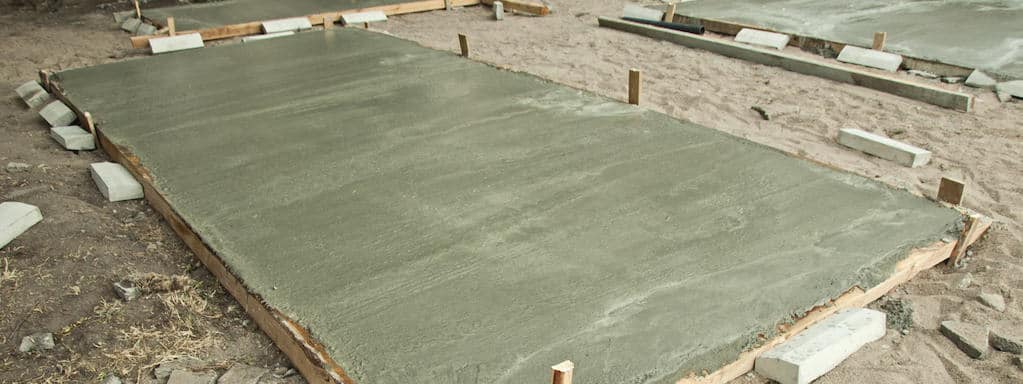
This article explains how to prepare the ground, pour and finish the concrete.
Example: A small shed floor:
A step-by-step example of how to make a concrete slab floor for a 1800mm x 1800mm (6ft x 6ft) garden shed.
The steps for this task are:
• Making up the formwork (the frame that borders the concrete and stops it spreading).
• Positioning the formwork on prepared level ground.
• Fixing the formwork in place with pegs.
• Digging a trench around the perimeter of the project.
• Mixing and pouring the concrete and placing a piece of reinforcing steel rod.
• Screeding and finishing the concrete.
• Dismantling the formwork.
Related topics: [What is cement] [What is concrete] [Reinforcing in concrete]
Materials you will need:
• Approximately 12m (40ft) of 100×25 (1×4) or 100×50 (2×4) for the formwork, brace and pegs.
• Three 40kg (94lb) bags of Portland cement.
• 0.2 cubic meters (7 cubic ft) sand.
• 0.3 cubic meters (11 cubic ft) gravel 20mm (3/4″) diameter and smaller.
• 10 meters (30 ft) #3 rebar (which is steel rod that is 10mm (3/8″) thick).
• Handful of 75mm (3″) nails.
Did you know? Cement is sold in bags of varying weights throughout the world. Common bag weights are: USA 94lb; Canada 87.5lb; UK 112lb; Australasia and parts of Europe 50kg and 40kg. There are also smaller bags sold as well.
Tools you will need:
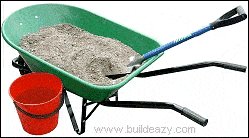
spade or small shovel; concrete finishing trowel; hammer; level; measuring tape; pencil; carpenters square; wheelbarrow; bucket.
Instructions
Make up the formwork
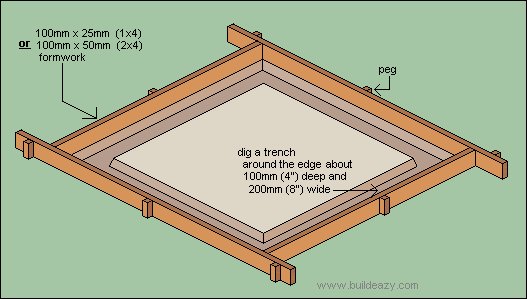
 Make up the formwork out of 100×20 (1×4) or 100×50 (2×4) lumber. The lumber should be straight but a low quality grade will do since it will eventually be discarded. The formwork is the frame that borders the concrete and stops it from spreading.
Tip: the formwork in this example DOES NOT have to be made up in place. It can be made up anywhere on even ground and carried in place later.
Cut two pieces of formwork lumber exactly 1800mm (6ft) long and cut another two pieces approximately 2400mm (8ft) long. Nail the four pieces together so that they make up a square with inside measurements of 1800mm x 1800mm (6ft x 6ft).
Ensure the formwork frame is square
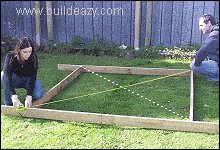
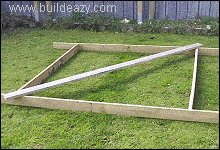 Ensure that the formwork frame is square. This can be done by making the diagonals equal length. Simply measure diagonally from corner to corner (see Step 1. picture) and then measure the other opposing two corners. The formwork frame is square when the distance between the opposing diagonals are equal.
When the formwork frame is square, nail a piece of lumber on top of the formwork frame from corner to corner, to make sure the formwork frame remains square until pegged in place.
The formwork is now ready to be picked up and carried into position, but first make sure that the ground has been prepared, that is, made level, with all vegetation and any soft ground removed.
Lay the formwork in place
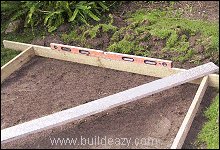 Lay the formwork in place. Ensure that it is level and then secure it by hammering pointed 50×50 (2×2) or 50×25 (1×2) pegs at 900mm (3ft) intervals against the outside of the formwork.
Nail the pegs to the formwork but not all the way in, as the nail will need to be pulled out later.
Dig a trench around the perimeter
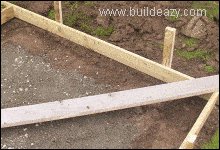 Dig a trench around the perimeter of the floor area about 100mm (4″) deep and about the width of the spade wide or about 200mm (8″). This is like a ‘footing’ to give the perimeter of the concrete floor more depth and strength, as that is the part of the floor that will be supporting the shed walls.
Saw off the tops of the pegs
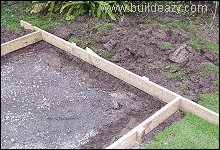 Saw off the tops of the pegs so that they are even with the top of the formwork. The area is now ready for concrete.
Dampen the pour area
 Lightly hose (dampen) the pour area with water prior to pouring the concrete. Work as quickly as possible when placing concrete in formwork
Safety Tip: Prolonged contact with fresh concrete will burn your skin. Wear safety goggles, gloves, rubber boots, and long sleeves when working with concrete.
Start pouring the concrete
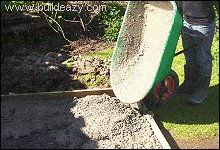 Start pouring the concrete into the pour area. Fill up the trench (footing) first to a height approximately 75mm (3″) below the top of the formwork.
You can now place your rod of reinforcing steel on top of the concrete.
The reinforcing steel will help to control cracking and also help hold the concrete slab together.
Lay a rod of #3 rebar
 Lay a rod of #3 rebar (which is 10mm (3/8″) thick reinforcing steel), around the perimeter of the pour area. The rod should be at least 50mm (2″) in from the formwork and at least 50mm (2″) down from the top of the formwork.
Wherever the reinforcing rod joins, make an overlap of at least 400mm (16″) and tie together with tie wire.
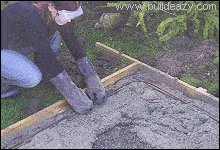
Fill the pour area up with concrete
 Fill the pour area up with concrete approximately to the height of the top of the formwork.
Tap around the outside of the formwork with a hammer. This will vibrate the wet concrete and help it to settle, as well as getting rid of any air pockets.
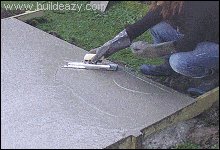
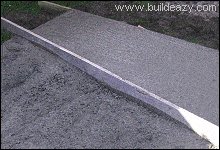
Use a straight piece of lumber (the bracing piece off the formwork will do) to “screed” or level out the concrete. Work the screed board back and forth with a sawing motion along the tops of the formwork until the concrete is level all over
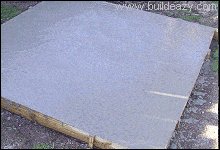
Smooth over the concrete
 Smooth over the level concrete with a trowel or float. Hold the blade flat against the surface and sweep it back and forth in wide arcs.
Tip: you will probably not get it near perfect in the first going-over, but that doesn’t matter. Leave it until it dries a bit or until all the excess surface water has evaporated and then re trowel.
A novice may need to go over it another two or three times to get a nice smooth finish, letting it dry a bit before each going over
For concrete floors that are inside, a smooth finish is usually required and so a steel trowel should be used because it gives a smoother finish.
However, outside concrete slabs, paths etc could get slippery in the wet if the finish is too smooth, so a wooden float would be better
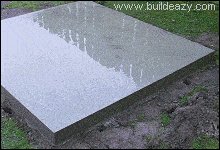
Re-trowel when excess surface water has evaporated
 Re-trowel when all the excess surface water has evaporated. If the finish is still not as good as you would like, then let it dry a little bit more and then give it yet another going over with the trowel. Each time gets easier and makes the concrete more smoother.
Remove the formwork
 The formwork can be taken off the next day ONLY if it can be easily removed. If for some reason the formwork needs a lot of hammering and knocking to remove it, then best leave it in place for three days or so, until the concrete is hard enough to withstand the punishment.
NOTE: The concrete will now need to set (cure). Keep the concrete moist for about three days by hosing with a fine mist every now and then. This is especially crucial in warmer conditions.
Concrete in direct hot sun should be covered with some type of building wrap, roofing felt or shaded, for the curing period. If you must pour the concrete on a very hot day, then leave it till mid or late afternoon.
Concrete sets very fast on hot days in direct sunlight and can be hard if not impossible to work with. This is especially a concern when you’re hand mixing, which requires a bit of time.


Awesome steps, thanks for sharing!
Thanks for sharing this great and useful information.
Wow great explanation! Thank you very much, I’ve been wanting to redo my garage floor but couldn’t come to pay out the money to hire someone. This is definitely quite handy at a time like this!
Thanks kindly for the information. I usually stick with stone and brick, but getting into concrete more lately.