 Step 1:
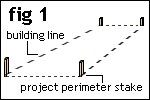
measure and stake the four outside corners of your project (fig.1).
The stakes can be any timber, as they will be discarded. 20×20 and 150mm long would suffice or even bits of steel rod.
 Step 2:
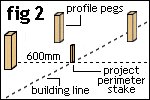
Cut 12 profile pegs 600mm long out of 50×50 timber (or similar).
Cut a point on one end of each profile peg so they can be hammered into the ground easily.
Position the twelve profile pegs as shown in fig.2 and fig.2b, (3 at each corner) and hammer them into the ground until they are firm.
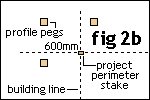 The profile pegs should be at least 600mm out from the building line to allow room to dig the corner footing holes.
Step 3:
Mark a level line on all twelve profile pegs approx 100mm above ground level. (by keeping the profile boards close to the ground saves the need for profile bracing). Find a level line by using the bucket and hose water level method. click here
 Step 4:
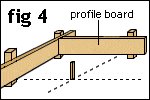
Once a level line has been established and marked on all twelve profile pegs, proceed nailing profile boards to the profile pegs so that the top of the profile board is flush with the level line that has been marked on the profile pegs.
The profile boards (8 in all) can be 100×25 boxing grade timber, each about 1 meter long. see fig.4
 Step 5:
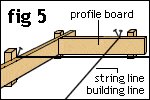
Run a string line from profile board to profile board passing over the perimeter stakes and fixed to the profile boards between 2 nails as shown in fig.5.
This will now show the approximate building line and perimeter of your project, but more exact measurements are needed.
 Step 6:
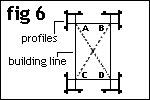
Parallels.
Check that distance between A and B (fig.6) and the distance between D and C. are equal. If not, make any necessary adjustments by moving the string line in or out along the profile board. Also the distance between A and C and the distance between B and D need to be equal. Make any necessary adjustments.
Once the perimeters are parallel, the diagonals need to be measured to see if the building line is square.
Do this by measuring the distance between A and D and the distance between B and C (the diagonals). Make any necessary adjustments to ensure the diagonals are equal and if adjustments are required, recheck the parallels again as altering the diagonals will also change the parallels.
When the building lines are parallel and the diagonals are equal the building line is then square. You now have a level, square building line to work off.


I am teaching applied technology to years 10 and 11. For year 10 we are on the topic of building construcrion – basic skills needed in this area of study. The information you aee sharing is the kind that we need. Thank you for sharing and God bless.