Contents

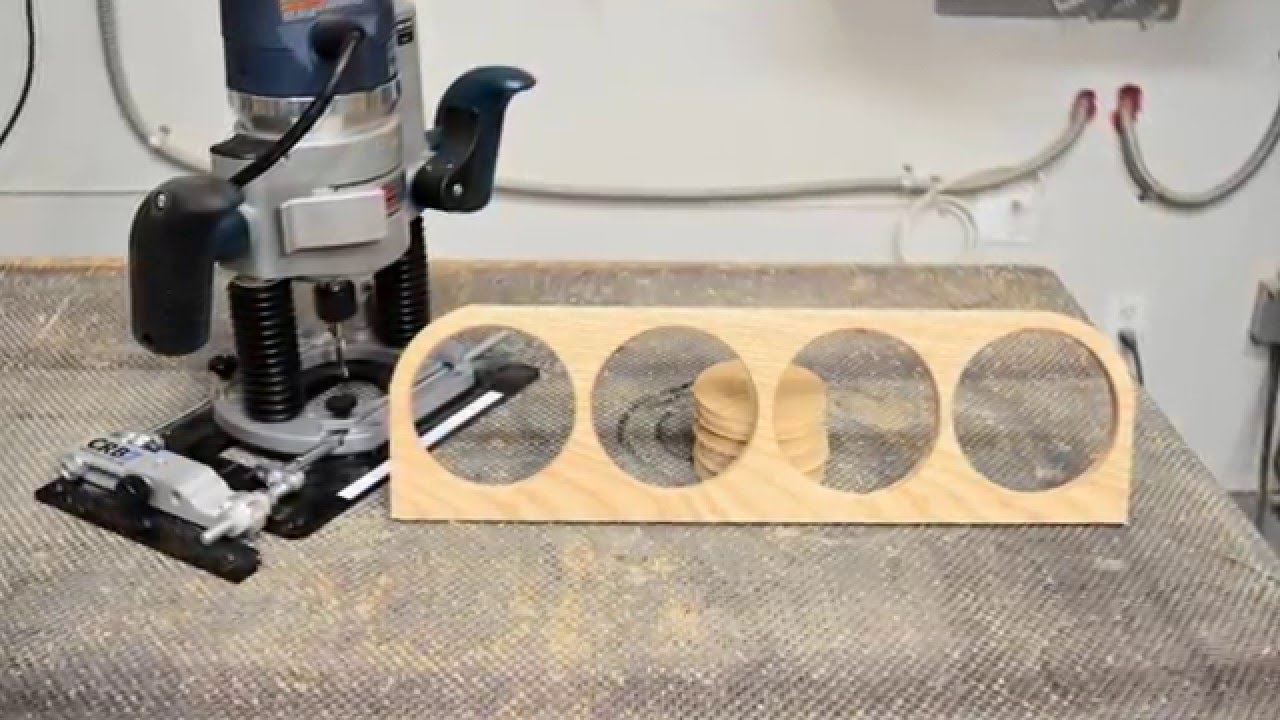
One of the challenging aspects of woodwork is cutting circles and curves in wood. You must have the right tools, and more importantly, you have to know how to approach it so that you make a perfect cut. If you want to learn how to cut outstanding curves and circles using a wood router, read on the instructions below.
[su_list icon=”icon: arrow-circle-right” icon_color=”#4f8901″]
- Router
- Drill
- Drill bits
- Hammer
- Measuring tape
[/su_list]
[su_divider top=”no” style=”default” divider_color=”#444″ size=”3″ margin=”15″ class=””]
[su_dropcap style=”flat” size=”2″ class=”” dropcap_color=”#fa5738″]1[/su_dropcap]
Step: Mount the router base to a pivot
[su_divider top=”no” style=”default” divider_color=”#444″ size=”3″ margin=”15″ class=””]
You want a single rod with a circular end to which you will mount the base router. Once you have the router installed on to the rod, place it where you need it and use clamps to hold it down. Drill a hole through the other end of the wooden rod. The hole will hold a single nail that will act as the pivot point.
Where possible, make adjustable points that will allow you to elevate or lower the router while the task is on-going. This is optional but will let you to cut circles and curves of different depths and dimensions.
[su_divider top=”no” style=”default” divider_color=”#444″ size=”3″ margin=”15″ class=””]
[su_dropcap style=”flat” size=”2″ class=”” dropcap_color=”#fa5738″]2[/su_dropcap]
Step: Set the radius
[su_divider top=”no” style=”default” divider_color=”#444″ size=”3″ margin=”15″ class=””]
You have to set the radius of the circle or arc according to the item you want to make. Align up the cutter flutes with the axis that stretches from the trammel point to the centre of the cutter. Adjust the diameter to suit the size of the circle or arc. If cutting outer circles or curves, ensure the radius sits between the trammel point and the closest cutting edge.
[su_divider top=”no” style=”default” divider_color=”#444″ size=”3″ margin=”15″ class=””]
[su_dropcap style=”flat” size=”2″ class=”” dropcap_color=”#fa5738″]3[/su_dropcap]
Step: Protect your wood
[su_divider top=”no” style=”default” divider_color=”#444″ size=”3″ margin=”15″ class=””]
As the radius trammel swipes, there a risk of it causing marks on the surface of the wood you are cutting. You do not want to impair the surface of your wood as you cut. To protect the surface, place a thin piece of wood between the wood you are cutting. Hold it in place using some tape; this way, you eliminate the risk of damaging the wood while cutting.
[su_divider top=”no” style=”default” divider_color=”#444″ size=”3″ margin=”15″ class=””]
[su_dropcap style=”flat” size=”2″ class=”” dropcap_color=”#fa5738″]4[/su_dropcap]
Step: Use a strong trammel for large radius for cuts with large radius
[su_divider top=”no” style=”default” divider_color=”#444″ size=”3″ margin=”15″ class=””]
You cannot use a sing rod trammel to cut a considerable radius. The longer the trammel, the more it flexes. The flexing will lead to irregular cuts of the curve or circle, and the radius will lose shape as while you are cutting. To avert this possibility, you need to use a stronger trammel. The solution is to use a twin-rod trammel saw (a flat-beam saw is an alternative), which already has a sub-base for the router.
[su_divider top=”no” style=”default” divider_color=”#444″ size=”3″ margin=”15″ class=””]
[su_dropcap style=”flat” size=”2″ class=”” dropcap_color=”#fa5738″]5[/su_dropcap]
Step: Set the trammel to swing freely
[su_divider top=”no” style=”default” divider_color=”#444″ size=”3″ margin=”15″ class=””]
You want the wood router to swing freely when using the trammel freely. First, make sure the centre point lies precisely where you want it. A good practice is to feed the timber against the rotation of the cutter to reduce the force acting along the axis of the trammel rod. Be careful, as pulling it from away from the centre will cause you to lose the centre point, and consequently, you will have to restart the task. A tip on the cutting direction is “always cut counter-clockwise while working on the outside and cut clock-wise when working on the inside.
[su_divider top=”no” style=”default” divider_color=”#444″ size=”3″ margin=”15″ class=””]
[su_dropcap style=”flat” size=”2″ class=”” dropcap_color=”#fa5738″]6[/su_dropcap]
Step: Maintain the size of the centre hole
[su_divider top=”no” style=”default” divider_color=”#444″ size=”3″ margin=”15″ class=””]
You want to make perfect cuts when you finish cutting the whole circle. However, you can quickly lose your accuracy when the trammel point enlarges the centre hole. If you want to make more than one identical cuts use the same central point, you should replace the centre point with a small rod that fits into the hole of the pad.
[su_divider top=”no” style=”default” divider_color=”#444″ size=”3″ margin=”15″ class=””]
[su_dropcap style=”flat” size=”2″ class=”” dropcap_color=”#fa5738″]7[/su_dropcap]
Step: Make even and steady movement with the router
[su_divider top=”no” style=”default” divider_color=”#444″ size=”3″ margin=”15″ class=””]
You may find it a challenge to maintain a smooth and steady cut, but you learn this quicker. A trick is to swing the router as far (while you cut) as far as your hand could reach. When arms cross, switch hands and continue cutting your circle. Do not stop; keep changing hands while cutting, so you achieve a perfect circle when you finish. A pause while changing hands will cause the router to make a burn mark on your wood, thanks to friction.
The smallest radius of the circle you can cut with a router is equal to the size of the base of your router. You may find this radius big for smaller cuts. You can get trammels with guide holes to help you cut smaller circles. When cutting smaller circles with these trammels, the pivot point will mount underneath the router.