Contents
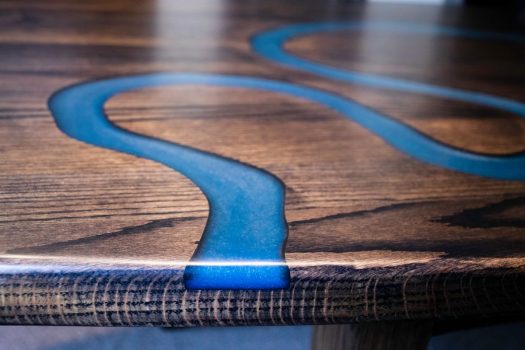
Epoxy tables are super trendy and they look like a true piece of art.
It might seem that only professional craftsmen can make a stylish epoxy resin table but it’s much easier than you might think.
You only need wood, resin and a few other materials as well as some tools to make your own resin river table at home.
If you want to create your own artful epoxy table, then you can find a step-by-step guide with all the details below.
We also put together some essential tips on how to give your epoxy table a professional look and finish.
Why Are Epoxy River Tables So Trendy?
Epoxy resin tables see a steady increase in popularity around the world, and this has a good reason.
These tables aren’t just a standard piece of furniture. They are unique and individual. Each table is a piece of craftsmanship that is created by hand.
Even bought epoxy resin tables are made by professional wood experts by hand which means that they may be similar in design but each table is fully unique.
Another reason why resin tables are so popular in the US and around the world is that they fit with almost any style and home decor.
When you make your own resin river table, then you can choose to match the color of the wood and the resin color to your furniture.
But you can also create a piece of resin furniture that creates a contrast in your room.
This will make your table stand out and it makes your handmade the centerpiece of your home.
You can get epoxy tables in a variety of styles and colors but making your own means you can create a table that fits with your furniture and also your personal preferences.
Resin tables are so versatile and this is what makes them a popular choice for many homes.
How To Find The Best Resin For Your Epoxy Tabletop?
One of the most essential materials that you will need for your epoxy table is the right type of resin.
You will need two types of resin: resin for pouring the tabletop and resin to add a final coat to your tabletop.
There are thousands of different resins available online and at hardware stores but there are a few things you need to look out for when buying your resin.
Epoxy Resin For Pouring Your Tabletop
Finding the right resin for the main part of the tabletop can be a challenge with so many other products out there.
Resin Should Be Durable
It’s a good idea to make a note of what you want from your tabletop first. Ideally, you want the resin to be scratch resistant and durable.
Even though you will be adding a top coat of resin on top of the poured tabletop, it’s important that the meat of your tabletop can withstand any scratches or damage.
You also need to consider the color of the resin.
Most people prefer to have a clear casting resin for their tabletop project as it allows you to see the wood underneath.
Good Quality Resin
When it comes to choosing a resin for your poured tabletop, then you need to make sure that you are using high-quality resin.
There is a vast range of quality and price difference in resins, and it’s worthwhile investing in a more expensive resin to ensure you get the best quality.
The quality of the resin will directly affect the quality of your epoxy table.
With a premium resin, you can keep any imperfections or bubbles in your tabletop to a minimum.
This will create a smooth table surface and it will also look nicer.
Easy To Use
Not all epoxy resins are easy to work with, so it’s a good idea to read some reviews and check out how your resin should be poured.
The ease of use of epoxy also depends on its formula. Some resin formulas are thicker and more difficult to pour than others.
Saying this, thicker resin with a low viscosity doesn’t cure as fast as thin resin, so you have some time to pour the resin and work with it.
When it comes to choosing the right resin for your epoxy tabletop, you also need to consider how quickly you can work.
Resin can dry very quickly, so you don’t have much time to remove any bubbles or imperfections from the resin before it gets hard.
If you have to worry about the time you have when pouring resin, then you may end up over pouring.
That’s why, we recommend that you use a resin that doesn’t dry too quickly, so you have enough time to concentrate on the pouring before the epoxy cures.
Depending on what the resin is sold in (bottles or tubs), you may also have to consider using a temporary container while you are applying the resin.
Some bottle resin applications can be a little more difficult, so make sure to read some resin reviews before you buy your tabletop resin.
Compatibility With Colors And Pigments
If you choose a clear resin and you want to add some pigments or colors to your table, then make sure that your epoxy is compatible with your chosen coloring.
Suitable For Wood
For a wooden table, you will need to choose a resin that is suitable for use with real wood.
There are so many different resins that you can pour on different types of surfaces, so make sure that you check the packaging to find out what you can use this resin on.
Tabletop Resin For The Table’s Final Coat
Once you pour your main part of your resin table, you should add a final top coat to your new piece of furniture.
The finish of your table is important as the final finish will make it look professional and stylish.
We would always recommend adding a final resin coat to your table project to keep it protected from scrapes, scratches and any damage.
Your final coat resin will be part of the finishing touches that you want to put on your table.
You might want to sand down the edges to ensure they aren’t sharp or you might want to add a little bit of wood stain for a soft wood finish.
Besides all this, it is a good idea to consider a finishing coat to add to your existing resin filler of the main tabletop.
Durable And Flexible Resin
One of the main reasons why a finish coat is so important for your tabletop is to protect your table from damage.
Many tables are heavily used and we put a lot of different things on our tables that can scratch and damage the surfaces, such as keys, hot cups and food.
When you use a durable resin as your top coat, you can help keep your new epoxy table look new and shiny for much longer.
A smooth top coat also allows you to just wipe your table with a damp cloth, so there is no need for a lot of cleaning.
Versatile Countertop Resin
When it comes to choosing your final coat resin, then make sure that it’s versatile enough for your tabletop project.
Whether you want to add glitter, mica powder, sequins or dyes, it’s best to pick a resin that is suitable for whatever way you want to finish your epoxy table.
Heat-Resistant Resin
Try to find an epoxy resin that’s heat-resistant up to at least 470 degrees Fahrenheit.
This will ensure that the resin doesn’t melt in hot temperatures or when you put a hot mug on your tabletop.
Keep Safety In Mind
We’ll go into more detail about safety below but whatever resin you choose shouldn’t be harmful to you, your family, your pets and the environment.
Saying this, as resin is a chemical, it’s still a good idea to wear personal protective gear when you are working with any type of resin.
UV Resistant Resin
If you want to use your resin table outdoors, then you will need to find a premium resin product that’s not just waterproof but also UV-resistant.
With UV resistant resin, your table won’t lose color or turn yellow in the summer months when it’s standing in the sun.
How To Choose The Right Wood For Your Resin Table?
Choosing good-quality materials for your resin table makes a big difference to the end result.
Besides the resin, you will also need to look for the right type of wood.
Similar to the resin, you don’t want to skimp on the quality of the wood as this can affect what your epoxy resin table will look like in the end.
You want to create a sturdy and durable table that can withstand anything you throw at it, including any scratches, liquids or hot cups.
It’s important to remember that making your own handmade resin table takes quite a bit of money, time and effort, so you want to ensure that your table is worth all your labor.
That’s why it’s essential to choose solid wood that can withstand the test of time.
We always recommend using natural wood. There are plenty of different wood options to choose from at DIY stores.
You might also want to consider the grain and how it might look in your finished table.
If you have some experience with furniture making, you can even use a part of a tree trunk with the bark on.
However, this will need special treatment to ensure that the wood is preserved and suitable for furniture use.
Luckily, you don’t have to go out into the woods and cut a tree yourself.
Just check with some of your local carpenter workshops and see what they offer.
Alternatively, you can also use standard wooden boards with a served shape on one side.
Whatever type of wood you choose and wherever you decide to buy it from: make sure that your table wood is fully dried.
The moisture content of your wood should be less than 12%. This is important because wet wood that’s full of water will crack when it dries over time.
A Step-By-Step Guide: How To Create Your Own Epoxy River Table
Now that you know how to choose the two key materials of your river table, resin and wood, it’s time to talk about how you can make your own resin table.
Materials You Will Need To Make A Resin Table
- Resin
- Wood boards
- MDF boards (16 mm thick)
- Good-quality bristle brush
- Release agent
- Circular saw
- Chisel
- Measuring tape
- Protective glasses
- Protective gloves
- Microfiber cloth
- Vacuum cleaner
- PPE mask
- Drill with mixer attachment
- Heat gun or blow torch
- Hot glue or screws
- Plastic hammer
- Wood oil
- Polishing machine and polishing paste
- Spatula
Preparations
All good quality pieces of furniture start with some solid preparations.
You will need to get all your materials together, prepare your work surface as well as your wood.
Prepare Your Workspace
If you are working with epoxy resin for the first time, then it’s a good idea to familiarize yourself with its properties first.
Epoxy is a sensitive substance which is affected by temperature and humidity.
Too high or low temperatures as well as humidity can affect the curing time of the resin.
This means that you will need to prepare your workspace to ensure the resin has the right conditions for your tabletop pouring.
We recommend that your workspace is a minimum of 20 degrees Celsius. This is the best working and storage temperature for resin.
While epoxy resin can handle minimal temperature fluctuations, the room temperature should not go lower than 17 degrees Celsius.
Another thing to bear in mind when preparing your workspace for any work with resin is where you store the resin.
When you store resin on a cold floor, then you will notice small bubbles form in the resin which will make it difficult to pour, and it also looks unsightly on your table.
It’s almost impossible to remove these bubbles from the epoxy, so make sure that you store your resin on a shelf or a workbench.
Another fact to keep in mind when working with resin is that it picks up even the smallest particles, such as dust.
This means you need to ensure that your work environment is dust-free.
Your space should also be well ventilated as working with resin can create toxic fumes.
Prepare Your Wood Board
This step depends on the type of wood you have chosen for your wooden resin table.
You can either buy your wood board in the right length and thickness or you can cut the board yourself.
If you choose to cut your wood timber, then you will need a planer and a circular saw to cut everything to the correct thickness and length.
You will also need to cut the wood through the middle to create the two wooden sides of your river table.
If you don’t want to cut the wood yourself, then you can get the right length wood in a carpenter’s workshop or a DIY store.
Make sure that your wood board has the right table length and thickness.
If you don’t have any experience with processing wood, then buying a ready-made wood board is much easier and it saves you some time.
Plus, you won’t need any of the tools and machines to cut your materials.
If you find that your piece of wood is very large to start with, then it’s a good idea to check with a professional how you can cut it down easily.
When you prepare your wooden board, make sure that the two pieces of wood are identical. They should have the same thickness and length.
Before you start working on your resin table, check that the two pieces of wood are the same length and thickness.
Both should have the side edges cut at right angles or you may want to round the outer sides off.
It’s also worth checking if your wood pieces are absolutely flat.
When working with natural materials, such as wood, then it can easily happen that one piece isn’t quite even.
If you are not sure how to process or prepare your wood board, then you can also ask a joiner to prepare the wood.
Step 1: Remove The Bark And Sand The Wood
While natural wood looks beautiful, you need to create a smooth surface for your table, so the first step is to remove any bark.
You can use a simple chisel for this but be careful not to crack the wood underneath.
Once you have removed all the bark, it’s time to sand the wood with some sandpaper. Start working along the edges first.
The sanding will help the resin and wood combine better, and the end result will also look more professional.
Then, you will need to sand the rest of the larger wood surfaces. It’s easier to use an electric sander for this.
Start with 80 grit sandpaper and then slowly go up to 220 grit sandpaper. Make sure to remove any of the dust between each grit size.
We found it easier to finish the sides and edges off by hand as you may run the risk of taking too much off with an electric sander.
Once you sanded the wooden surfaces properly, you will need to remove all the dust and clean the wood.
We tried a few different tools but a vacuum cleaner still works best for removing the majority of the dust, and then wipe the surface with a microfiber cloth.
Step 2: Fill In Any Cracks And Seal The Wood Board
Now that you have a flat surface and the wood board is smooth, you can start repairing any cracks or unevenness in the surface.
In order to create a fully flat surface, it’s important to level the wood surface fully.
You only need a little bit of unpigmented, crystal clear epoxy resin to fill in any cracks.
If you notice any uneven spots in the wood surface around the edges, then you can also use extremely strong adhesive tape to cover the surface.
This will ensure that the resin doesn’t run over the edges and into the porous cracks.
After you finish filling in the cracked areas, you will need to allow the resin to dry. Once everything is dry, you need to seal the whole wood surface.
Use crystal clear resin and apply it all over the wood board surfaces.
This should create a solid seal preventing any possible overflowing of the resin later.
The best way to apply the resin is with a strong bristle brush. It’s worth buying a good quality brush as you will be using it a lot for your resin table project.
Plus, you don’t want any of the bristles ending up in your resin. Once any bristles are stuck in a resin layer, it’s impossible to remove them.
When you are done applying the clear resin to the entire wood surface, allow the resin to cure for as long as possible.
Make sure that the resin can dry in a room with a temperature of 18 to 24 degrees Celsius.
After your table has cured, you just need to gently roughen the inner edges of wood with some sandpaper.
This is the area where you will pour in the resin later.
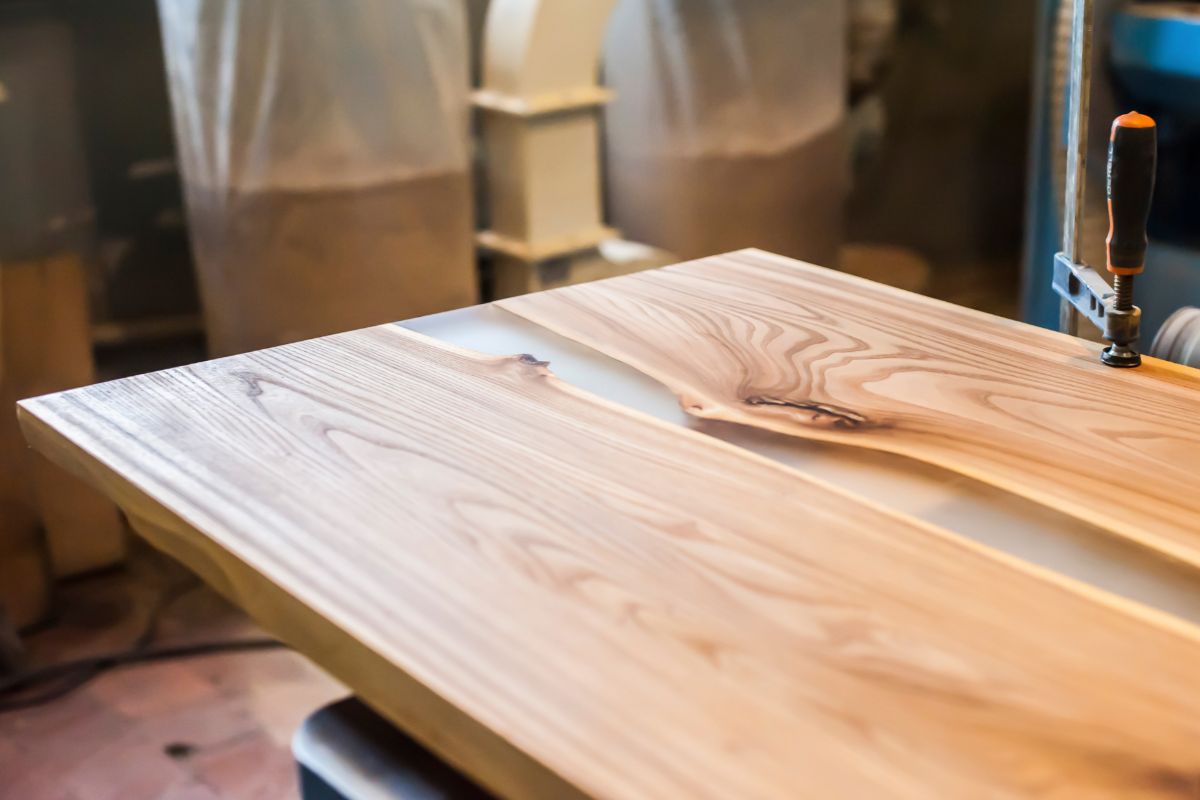
Step 3: Build The Framework For Your Tabletop
While your table wood is drying, you can create a mold or frame for the tabletop. This needs to be in your chosen size and length of your table.
While building a frame sounds really complicated, it’s actually not that difficult. You can use some basic MDF board for the mold.
You will need to measure carefully and double check all your measurements before you put the frame together.
We found that a 16 mm thick MDF board for both the sides of the tables and the undersides, works very well.
The side panels of your framework need to protrude the tabletop by around 15 mm.
You will need to either screw the individual parts together or you can also join them with hot glue.
Just bear in mind that glue usually takes some time to dry, so may not be an option if you are keen to get on with your project.
The edges need to be sealed once they are joined together. You can use standard sanitary silicone for this.
It is essential that you make sure the mold is tight and no epoxy can leak out later.
Once you seal your tabletop frame, you will need to apply a release agent.
This substance will ensure that your resin doesn’t stick to the MDF frame when it’s drying.
As an alternative to release agent, you can also use adhesive tape, liquid release wax or silicone spray.
Apply a few layers of the release agent across the entire surface of the frame and allow it to dry.
Step 4: Insert The Wood Into The Mold
It’s time to put the wood into your frame but before you start, check your work surface is fully level.
This is essential that an uneven surface could make the resin surface uneven and the resin might also leak out of the mold.
Place your mold on the even surface and then put your wood into the frame.
Adjust the wood boards to ensure that it’s exactly in the position that you want it to be.
You need to make sure that the wood boards stay in place while you are pouring the resin, so place small weights or objects on top.
However, bear in mind that they could come in contact with the resin.
We recommend that you also add a barrier of sanitary silicone to the inner edges of the wood.
This will prevent any spillage or over-poured resin to leak to the rest of the tabletop.
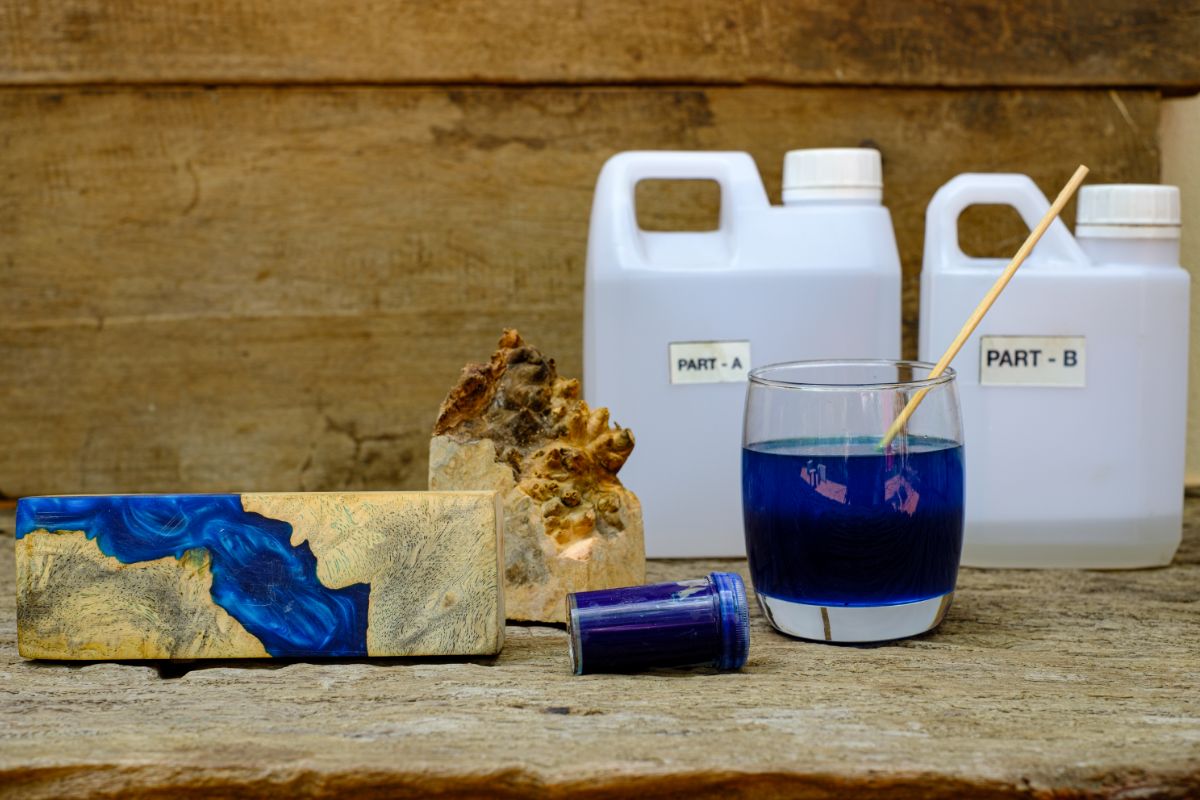
Step 5: Mix The Epoxy Resin
Now that you have all your wood in place, it’s time to mix your epoxy resin.
It’s important to remember that you should always wear gloves, breathing protection and safety glasses and you are working with resin.
Once you put your protective gear on, you are ready to mix the resin in a large bucket.
The bucket should be big enough to hold the first layer of resin. It’s better to use a larger bucket to ensure that there are no spills or drops.
Resin is difficult to clean up, so just take a large-size bucket that is wider than its height.
This type of bucket will keep the temperature of the resin low.
This is essential as resin gets hot very quickly, and it can even boil which makes it unusable.
This is the reason why it’s important that you only mix one layer at a time.
How mix resin you need to mix for each layer depends on the thickness of the tabletop.
Your resin should come with clear instructions how much you will need to create a certain thickness.
Make sure that you follow the manufacturer’s instructions carefully, especially the mixing ratio.
You will then need to blend the individual components of the epoxy with a drill with a mixer attachment.
This will combine all the components well.
You will notice a few air bubbles rising in the resin after the mixing. Just remove them by using a heat gun or blow torch.
Saying this, be extremely careful when using either of these tools on resin as they can increase the temperature of the epoxy possibly damaging the substance.
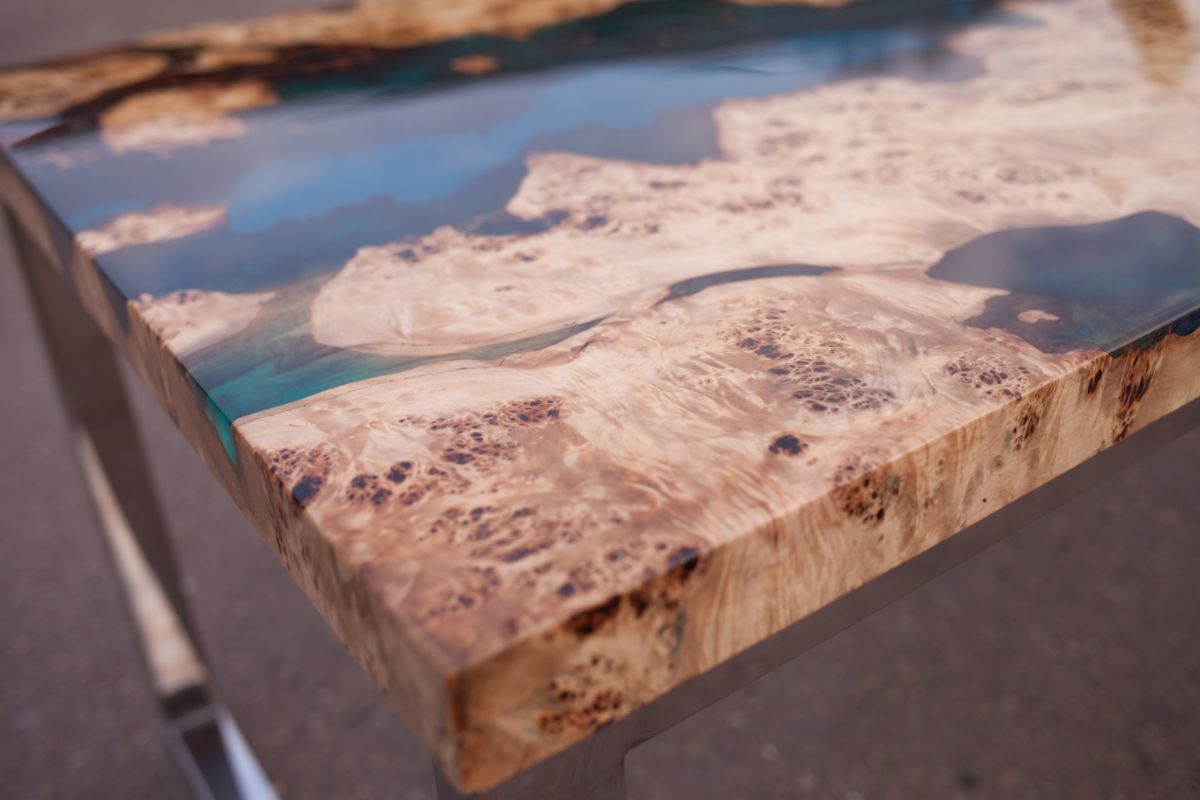
Step 6: Cast The Resin And Create A River Water Effect
When you are casting your resin, the quality of the resin will show immediately.
If it’s easy to cast without bubbles, then you are using a high-quality epoxy.
Clear-cast resin can also be poured in a single layer, so you don’t have to worry about different casts in a single layer.
But where premium clear cast resin comes into its own is when you are adding color for your water effect table.
For this water effect, you need to add your color pigments after you mixed the hardener into the resin.
This is relatively easy to do. Divide your mixed epoxy resin in two containers or buckets. Ideally, put a little more of the resin into one bucket.
Put some color pigment in turquoise or teal into the larger resin bucket and then mix everything thoroughly.
Then put some blue pigment into the bucket with the smaller amount of resin.
Blend this with the drill mixer attachment until it has all fully combined.
These two colors allow you to create the natural water look in a river table but it’s worth mentioning here that you can use any colors of your choice.
Once you have your resin mixtures, you can fill the gap between the two wood boards in your MDF mold.
If you are working on your table on your own, then you can just slowly pour the resin into the mold.
Alternatively, if you have a second pair of hands to help you, you can pour both resin colors simultaneously.
You can be as creative with the pouring as you like. Small circular movements will create a beautiful ripple effect that look almost like real water.
But you can change the pattern shortly after the pouring by using a wooden stick or any long object that you can dispose of later.
Make sure that you work as quickly as possible as resin starts to dry slowly from the moment it comes into contact with air.
Depending on your type of resin, you might have a little longer to play around with your water effect table design but it shouldn’t take too long.
Once you are done, you just need to let the resin cure fully (check the resin label for exact curing times).
Step 7: Alternative Designs With Crystal Clear Resin
You can create any number of designs with resins and you don’t even need to use colored resin for your DIY table.
A really fun way to create a stylish and unique piece of furniture is by using clear resin epoxy and embedded objects.
This may sound complicated but it’s super easy. You just need to pour the first level of clear resin quickly but with care.
Then go over the resin with a hot air dryer swiftly but make sure that you don’t expose the resin to heat for too long.
Anything longer than 3 seconds in the same spot can damage the resin and burn the components, and you would end up with an ugly-looking yellow epoxy.
Once the resin has partially hardened, you can pour the second layer.
It’s important that the first layer surface is still sticky before you pour the second resin layer.
This is essential as the two layers can only bond when the first layer is still sticky.
If you waited too long and your first layer has cured, then allow it to dry fully and sand it with 220 grain sandpaper.
Next, clean the surface thoroughly and then pour your second layer.
Depending on the size of your objects that you want to embed, you should add them in the second layer.
This is the best place as the first layer has dried by then and the objects won’t be able to sink to the bottom of your resin table.
Once you have embedded your crystals, pebbles or other objects, you can fill in the resin layer to the table edge.
Just allow everything to dry completely as per the manufacturer’s instructions.
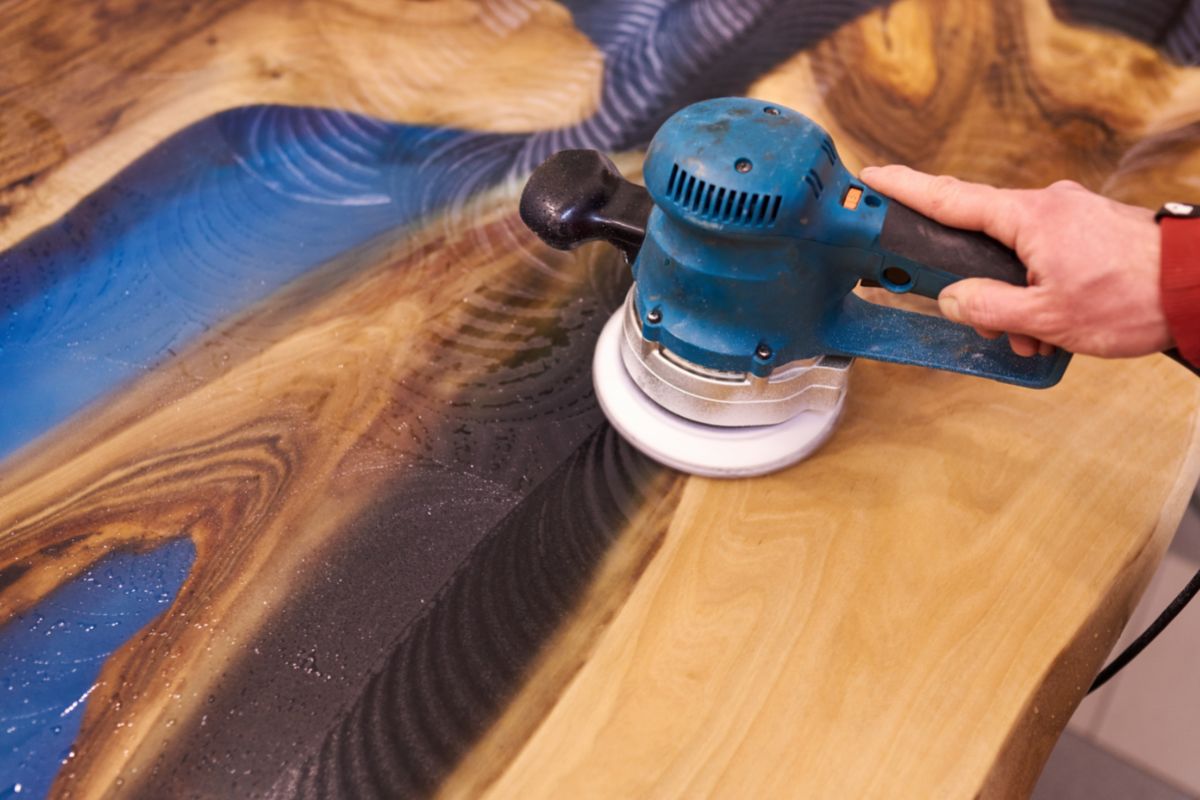
Step 8: Remove The Casting From The Mold
After your resin has fully cured, you can release the cast tabletop from the frame.
The best way to do this is by removing any screws and clamps that hold the mold together.
Then slowly and carefully loosen your resin tabletop from the mold with a plastic hammer and chisel.
Once you have removed your tabletop from the framework, you can sand the resin tabletop.
It’s best to do this by hand as you can control better how much of the surface you are taking off.
However, if you are in a hurry, you can also use an orbital sander with 80 grit sandpaper going up to 400 grit.
The higher the grain of your sanding paper, the lighter the surface of your resin river table will look later.
Keep this in mind when you want to achieve a darker look. Make sure that there is no resin left on the wooden part of the tabletop.
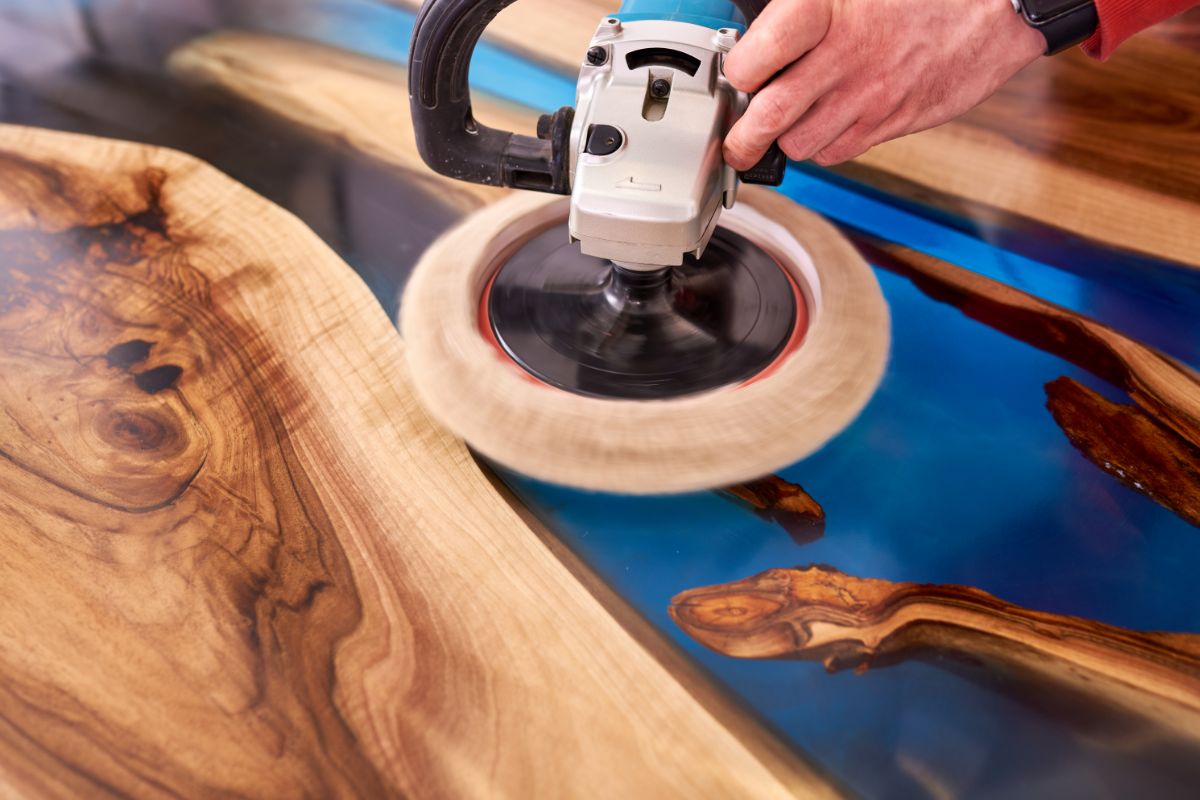
Step 9: Polish The Tabletop And Apply Some Oil
You are almost done with your new piece of art. You just need to add the finishing touches.
The right finish with a good sealing resin helps to protect the wood and the entire tabletop surface from scratches and any damage in the future.
When you are applying a finish, you need to decide what type of look you want for your table.
Matt Finish
The more traditional epoxy river table has a natural look with a Matt finish.
This can be achieved by polishing the entire tabletop with polishing paste and a polishing machine.
The polishing removes any sand dust and it leaves a nicely silky table surface.
After your table surface has been polished, you need to apply a good layer of oil across the entire tabletop.
You can just use regular wood oil and a soft cloth. This is one of the easiest ways to finish and seal the wood and resin surface perfectly.
Plus, you only need a single layer of the oil to create a stunning finish on your epoxy river table.
Glossy Finish
For a glossy finish on your resin table, you will need to apply several layers of clear resin to the surface of the tabletop.
Start with applying some sturdy adhesive tape around the underside of the tabletop.
This ensures that nothing of the resin is leaking onto the floor.
Then, pour your crystal-clear resin over the surface of the tabletop and distribute it evenly. You can just use a spatula for this.
If you spot any bubbles, then go over the surface with a heat gun.
Once the bubbles are gone and the surface is even, allow the resin to harden fully.
As you will need to apply a second layer, you will need to sand the surface of the first layer to ensure that both layers bond properly.
Once the second layer has fully cured, you can remove the adhesive tape and apply it to the edge of the painted underside of the table.
The tape should be a minimum of 5 cm wide to ensure that no resin is leaking.
Now, turn the tabletop over and place it on a fully level surface.
It’s a good idea to put something soft underneath, such as a fleece, to ensure the lacquered side is not scratched.
You need to ensure that the surface is fully level as any uneven surfaces might also make the surface of your finished coat uneven.
Now pour the crystal clear resin over the top of your table and distribute everything evenly with a spatula.
After the final layer of clear resin has dried on your table surface, you can remove the remaining adhesive paper.
If you notice any sharp edges, just sand them down gently with some fine sandpaper.
Professional Finish
If you want a high-end finish for your tabletop, then it’s a good idea to commission a professional.
They will apply polyurethane lacquer to your tabletop to fully seal the surface, and this type of technique can only be done with special equipment.
Bear in mind that a professional finish is costly, so this would be a serious investment in your new epoxy river table.
This being said, we spoke to many crafters who found the investment worthwhile for their state-of-the-art piece.
Step 10: Attach The Table Legs
Your beautiful resin table is nearly done. You just need to get some table legs and screw them on.
You can choose any type of legs for your table, from rustic metal legs to classic wooden legs.
You can match them easily with your existing furniture and home decor.
Tips And Tricks For Making A Wood Epoxy Resin Table
When it comes to creating your own wood resin table with a water effect, there are a few things you will need to look out for.
Here are some tips and tricks for how you can make your resin river table like a high-end piece of furniture.
Choose Your Table Size Wisely
When you decide to make a resin table, you might already have a space for it in your home in mind.
You can generally make any size table that you want but it’s worth remembering that the larger your table, the more materials you will need.
This will also have an impact on your budget and how much the table will cost in the end.
You will also need to have a large enough workspace where you can leave it on the table for a few days to work on it and allow it to cure.
A Resin Table Is An Investment
This statement is true on so many levels. You invest a lot of time, effort and money into making your own river table.
Always keep this in mind when you are buying your materials, as good quality materials will ultimately help you create a professional-looking piece of furniture.
Carefully Consider The Finish
While many crafters focus on the main water effect with their resin table, the finish is often forgotten but it can have a big impact on the appearance of the end result.
You can choose to keep the tabletop surface Matt or you can make it glossy.
Consider where you want to put your table and if you want it to stand out as a centerpiece in the room.
Keep An Eye On Your Budget
Epoxy resin is expensive, so you want to treat it with a lot of care.
Try not to waste anything and only work with the instructions provided by the manufacturer.
But you won’t just need resin for your epoxy table project. There are plenty of other materials and tools you will need.
While making a resin table yourself saves you money compared to a store-bought table, you need to make sure that you don’t spend too much on your new piece of furniture.
Watch The Quality Of Wood
The quality of your materials decides the quality of your furniture, so make sure that you buy fully dried wood that doesn’t have any cracks.
You can use almost any type of wood for your wooden resin table, including cherry, oak, walnut and maple.
Also hickory, ash and sycamore are very popular table woods.
Don’t Forget The Legs
We have talked a lot about the tabletop and how you add the resin to a tabletop mold but your table also needs some solid legs.
There is no limit as to what type of table legs you can attach to your resin table.
Anything that suits your personal preferences and the style of your home can work.
From metal legs to traditional wooden legs, you can get pre-made table legs in almost all shapes and sizes.
Keep The Weight In Mind
What many people forget when they work with resin is that it can harden into a heavy material.
Especially when working with crystal-clear resin, it’s easy to forget that resin turns into a solid block.
It’s important to bear in mind that epoxy resin tables aren’t as light as they look.
Frequently Asked Questions
How Long Will My Wood Epoxy Table Last?
There are several factors that influence how long your wood resin table can last. Generally, wooden epoxy tables can last well over 20 years.
Just make sure that you choose a good quality resin and fully dried wood for your table.
Also, don’t expose your resin table to any direct sunlight or UV light to avoid yellowing.
This will ensure that your epoxy resin table will last for generations.
How Much Is Epoxy Resin For A River Table?
Epoxy resin is not cheap and the exact amount you need for your river table is dependent on the size of the tabletop.
Why Is Epoxy So Expensive?
Epoxy resin is much more expensive than other kinds of resin.
The reason for this is simple: epoxy resin costs a lot more to produce than the cheaper resins.
Additionally, the production process of epoxy resin is also more complex.
How Many Gallons Of Epoxy Do You Need To Make A Wood Epoxy Table?
The amount of resin you will need for your wood epoxy resin will depend on the size of your tabletop.
As a rule of thumb, you will need between 1 and 4 gallons of epoxy resin to make a good size wood resin table.
Craftsmen say that a gallon of epoxy resin can cover around 20 square feet of your wood resin table.
Do You Need To Seal Wood Before Using Epoxy?
Yes, it’s essential to seal the wood before you can add epoxy.
The best way to do this is by applying a thin layer of wood epoxy or clear epoxy, and then allow it to dry fully.
This will provide a good seal on the wood surface before you pour on your epoxy resin.
Are Epoxy Tables Heavy?
Yes, epoxy tables are surprisingly heavy. This is because epoxy resin is much heavier than most solid woods.
In addition, epoxy is also denser than solid wood, making your resin table heavier.
Final Thoughts
Creating your own piece of furniture is always special because you can use the materials and colors that you like.
While making your own epoxy river table can be an expensive investment in your creativity, it is still cheaper than buying a ready-made resin table.


