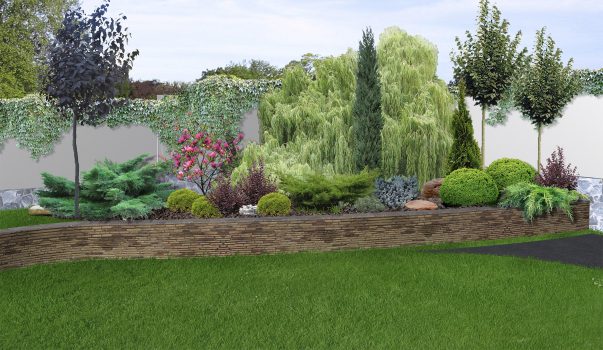
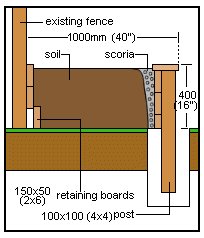
This section will explain how to make a garden retaining wall along an existing fence, which can transform a dull front or back yard into an exciting garden. The retaining wall will be 1 meter (40″) in from the fence and on average 400mm (16″) high (depending on the contour of the ground), and with a capping board on top will also double for a seat the length of the retaining wall.
The drawing above shows an example of the shape the retaining wall might take, but other shapes and ideas are only limited by the imagination.
Materials
Posts: Treated 100×100 (4×4) rough-sawn posts.
The posts will be spaced a maximum of 1200mm (4ft) and concreted into post holes 500mm (20″) deep.
Retaining boards: Treated 150×50 (2×6)rough-sawn.
Capping: Treated 150×50 rough-sawn.
Instructions
Step 1: Determine perimeters
- Determine the shape and perimeters of the retaining wall and mark out with a string line slightly above ground and tied to stakes where needed. The string line will mark the outside boundary of the retaining wall.
Step 2: Preparing holes
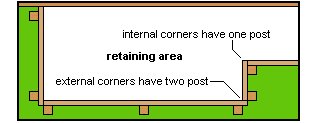
- Mark out all end and corner post holes first. External corners will have 2 posts and internal corners will have 1 post (see drawing below)
- Measure and divide the straight lines between the corners and ends into equal distances not exceeding 1200mm (4ft) and mark for post holes.
- Dig all the post holes 250mm (10″) diameter and 500mm (20″) deep.
Note: If the ground is exceptionally soft or subject to frosts, then the hole should be deeper and the diameter larger. Commonsense stuff.
Step 3: Putting in the posts
- Cut all the posts 1 meter (40″) long. That is slightly longer than required, but the tops will be trimmed later.
- Make a mix of concrete.
- In a wheelbarrow or concrete mixer make a mix consisting of 5 parts aggregate (gravel and sand), to one part cement.
- Pour in clean water and mix to a uniform consistency with a spade or shovel.
- The mix should be stiff enough to hold up the posts without the need of bracing props yet wet enough to work around the posts
- Put the corner and end posts in first. Position the posts to almost touching the string line and ensure post is plumb or vertical by way of holding a spirit level against two adjacent sides of the post.
- Shovel concrete around the post and fill to within 50mm (2″) from the top of the hole.
- Lift the post up slightly in order to allow some concrete to flow under the post. Shake the post repeatedly slightly back and forward (having a vibrating effect) to enable the concrete to flow evenly under and around the post. You shake it to the left
 you shake it to the right you do the hippy shake and you shake it all about…
 - Check the post again for position and plum.
- Repeat this action until all posts are in. First the corner and end posts and then the intermediate posts.
- Leave a couple of days to set.
Step 4: Fixing the retaining boards
- The posts should be approximately 550mm (22″) out of the ground. That is more than needed, but the tops will be trimmed off later.
- The retaining boards are 150×50 (2×6) treated rough-sawn lumber, and the required finished height of the wall including the capping is 400mm (16″) which is a good seat height, but of course the height will vary in places due to the contour of the ground.
- To obtain the required height, the first (bottom) board needs to be 80mm (3″) above ground level. Achieve this by either ripping (cutting) along the board or by digging the board into the ground. Fix the first board level to the inside of the posts with 100mm (4″) galvanized nails. Join boards only on posts.
- Fix another two boards on top of the first.
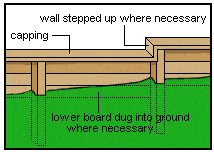
- If the ground is not even, it will be necessary to either step up or step down the retaining wall depending on the contour of the ground.
- Do this as shown in drawing below.
Step 5: Trimming the posts and fixing the capping
- With a handsaw, trim the top of the posts off level and flush with the top of the retaining boards.
- Fix the capping on it’s flat so it covers both retaining board and post. Miter corners and rises and fix to both retaining boards and posts with 100mm (4″) galvanized flathead nails.
Step 6: Fixing the retaining boards to the fence
- Fix the top retaining board to the fence posts with 100mm (4″) galvanized nails so it is level with the top of the retaining wall capping
- Fix the second board under the first and nail also to the fence posts.
- The third board (bottom) can be placed on the ground and against the second board. It does not have to be ripped (cut) or dug into the ground. The loose fit is good for water seepage.
- Fence posts are not purpose designed as retaining wall posts, so a brace is required to stop the fence from leaning or being forced out when the soil is placed in the retained area.
- Brace each post as shown in the drawing below using 75×50 (2×3) treated lumber for both braces and pegs (rip 150×50 (2×6) retaining board in half to get the braces and pegs. Bolt the braces to both the fence posts and the pegs using galvanized bolts or galvanized coach screws.
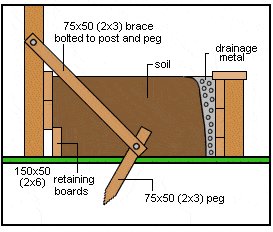
Step 7: Drainage and fill
- This retaining wall retains little soil and not subject to the forces of higher walls, however, a drainage system is still advisable to take seepage away and to avoid any possible waterlogging.
- Position old sheets of cardboard, hardboard or gibboard (or some other material that will disintegrate) down the back, about 100mm (4″) behind the retaining wall.
- Commence filling the retaining area up. Fill between the sheets and the wall with drainage metal and behind with soil, keeping the level the same on both sides of the sheets.
- If there are gaps between the retaining boards, that will be enough to let the seepage through and complete the drainage system.
- If there are no gaps between the retaining boards, either drill weep holes in the bottom retaining board about every 1200mm (4ft) or run a drain coil or drain tile the length of the wall at the bottom of the drainage metal backfill.


I agree with Terry on the timber preservative – an empty Window Cleaner spray bottle or similar will provide a less messy and more economic alternative in application.
Carwyn Dewes
I read through your instructions for building the retaining wall, and wish to compliment you on the material specifications and clarity of instruction. One point that is worth adding is the use of a brush-on preservative for cut ends of treated timber.
Larger section material (such as 100 x 100) will inevitably contain heartwood that is often impenetrable during the pressure treatment process. When left intact, the envelope of treated wood created will perform very well against decay, however when untreated heartwood is exposed by cutting, this can lead to premature decay. The use of a brush-on preservative based on copper naphthenate such as Metallex Green is strongly recommended on such cut faces to restore the protective envelope. Another recommendation is to avoid placing the cut end in the ground. Terry Smith