Contents
Do you want to build your own wooden fence with a gate? If you do, rest assured that you’ve clicked on the right article!
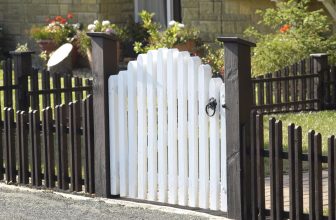
A wooden fence gate is affordable and durable and is a great way to connect a backyard to the front of the home.
The only problem? Many homeowners and DIYers often find making a wooden fence with a gate a little tricky.
However, we’re here to help make the process as easy as possible by sharing with you a tried and true method that will allow you to assemble your very own wooden fence gate in just a few steps.
Below, you will find an easy, step-by-step guide showing you how to make your own wood fence gate.
Along the way, we’ll also share some additional tips and tricks to help prevent any warping or sagging. So, without further ado, keep reading!
How To Build A Wood Fence Gate: Step-by-Step Instructions

Building a wood fence is easier than you might think, and below, we are going to be providing you with simple instructions that will allow you to make a wooden fence gate in just a few steps:
Step One: Decide Where You Want Your Wooden Fence Gate To Go
First, you will need to decide where you would like your fence/gate to go.
The last thing you want to do is build your wooden fence and gate, only to discover that the area you have chosen isn’t an appropriate spot!
So, for this reason, we strongly recommend that you spend some time thinking about where the most appropriate way to build it will be.
Remember, you’re not just building a wooden fence; you also want to incorporate a gate, so you will need to pick an area of your home that is accessible.
In addition, you should also take the time to safely clear away any items that might be in the way, such as plant pots and other outdoor items.
Before you begin, we also recommend that you take the time to discover whether or not there are any underground utilities in the area where you want to build the fence and gate, as the last thing you want to do is to build over them.
Plus, by making sure that you choose the exact location where you want to build your wooden fence and gate first, you will be able to purchase the items needed to build the fence and gate with the exact measurements to fit the area.
Step Two: Gather Your Supplies
After you have picked the area where you want to make your wooden fence and gate, you will be ready to gather all the items you need to build it!
At your local hardware/home store, you will need to pick up your chosen wood, the external metal frame, cross braces, and other supplies needed to build the gate that you have in mind.
Step Three: Mark Fence Posts
When you’ve got everything you need to begin, and the area has been selected, you can then go ahead and begin marking out your fence posts, which will serve as your visual aid for where the base of the fence is going to be.
To help make sure that you do not lose the spots where you want the posts to go, we recommend that you begin digging the holes that the posts are going into, and then marking the area with temporary paint.
For the best results, we strongly recommend that you do not locate the posts more than 8 feet apart. Otherwise, this might cause weakness in the overall structure of the fence.
When you’re ready to begin adding the posts to the marked spots, you can go ahead and insert them into the holes that you have already made when marking the areas.
After that, you can take some concrete to fill the hole and add stability to the posts.
Keep in mind that as you add a gate, you will need to leave the appropriate space between posts for it to fit later.
Step Four: Add The Planks And Cross Pieces
After the posts have been added and stabilized with concrete, all you will need to do is add the plans and cross pieces.
For the best results, many DIY’ers will add the planks to the structure first and then finish up with the cross pieces to ensure plenty of stability and help lower the chances of warping.
Step Five: Assemble The Gate
Last but certainly not least, the final thing you will need to do is assemble the gate.
To make the gate, we recommend using an external frame (the standard sizing is 2×4) and then screwing them together.
Once you have done that, you can then go ahead and add a cross brace for support and then simply mount the gate to your existing fence that you have created.
Wrapping Up
There we have it! You’ve made it to the end of the article.
Making a wooden fence gate isn’t always the easiest thing to do, so much so that many homeowners find it one of the most challenging DIY projects to undertake.
Nevertheless, now that you have taken the time to read through the guide above, we are hoping that you are now feeling confident to go and build your very own wood fence gate for your home.
Thank you for reading!