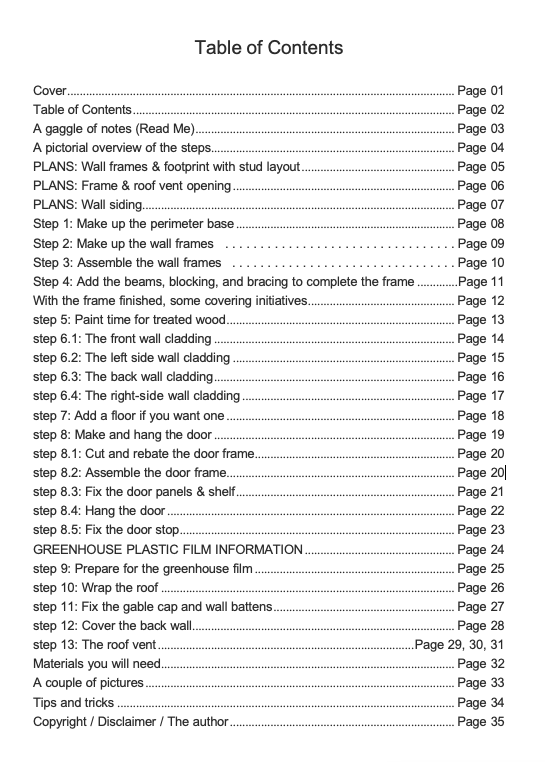
Contents
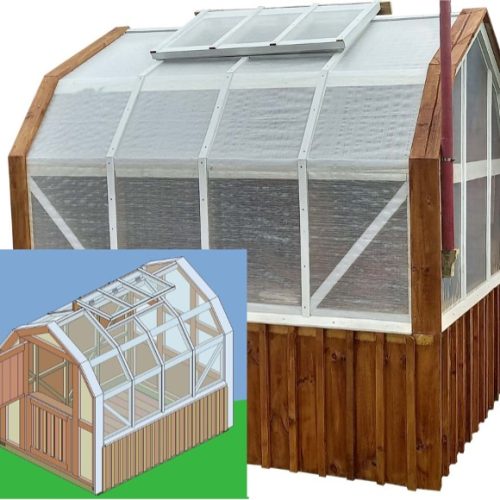
These plans are for a mighty wood frame greenhouse-come-potting shed (easy to make it one or the other or both) that includes a gambrel barn-style roof, a roof window for ventilation, and a stable door (also called dutch door) which is a door split in the middle to allow the top half to open while the bottom half remains shut.
The plans include information about greenhouse plastic film, and shows alternative covering. The plans are for 2×4 (50x100mm) frame covered with a mixture of greenhouse film and solid cladding but also shows how the project can easily be adapted to lean more to a greenhouse or more to a potting shed by changing the ratio of greenhouse film in comparison to the solid cladding.
The finished project (from the plans) will boast an awesome farm-style greenhouse-come-potting shed with a gambrel roof, roof vent window, and a dutch two-piece door.
You can also purchase this plan:
- 🛑 No ads
- 🖨 Printable PDF
- 🎗Support the author
How to build A solid 6×8 barn-style greenhouse Plans & Construction Guide
Original price was: $5.00.$3.00Current price is: $3.00. -40%
|
Materials You will need
Lumber for the frame
Cut all the frame members out of the following lengths
- 4×4 (100x100mm) lumber: 2 @ 8ft (2400mm), 2 @ 6ft (1800mm)
- 2×4 (50x100mm) lumber: 16 @ 8ft (2400mm), 4 @ 6ft (1800mm)
- 2×2 (50x50mm) lumber: 3 @ 8ft (2400mm), 17 @ 6ft (1800mm)
Cladding
- 1×6 (25x150mm) boards: 41 @ 8ft (2400mm)
- 1×2 (25x50mm) battens: 36 @ 8ft (2400mm)
- 1/2″ (12mmm) plywood: there will be waste from a 4×8 (1200x2400mm) sht
- Lattice strip or similar 90ft (27m) overall
Floor (optional)
- 2×3 (50x75mm) lumber: 4 @ 8ft (2400mm)
- 1×6 (25x150mm) boards: 15 @ 6ft (2400mm)
Door
- 2×4 (50x100mm) lumber: 2 @ 8ft (2400mm), 2 @ 6ft (1800mm)
- 1×6 (25x150mm) boards: 6 @ 6ft (2400mm)
- 1×2 (25x50mm) battens: 4 @ 6ft (2400mm)
Greenhouse film
- One piece 10ft (3m) wide by 14ft (4.2m) long,
- One piece 7ft (2.1m) x 6ft (1.8m) for the back wall. Allows for overhang.
You can buy this one in 10x25f and cut it.
Hardware for all above
The fixings listed below is a guide that should get you through the job.
Screws: galvanised bugle head batten screws or construction screws. 120 @ 3″ (75mm), 20 @ 4″ (100mm), 60 @ 6″ (150mm).
For base, frame, and floor.
Nails – galvanised flat head: 1.1lb (1/2kg) @ 2″ (50mm), 2.2lb (1kg) @ 2-1/2″ (60mm), 2.2lb (1kg) @ 3″ (75mm), 2.2lb (1kg) @ 3-1/2″ (90mm).
Also: 3 only 6″ (150mm) ‘T’ hinges (for door), 2 only door bolt, 2 only 3″ (75mm) butt hinges (for roof vent), 1 only stay (for roof vent).
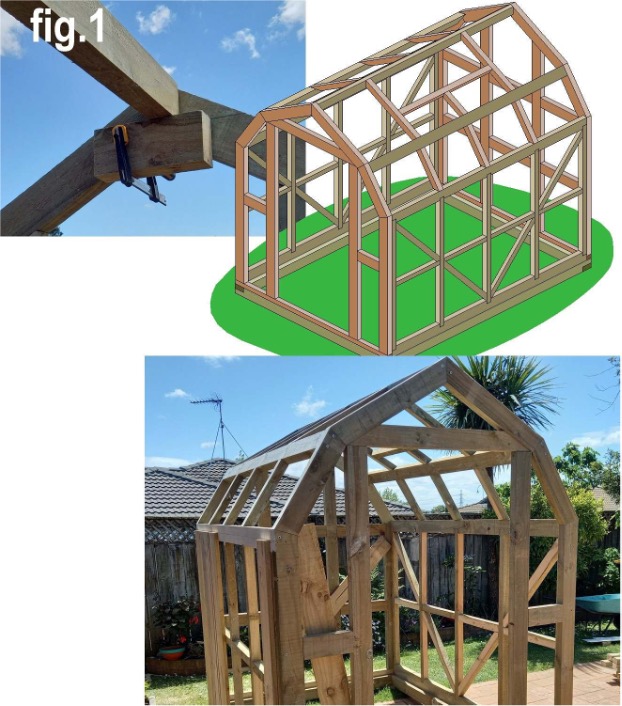
A pictorial overview of the steps
The frame

The covering


Plans – wall frames & footprint

Plans – frame & roof vent opening
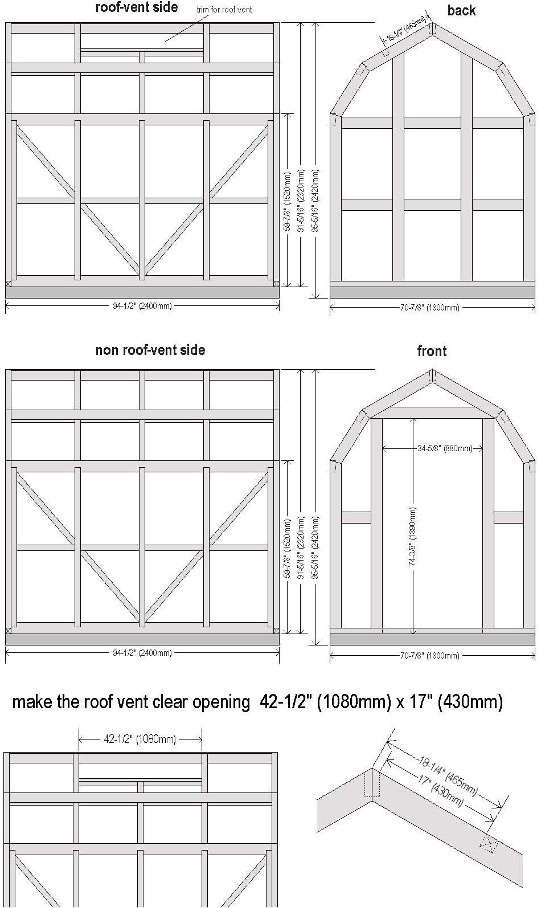
Plans – wall siding

The wall cladding is 1×6 (25x150mm) boards.
On the two side walls, the second board in at each end is 3-1/8″ (80mm) back from the end of the frame as shown on the plan drawing above.
That means the end boards will be sticking out past the frame.
The reason? The end boards will continue up and around the frame once the film is on.
Build Instructions
Step 1. Make up the perimeter base
Using 4×4 (100x100mm) lumber, make a rectangle 94-1/2″ (2400mm) x 70-7/8″ (1800mm). Join each corner with a half-lap joint.
Have the rectangle (the base) sitting square and level on firm ground.

Making a Half-lap joint
- fig.1: Clamp the four pieces of base lumber together with the ends flush. Set the blade of a circular saw to half the depth of the lumber. Make multiple saw cuts across the wood, to within 4″ (100mm) from the end (the cut-out area). Do the same at both ends.
- fig.2: Clean the cut-out area with a chisel.
- fig.3: Fix the laps together with nails or screws.

Step 2. Make up the wall frames
Make up the wall frames on a flat surface.
Rebate the side frames’ top & bottom plates to house the studs.
Refer to the plans for all measurements and the required angle cuts for the end frame members.
You can use the base as a flat surface to make up the wall frames.


Step 3. Assemble the wall frames
Fix the frames to one another with 3 screws at each corner – one top, one middle, and one bottom. Use 6″ (150mm) screws. That will pull everything in nice and tight.
Align the bottom plates of the frames with the outside edge of the base perimeter and fix using 6″ (150mm) screws. Refer to the drawing below


Step 4. Add the beams, blocking, and bracing to complete the frame
Cut 3 roof beams to fit between the front and back walls. Refer to the plans for dimensions.
Clamp blocks accordingly to the front/back wall frame to sit the beams on while screwing (fig.1).
Fix with 6″ (150mm) screws, two at each meeting.
Add blocking, wall bracing, and then trim for the roof vent according to the plans.
This practical frame design with it’s gambrel roof is open to a myriad of alternative covering initiatives.
Just saying, you can easily change parts or all of the outside cover to suit your personal likes.


Step 5. Paint time for treated wood
It is strongly recommended to paint any treated wood where it touches the greenhouse film with a water based white paint to help seal the lumber, as some treatment in treated pine can affect the UV stabilizer over time.
Alternatively use an anti-hot spot self adhesive greenhouse tape. More about that in ‘Step 9. Prepare for the film’.


Step 6. Clad the walls
This step is broken into 4 parts.
- The front wall cladding
- The left side wall cladding
- The back wall cladding
- The right side wall cladding

Step 6.1. The front wall cladding
Out of a sheet of 3/8″ (9mm) or 1/2″ (12mm) plywood, Measure and cut accordingly three pieces (two side pieces and a top piece) and fix them to the inside of the front frame as shown in the drawing below.
Ensure the plywood is set back 2″ (50mm) around the edge of the frame (but not the bottom) so as not to have to cut around any beam,block, or stud that is attached to the front wall frame.

Step 6.2. The left side wall cladding
For this example use 1×6 (25 x 150mm) boards, 59-1/2″ (1510mm) long.
Note: 2×2 (50 x 50mm) battens will cover the joins between the wall boards, but they will be added after the film has been put on.
The boards will cover the left side wall, in 3-1/8″ (80mm) from each end and up from the bottom of the base 2″ (50mm). The tops of the boards should finish approximately 1/3 of the way onto the wall top plate.
Begin fixing the boards from each end and work towards the middle. The middle board may need to be ripped (cut lengthwise) to fit.
Once all the boards are fixed, add another board to each end, where they will be overhanging the frame by approximately 2-3/4″ (70mm).
Why the overhang board? – Once the film is on, that line will continue up and around the frame.

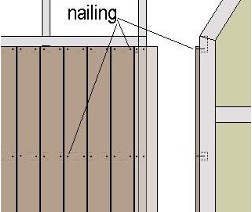
Nailing:
Use 2-1/2″ (60mm) common (or flat head) galvanised nails.
Nail approximately 3/4″ (19mm) in from each side of the boards along the rows of blocking and plates, and the same amount down from the top and up from the bottom.
Step 6.3. The back wall cladding
For this example use 1×6 (25 x 150mm) boards, 29-1/2″ (750mm) long.
Note: 2×2 (50 x 50mm) battens will cover the joins of the boards, but they will be added after the film has been placed.
The boards will cover the width of the back wall, flush each end and up 2″ (50mm) from the bottom of the base.
Begin fixing the boards from each end and work towards the middle. Hence the middle board may need to be ripped (cut lengthwise) to fit.

Nailing
Use 2-1/2″ (60mm) common (or flat head) galvanised nails.
Nail approximately 3/4″ (19mm) in from each side of the boards along the rows of blocking and plates, and the same amount down from the top and up from the bottom.
Step 6.4. The right side wall cladding
For this example use 1×6 (25 x 150mm) boards, 29-1/2″ (750mm) long.
Note: 2×2 (50 x 50mm) battens will cover the joins of the boards, but they will be added after the film has been put on.
The boards will cover the width of the right side wall, in 3-1/8″ (80mm) from each end and up from the bottom of the base 2″ (50mm).
Note: You will need to run another row of horizontal blocking under the existing row to accommodate the tops of the wall boards.
Begin by fixing the two end boards (they will be in 3-1/8″ (80mm) from each end) and then work towards the middle. The middle board may need to be ripped (cut lengthwise) to fit.
Once all the boards are fixed, add another board to each end, where they will be overhanging the frame by approximately 2-3/4″ (70mm).
Why the overhang board?
Once the film is on, that line will continue around the frame as a capping.

Step 7. Add a floor if you want one
This is optional depending on the ground and/or your needs.
In some cases you may just need a row of paving stones down the center, or a boxed in stone path. Whatever works.
However, if you do want a full built in wood floor, then do the following.
Run four 2×3 (50x75mm) floor joists the length of the floor.
Position the tops of the joists 1″ (25mm) below the top of the base lumber. Nail the two end joists along the inside edge of the base lumber and nail the intermediate joist at each end.
Pack under the intermediate joist to prevent sag.
Screw 1×6 (25x 150mm) floor boards to the joists. Refer to the images below.


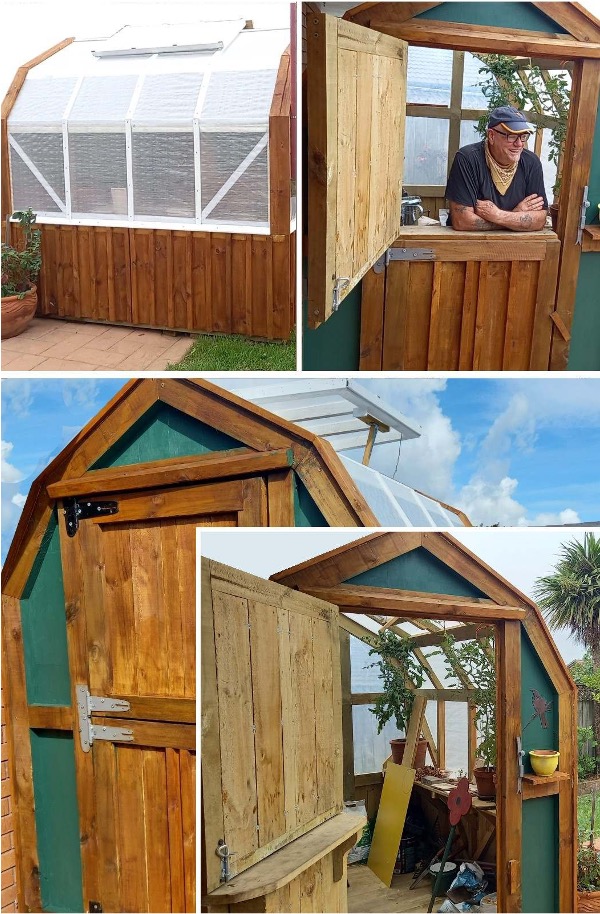
Step 8. Make and hang the door
A split-leaf stable door
A split-leaf stable door also called a Dutch door or a half door is a door split in the middle to allow the top half to open while the bottom half remains shut.
They are a very practical door, allowing fresh air while keeping pets out. This one has a shelf making it even more practical. Rest an elbow on it while having a cup of coffee.
In this case, we are going to make a stable door to fit into an opening 34-5/8″ (880mm) wide by 74-3/8″ (1890mm) high.
Allowing 3/8″ (10mm) clearance on each side of the door, as I prefer a wide clearance with outside shed/greenhouse structures, and 5/16″ (8mm) top and bottom, the overall finished door size will be 33-7/8″ (860mm) wide by 73-3/4″ (1874mm) high. The door is made out of 2×4 (50x100mm) frame and 1×6 (25x150mm) infill with 1×2 (25x50mm) battens.

Step 8.1 Cut and rebate the frame
From 2×4 (50x100mm) stock, cut and rebate the frame pieces according to the plan drawing below. The rebates are 1×1 (25x25mm).
Pay attention to piece (d), which has a double rebate. The lower rebate is the part that closes over the shelf.

Step 8.2 Assemble the door frame
Assemble the frame as shown in the images below. The vertical pieces are the ‘styles’, and the horizontal pieces are the ‘rails’.
Fix the styles to the rails with two 6″ (150mm) screws at each join.

Step 8.3 Fix the panel & the shelf


For both the top leaf and the bottom leaf.
fig.1: Ensure the frame is square and fix the two side boards.
fig.2: Fix the intermediate boards. The middle board will need to be ripped (cut lengthwise) to fit.
fig.3: Fix a batten over each join.
The shelf: Fix the 1×6 (25x150mm) shelf as shown below.
Step 8.4 Hang the door


Fig.1 Place the both halves of the door into the opening, held with blocks both sides of the wall.
Pack the door around the edges so the gaps are even all way around and in between the top and bottom door.
Fig.2 Apply the hinges.
Fig.3 Take out the packers and front blocks and test the door for opening and closing.
All being well, fix a drip cap above the door.
The drip cap A drip cap deflects any water from running over the top of the door into the building.
You can cut one out of a piece of 2×4 (50x100mm) as shown in the drawing. Make it at least a couple of inches past each side of the opening, and position the height slightly above the top of the door.
Step 8.5 Fix the door stop
Fix a door stop, say 1×2 (25x50mm) or wider wood around the inside of the door opening frame to cover the gap between the door and the frame.
Also, add the required hardware to the door i.e., a pad bolt on the inside to hold the top half of the door to the bottom half (see image) and a latch of choice on the outside on the top half, which will lock both halves.

Greenhouse Plastic Film Frequently Asked Questions
What is the best film for a greenhouse?

The best greenhouse film to use is UV-stabilized polyethylene plastic, because the rays of the sun don’t affect it, unlike other plastics.
What thickness should the greenhouse plan plastic film be?
Greenhouse plastic films are generally measured (thickness-wise) in microns or mils.
A micron or micrometer is one one-thousandth of a millimeter [1 micron (1µ) = 1/1000 mm].
A mil is one-thousandth of an inch. 1 mil = 25.4 microns.
Select a plastic greenhouse covering of at least 6 mil thick. This is the benchmark standard set by the
Natural Resources Conservation Service.
6 mil film is expected to last for four years but will last well beyond that with good maintenance.
Greenhouse films that are 4 mil or less are often only rated for one to two years. You can use an 8 mil, 10 mil, 11 mil, or bigger film. The heavier thickness is often found in woven UV stabilized polythene and has an opaque hue. It has extra protection against the elements and a longer warranty is more resistant to tears and holds heat better than regular plastic film.
For this project, I went for two types of heavier film. I wanted the film to last for 10 years and beyond.
I used an opaque reinforced greenhouse film 300 microns (11.8 mils) thick for the sides and roof, and a clear greenhouse film 215 microns (8.46 mils) thick for the back wall.
There’s a good plastic greenhouse cover option on Amazon (link). Buy the 10×27 ft version and cut it to size.
Step 9. Prepare for the film
A bit of preparation
Relevant for rough and/or treated wood
Sand any sharp or rough patches in the wood framework to prevent any possible damage to the film.
If you are using treated wood, The Tanalith in treated pine can affect the UV stabilizer over time, its best to paint the timber framing with water based white paint to help seal the timber.
Alternatively use an anti-hotspot tape (commonly used for pipe polytunnels). Simply apply it to the greenhouse framework. It provides a soft barrier between the framework and the polythene film, extending the film life.
Anti Hot Spot Tape is a self-adhesive foam tape. It is very easy to apply.

Step 10. Wrap the roof


With the film taut, fix a sill each side against the frame on top of the wall boards, over the film.
The sill finishes 3-1/8″ (80mm) in from each end or flush with the second board. That is because the line of the end wall boards will continue up and around the top (barge cap).
Then fix the lattice strips placed as show in the drawing above.
Step 11. Fix the cap & wall battens

Step 12. Cover the back wall

Cover the back wall in the same manner as the roof was done.
Do it in this order:
Staple the film to the back wall ensuring it is taut.
Fix the sill over the film on top of the wall boards.
Fix a trim around the perimeter of the film against the barge cap.
Fix the vertical lattice strips placed as show in the picture above.
Fix 1×2 (25x50mm) battens over the joins of the wall boards.
Step 13. The roof vent

Cut the film out of the roof vent opening as in the picture above. Then make a frame up according to the plans below.


Position the roof vent frame and fasten it with 3 hinges. Refer to the drawing above and fig.1..
Then unscrew the top portion of the hinges only and remove the roof vent frame for covering.
The hinges will remain fastened to the top beam of the greenhouse. That is important, because once the film is added to the roof vent frame, that part of the hinge will be inaccessible.

Fig.2: Cover the frame with film, add a 1×3 (25x75mm) board along the back of the frame, and fix the lattice strips over the film as shown in the picture.


Fig.3: Screw the roof vent lid back in place.
Fig.4: Fit a latch to hold the lid open.


The latch
I simply made a latch out of left over wood and a T-hinge.
1×2 (25x50mm) horizontal piece to attach the T-hinge to
1×1 (25x25mm) handle attached to the T-hinge
8″ (200mm) T-hinge
1×2 (25x50mm) block for the handle to sit on when the lid is open


Tips and tricks

Battens to wall boards
The plates and horizontal blocking that the wall boards are fixed to, are spaced too far apart to allow adequate fixing for the vertical battens which cover the joins of the wall boards. Hence, in the weather extremes the battens could pull out from the wall or twist and wrap.
So… , run another row of blocking between the existing plates and blocking to allow more fixing
–OR-, do this fix…
From the inside of the wall, with Hex washer head screws, screw through the join into the batten. That will pull the batten nice and tight to the wall boards.

Fixing the greenhouse film
You can fix the lattice strips to the greenhouse film as you roll the film out. That way you can get easier access to the high to reach places,
e.g. you can climb on the frame or place a ladder against the frame (uncovered part of course).
However, roll the film out completely first, to ensure it covers the intended area, then fix it at one end and roll it back up to give you the required workspace
Consider fixing the barge cap, lattice strips, and sills with screws.
Consider fixing the barge cap, lattice strips, and sills with screws as opposed to nails.
Tears and rips in the greenhouse film can usually be repaired, but if you ever want to completely remove the film to replace it for any reason, then being able to unscrew the wood members (namely the barge cap, the lattice strips, and the sills ) that hold the film would make the task that much easier.
A couple of pictures


How To Make Cornhole Boards

Buildeazy.com started as a hobby for Les Kenny over eight years ago when he decided he would share his successful DIY projects with the wider world, putting them up online for anyone to access.