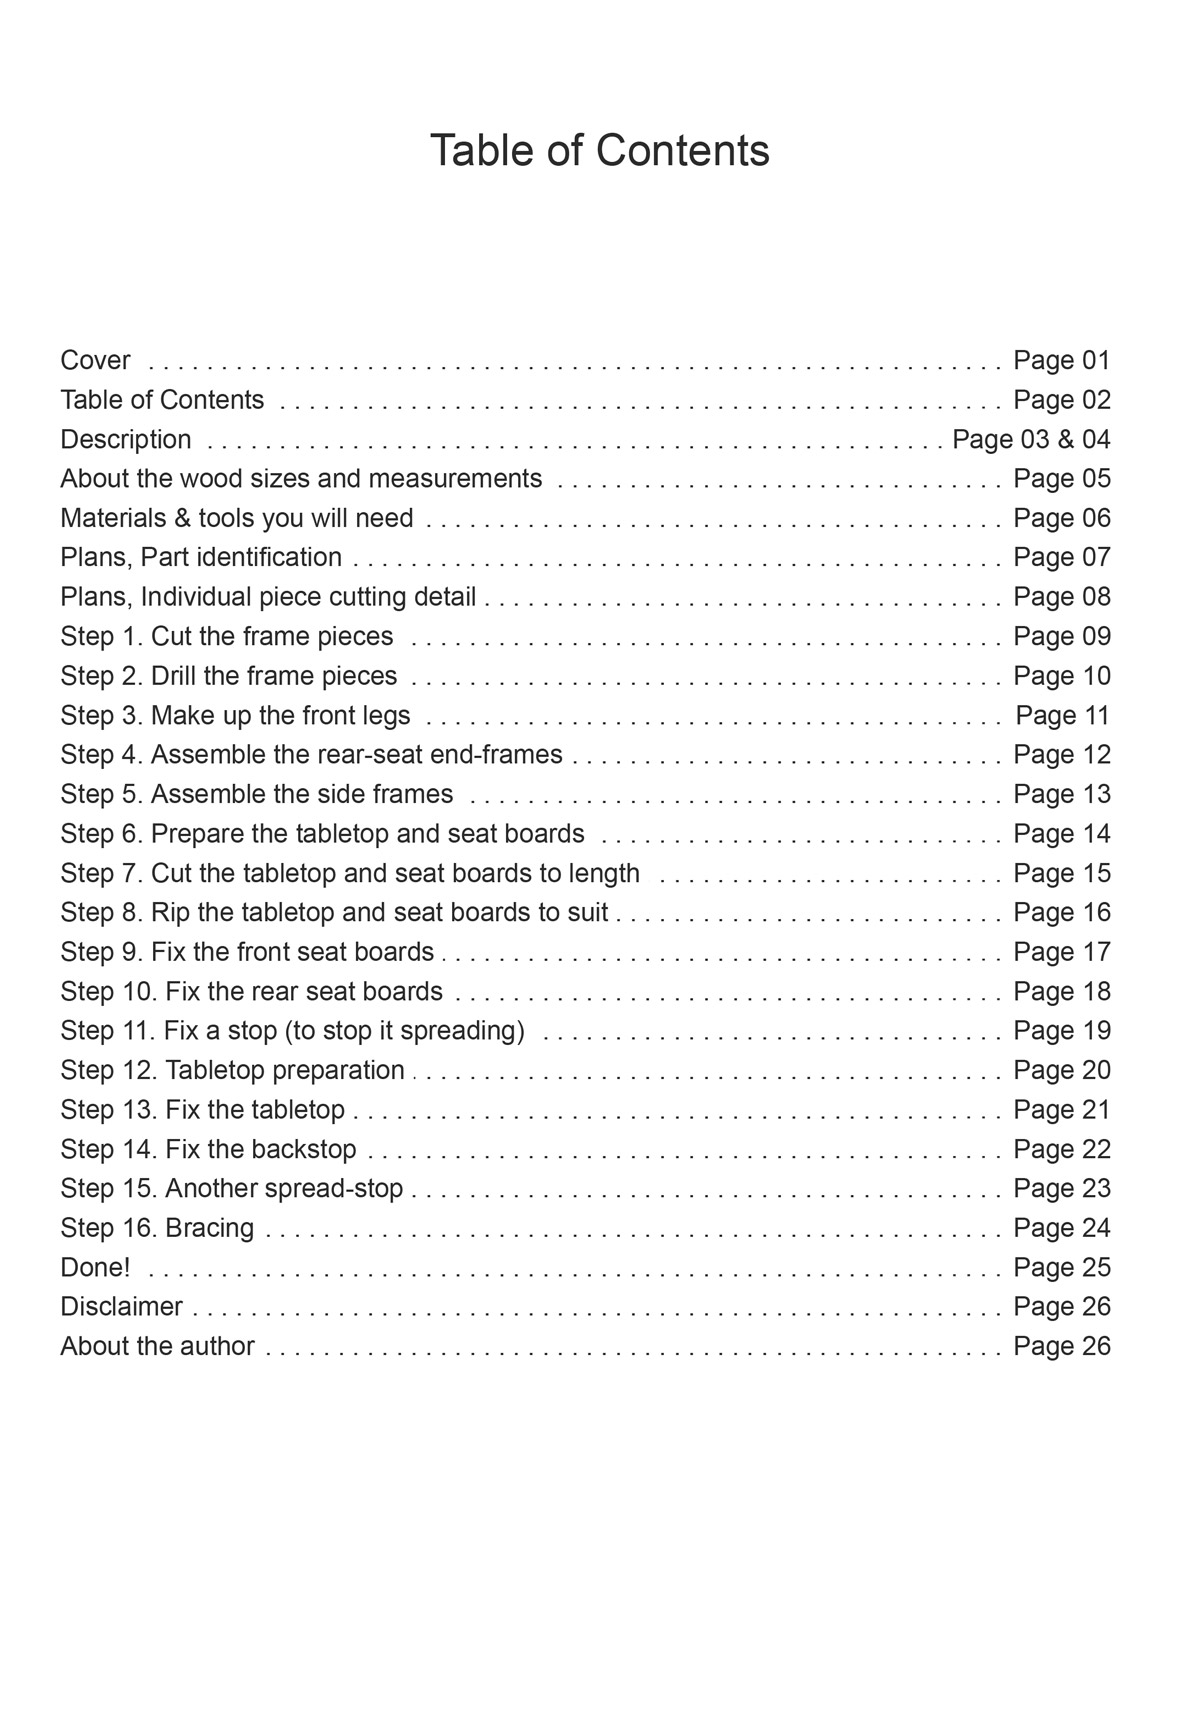
Contents
There is already a slightly different picnic table on BuildEazy.

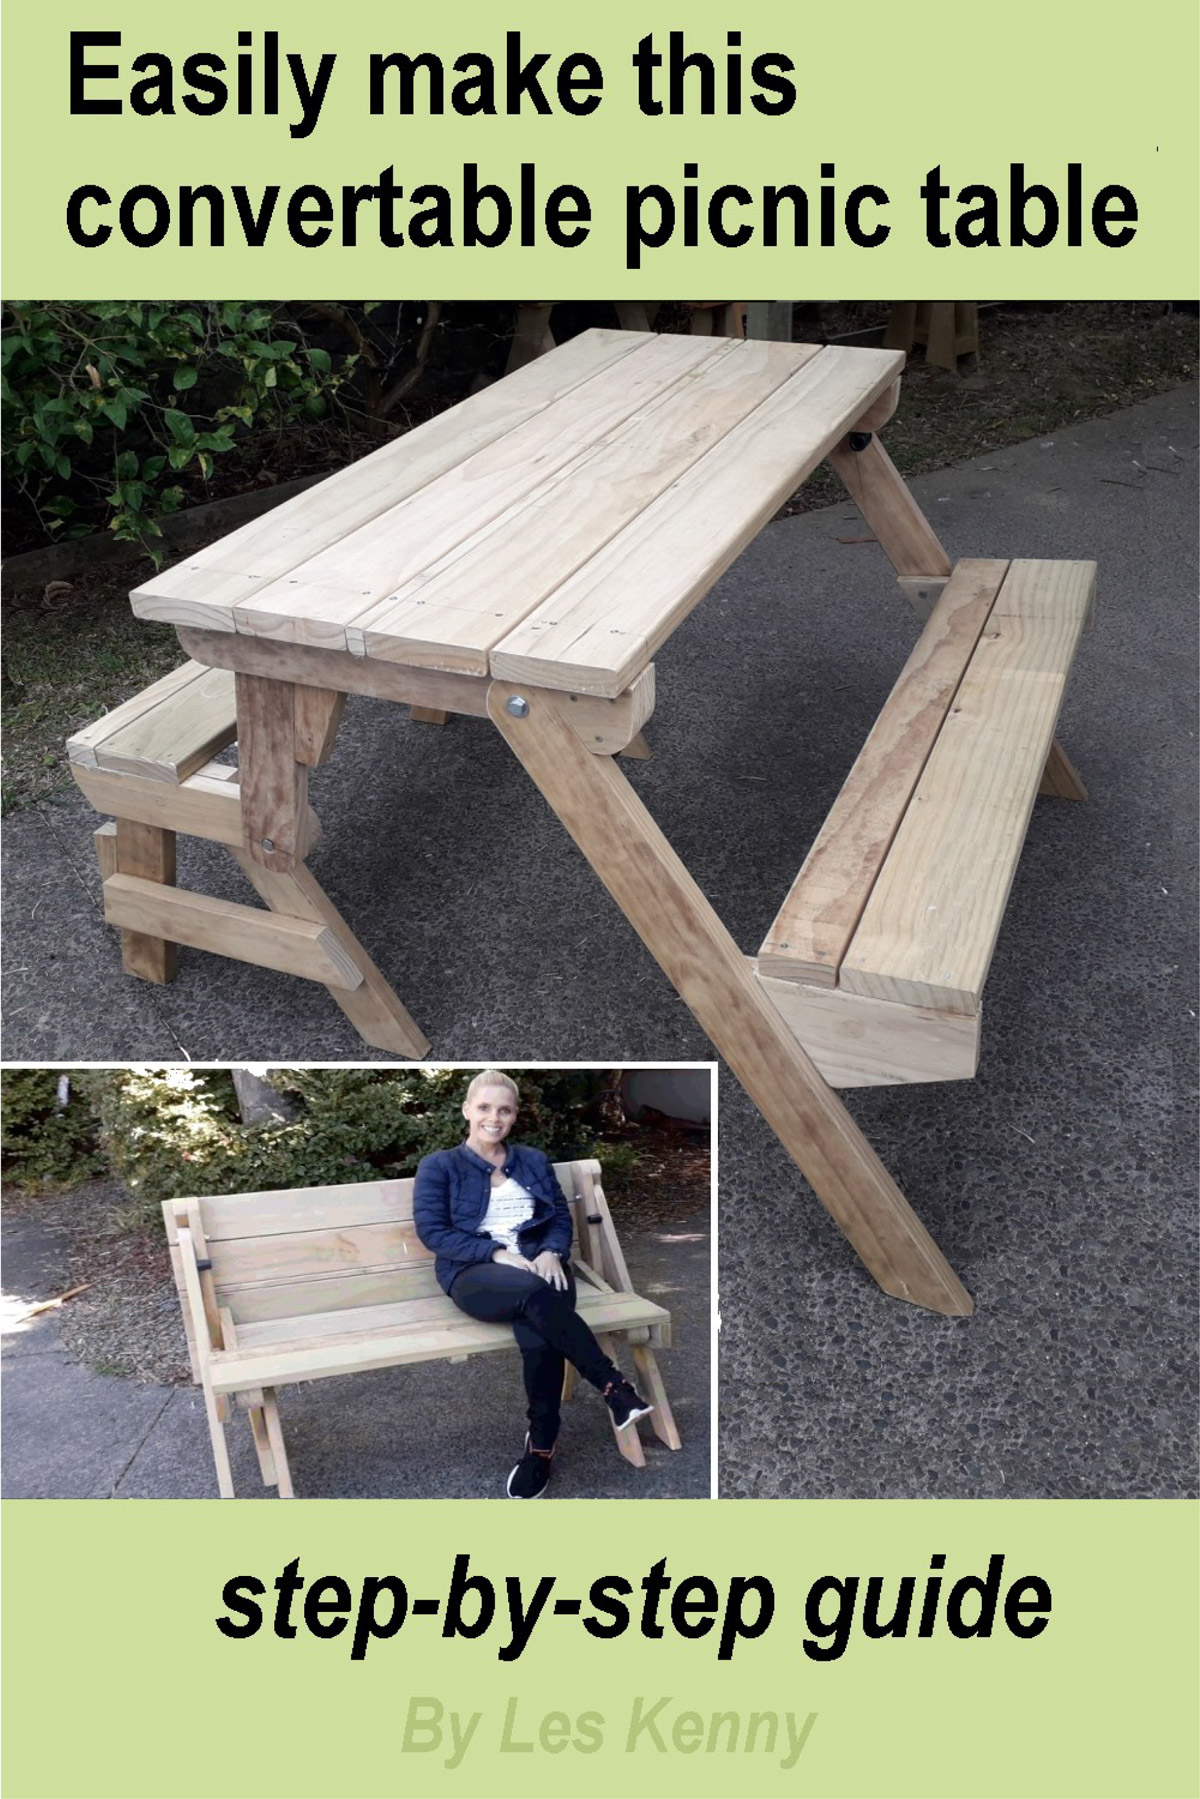
This one has a wider top

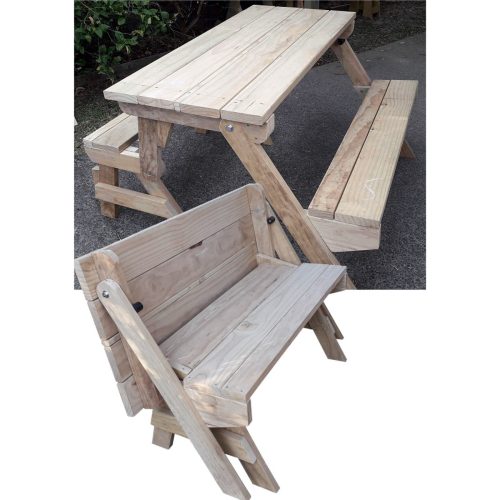
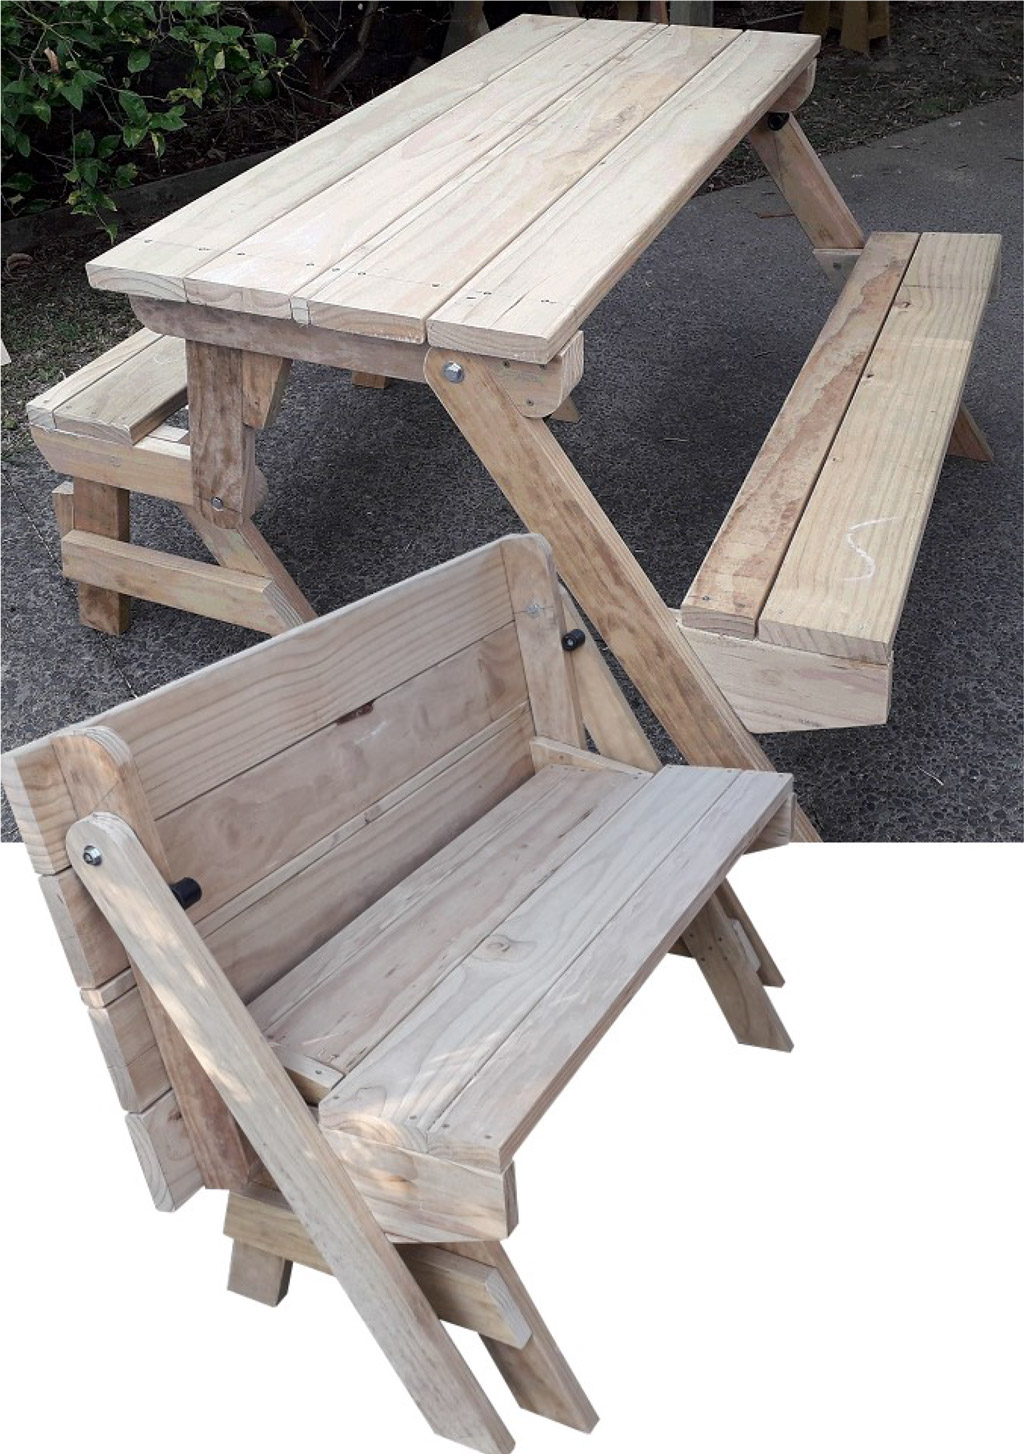
From picnic table to bench seat & back

Typically, one-piece folding picnic tables have narrow tabletops – that’s been the downside of an otherwise great design.
The narrow tabletop was seemingly a requisite needed for the folding mechanism to work as intended.
However, I have overcome that perceived requisite with this design.
My previous two designs had a maximum tabletop width of 18⅛” (460mm). This one has a tabletop width of 23¾” (605mm).
That’s 5⅝” (145mm) wider, which makes the tabletop a useable area.
You can also buy this plan:
- 🛑 No ads
- 🖨 Printable PDF
- 🎗Support the author
Plans to build a Convertible Picnic Table
Original price was: $5.00.$3.00Current price is: $3.00. -40%
|
The size of it
The tabletop is 23¾” (605mm) wide and 51½” (1310) long.
The height is 31½” (800mm) and the overall width is 52″ (1320mm).
It is a handy 4-seater picnic table or a 2-seater bench seat.
About the wood sizes for this project
The wood size (thickness & width ) I used for this project (actual size) was – For the frame: 1¼” x 3½” (32 x 89mm).
For the seat & tabletop boards: 1¼” x 5½” (32 x 140mm). That is not an overly common wood size worldwide
But don’t worry
You could also use 1½” (38mm) thick wood if you want. which is far more common and a standard in North America.
These plans are written to allow for both thicknesses, but it only becomes relevant when it’s time to cut the tabletop and seat boards in Step 7.
In short, if you cant acquire the stock size I used, you can use 1½” x 3½” (2×4 nominal size North America)
About the length measurements given in this project
All length measurements in this project are given in both inches (standard) and metric (mm).
The standard (inch) measurements are given first followed by the metric equivalent in brackets. For example: 19-5/8″ (498mm)
Materials you will need
First, about the wood size again:
The wood size (thickness & width ) I used for this project (actual size) was – For the frame: 1¼” x 3½” (32 x 89mm) lumber.
For the seat & tabletop boards: 1¼” x 5½” (32 x 140mm) lumber.
But don’t worry – a different size will be fine.
You can also use 1-1/2″ (38mm) thick wood if you want. which is far more common and a standard in North America.
These plans are written to allow for both thicknesses, but really it only becomes relevant when it’s time to cut the tabletop and seat boards in Step 7.
So with that in mind, this is the amount of wood you will need…
For the frame
Use either 1¼” x 3½” (32 x 89mm) stock -OR- 1½” x 3½” (38 x 89mm) stock You will need 30ft (9 meters) in total.
For the seat and tabletop boards
Use either 1¼” x 5½” (32 x 140mm) stock -OR- 1½” x 5½” (38 x 140mm) stock You will need 36ft (11 metres) in total.
You will also need:
4 of 3/8″ (10mm) carriage/coach bolts 3″ (75mm) long with washers and self-locking nuts.
80 of 3″ (75mm) exterior type wood screws. Exterior wood glue.
Tools you will need
- Circular power saw
- Miter saw – able to cut accurate angles
- Jigsaw
- Electric drill
- Hammer
- Hand saw
- Measuring tape
- Pencil
- Square
- Screwdriver
- Level
- Clamps
- Adjustable angle bevel.
- 3/8″ (10mm) drill bit for the bolt holes,
- 1/8″ (3mm”) drill bit for the screw holes,
- 1″ (25mm) drill bit to countersink (embed) the bolt head,
- (Optional) A bench saw would be helpful but not essential.

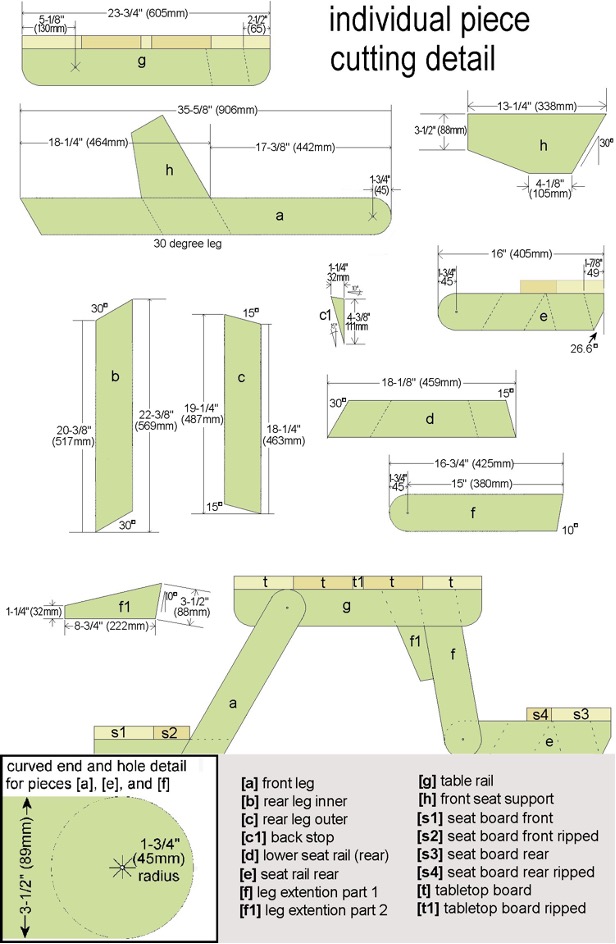
Step 1. Cut the frame pieces
Cut the frame pieces according to the dimensions given in the ‘individual piece cutting detail’, namely pieces [a] to [h]. Cut two of each piece.
Note 1: All the pieces are from 3-1/2″ (89mm) wide stock except for pieces [h]
which is cut from 5-1/2″ (140mm) wide stock
Note 2: Pieces [h] have to be rebated, and pieces [f] need a countersunk hole, as you will see further on.
When you have cut pieces [h] (the front seat supports), they will need to have a rebate cut out of each piece as below. Ensure the pieces are mirrored.
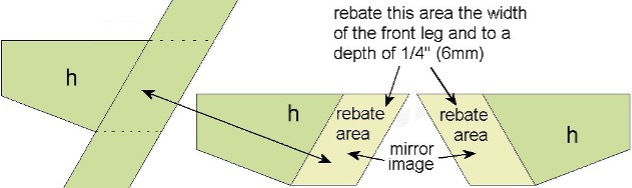

Make the rebate (cut-out area) the width of the front leg and a depth of 1/4″ (6mm). You can do it with a bench-saw or a circular saw. Set the blade to a depth of 1/4″ (6mm) and make multiple cuts along the cut-out area (fig.1). Clean out the rebate (cut-out area) with a sharp chisel (fig.2).
Step 2. Drill the frame pieces
Pieces [a], [e], [f], and [g] will need 3/8″ (10mm) holes through them – positioned as shown in the ‘individual piece cutting detail’ on page 8.
On pieces [f] only, first drill a 7/8″ (22mm) starter hole (countersink hole) into the face side of each piece, 1/4″ (6mm) deep, to house the bolt head. Continue through with a 3/8″ (10mm) hole. Details as below.

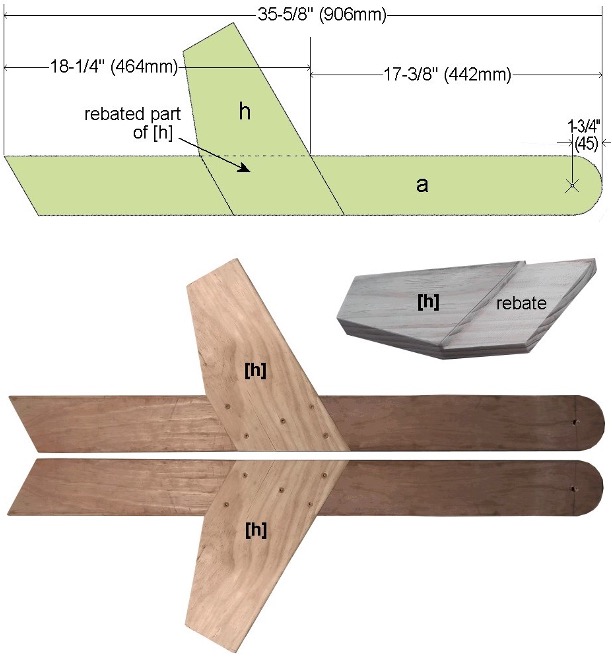
Step 3. Make up the front legs
Fix the front seat support [h] to the front legs [a]. Assemble to the dimensions given below.
The legs must be made up in a mirror image of one another.
The rebated part of the seat support [h] fits over the front leg [a]. The rebated detail is shown in Step 1.
Glue and screw, four screws at each meeting.
Step 4. Assemble the rear-seat end-frames
Remember, each one is a mirror of the other.

Make up the two rear-seat end-frames taking note of the given measurements in the drawing above and that the top of the legs [b] and [c] are flush with the top of piece [e].
Secure with glue and two screws at each meeting.

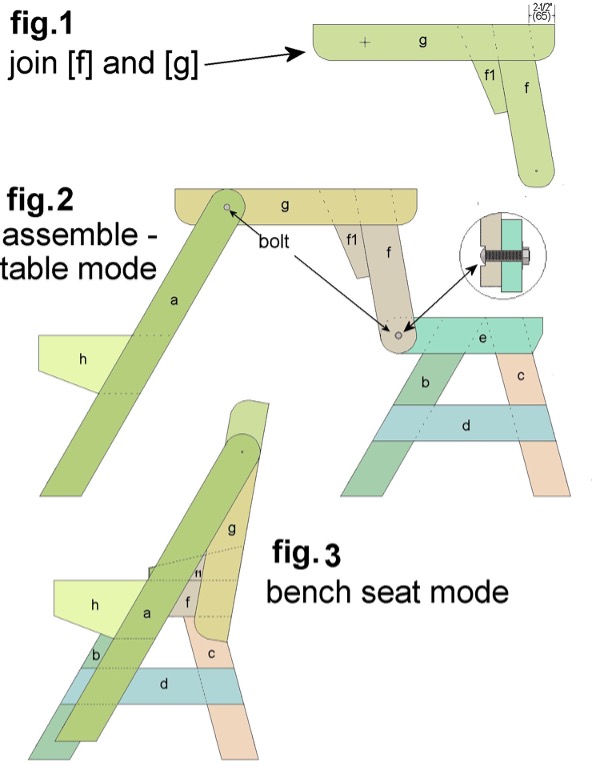
Step 5. Assemble the side frames
Now, with all the pieces cut and drilled, join pieces [f] and [g] as shown in fig.1
below.
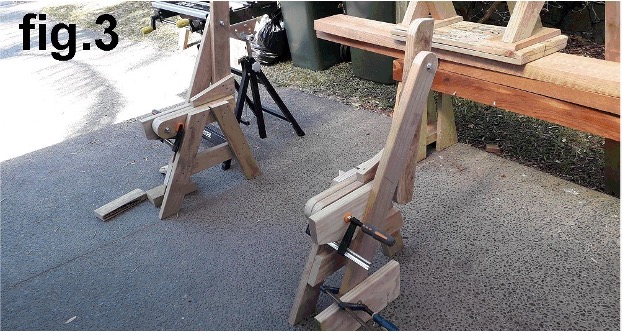
Next assemble the side frames as shown in fig.2, and if all’s well, when you fold it back it should look like fig.3.
Step 6. Prepare for the tabletop and seat boards
Fold the side frames into seat mode and lay them on their side on a flat surface. Place a 1/4″ (6mm) packer between pieces [f] and [h] and ensure pieces [e] [f] [h] are flush at the top. See fig.1 below.
Then hold each side frame in that position with a clamp. See fig.2 below.

Stand each side frame upright. Clamp a block to the bottom of the front leg [a] for balance. See fig.3 below.
Space the side frames apart in readiness for the seat boards.
Step 7. Cut the tabletop and seat boards to length

If you use 1-1/4″ x 5-1/2″ (32 x 140mm) lumber
- Cut 5 @ 51-1/2″ (1310mm)
- Cut 2 @ 47-1/2″ (1208mm)
- Cut 3 @ 41-3/4″ (1061mm)
If you use 1-1/2″ x 5-1/2″ (38 x 140mm) lumber
- Cut 5 @ 51-1/2″ (1310)
- Cut 2 @ 47″ (1196mm)
- Cut 2 @ 40-1/4″ (1025mm)
Step 8. Rip the tabletop and seat boards to suit
Rip means to cut a board lengthwise.

The tabletop is 23-3/4″ (605mm) wide.
In the previous step, you cut 5 boards for the tabletop. You will have to rip (cut lengthwise) one to suit.
The front seat is 9″ (230mm) wide.
In the previous step, you cut 2 boards for the front seat. You will have to rip (cut lengthwise) one to suit.
The rear seat is 8-1/8″ (205mm) wide.
In the previous step you cut 2 boards for the rear seat. You will have to rip (cut lengthwise) one to suit.
Step 9. Fix the front seat boards
By now you will have all the pieces cut and prepared so it’s just a matter of putting it all together.
From here on in it will be mostly a pictorial guide so just follow along, look at the pictures, and read the stuff underneath them.

Fix the front seat boards as shown in the photo above.
Screw only at this stage. Do not glue, just in case they may have to be taken off for an adjustment.
The overall width of the boards is 9″ (230mm).
Make the ends of the boards flush with the outside face of the seat supports [h], and the front side of the boards flush with the front of the seat supports [h].
Basically, just as shown in the picture.
Step 10. Fix the rear seat boards

Fix the rear seat boards as shown in the photo above.
Screw only at this stage. Do not glue, just in case they may have to be taken off for an adjustment.
The overall width of the seat is 8-1/8″ (205mm).
The boards should be flush at the back edge with piece [e].

Step 11. Fix a stop (to stop spreading)
Now is a good time to fix a stop to the inside of the front legs [a] to stop the unit from spreading more than intended.

With the picnic table in table mode (the legs should be spread out at the bottom approximately 52″ (1320mm)), screw a stop to the inside of the front leg [a] directly under piece [g]

Important! Make sure the stop is as close as possible to the outside edge of the front legs [a], so it does not get in the way when the seat is folded into bench-seat mode.
I used a hard rubber door stop for the stop, but you can use pretty much anything similar to do the same trick.
Step 12. Tabletop preparation
This makes things easier – make the tabletop up first. Lay the tabletop boards together and hold them in place with a couple of battens temporarily fixed to the boards.

Check the parallel measurements of the table rail [g] in relation to the seat rails. You may need to add a temporary stay, spacer, or prop to hold everything true.

Step 13. Fix the tabletop
Screw the tabletop onto the table rail [g] ensuring everything is parallel and square. Make the sides flush with the ends of the table rail [g] and have the overhang equal to each end.
Once fixed, remove the temporary battens from the tabletop.

Note: At this stage, I did not apply any glue to the tabletop boards or the seat boards – only screws in the case any of the boards had to be removed for adjustment.
Once I was sure all the mechanisms worked as intended, I removed the boards one by one, applied glue, and screwed the boards back on.
Step 14. Fix the back-stop

Fold the table to bench-seat mode. If everything works as intended – pack the tabletop (in backrest mode) off the ground at a height where the bottom of the tabletop is just touching the back leg [c]. Then fix the backstop

Step 15. Another spread stop


Just for more ‘stop spread support’, add another spread stop. Just shape a pieces of wood as shown and glue and screw it in place. Refer to the pictures.

Step 16. Bracing
And finally, add some bracing as shown in the picture. There’s sure to be enough off-cuts of lumber to make up the brace pieces – a batten under the middle of each seat and a brace at each end of the rear seat to stop any ‘wobble’.


Done!
Copyright stuff
These plans and writings are copyright protected. In short, that means this:
These plans are for personal use only and cannot be passed on, resold, or redistributed without the copyright owner’s express written permission. All rights are reserved.
However, you can do what you like with what you make with these plans. You can make as many of the items as you want. Keep them, give them away, sell them, and do what you want with them.
It is the plan that is copyright protected – not the item that you build from the plan.
Disclaimer
Although all due care is taken, no responsibility is accepted by the author (Les Kenny) for any wrongful information, omissions, or any other irregularities regarding this article.
This project is to be undertaken at the user’s own risk.
No responsibility will be accepted by the author (Les Kenny) for any injury, harm, or loss to any person while using or undertaking this project, either directly or indirectly.
Work safe – have fun.
If you have never used a power tool before – do so under the supervision of a capable person.
Copyright © Les Kenny. All rights reserved. Reproduction of this content is strictly prohibited.
About the author
With a background in building, Les Kenny has had an online presence spanning over two decades of designing, building, and writing about ‘How to Make’ woodworking and DIY projects.
From 2000 until 2018 (for 18 years) he wrote primarily for buildeazy.com.

How To Remove Mold From Wood

Buildeazy.com started as a hobby for Les Kenny over eight years ago when he decided he would share his successful DIY projects with the wider world, putting them up online for anyone to access.