How to make and fit double lumber gates and how to offset and align the hinges allowing the gates to open over raised groun
Introduction and how to hinge and align a gate
It’s a simple enough project to build and attach a standard type cedar garden gate as long as the posts are parallel and the ground is level and even. However, what if the location is not ideal and the ground slopes up from the gateway entrance? How can you install a gate if the ground slopes up higher than the bottom of the gate, affecting the alignment of hardware and braces?
Well, there are a few ways to counter this problem in your building project, but they might not be suitable in all cases.
Here are a few of the more common solutions:
- You could fit the gate to open away from the slope, but depending on the make-up and position of the fence and gate posts, this might not always be possible.
- You could raise the gate higher off the ground using additional braces and screws so it can open over the sloping ground. But that’s not much good if you are trying to keep little puppies or other critters locked in. They would all scarper under the bottom of the gate.
- You could dig out the ground that slopes higher than the bottom of the gate. Not always possible.
- You could install a sliding gate. Mmmmmmmmmm, that’s a bit tricky and really needs a complete chapter to go there. Alternatively, using double pickets can provide better stability.
- Another method often overlooked in gate building projects is creating wide swing gates that can accommodate shifts in ground level more smoothly. By using double rails and securing the pickets with sturdy screws, you can ensure the gate remains level even when the ground shifts.
Or you could offset the hinges using specialized hardware to better brace the gate.
WHAT?
Offset the hinges. That is, align the hinges so that the bottom hinge is not in a vertical line (directly under) the top hinge. The amount of offset determines what the angle or pitch of the gate will be when opened. When the gate is open, the bottom of the gate angles up, thus enabling the gate to open over raised ground.
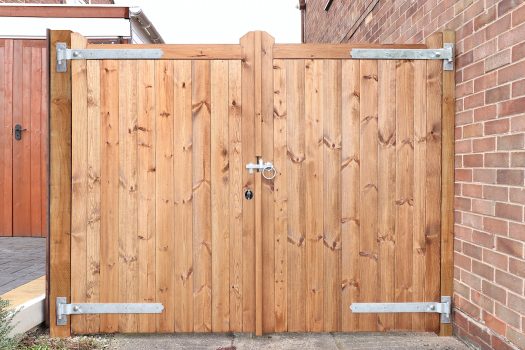
We were recently asked to build and fit a gate into an opening between existing lumber posts in a 1800mm (6ft) high fence. The opening was over 2100mm (7ft) wide and in this case, double gates made from cedar would be more practical than a single wider gate. The gates had to open inwards and had to be low enough to the ground to keep a little puppy in. The ground sloped up inwards from the gate entrance at right angles to the fence line, as well as sloping along the fence line. We were told that we could not dig out any of the ground that sloped upwards.
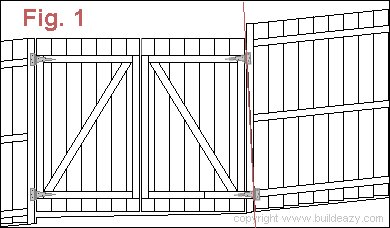
Below (Fig.1) is a drawing of how the bottom hinge on the gate can be offset using appropriate hardware and braces to enable the gate to open over raised ground. The red line in the drawing shows how the top and bottom hinges should be aligned, maintaining an even gap between the gate and the fence.
How much should the bottom hinge be offset?
About half the degree off plumb from the degree off level that the incline of the ground is along the fence line.
Lost yet?
Okay! Suppose the upward slope of the ground along the fence line is 6 degrees (approximately a rise of 1 in 10), then the bottom hinge should be offset vertically from the top hinge by 3 degrees. To achieve this, use appropriate screws and braces to securely attach the hinges.
Of course, you can always work it out by trial and error; have a couple of people hold the gate in an open position and measure the offset.
Note: Sometimes the ground might also be sloping up at right angles to the fence line at a steeper angle than the slope along the fence line. In that case, the bottom hinge will also need to be offset at right angles to the gate. This can be done by adding a cedar block of wood to the gate and fence, thus packing the hinge out. Ensure you use the right hardware and braces for added stability. You will see how this is done in the following steps of the project.
Even more, addressing slopes can be simplified through the use of adjustable hinges that can be finely tuned with screws after installation to account for minute slopes or bumps along the pathway, enhancing the gate’s functionality and stability.
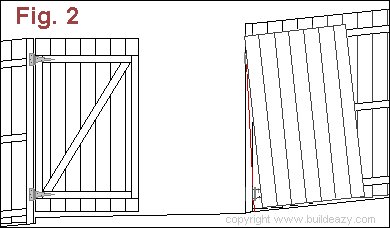
The drawing below (Fig .2) shows how the gate tilts up when opened.
How to make double gates
Measure for the gates.
- Measure the width of the opening between the fence posts where the double gates are to go. Deduct approximately 25mm (1″) to allow for the gaps between the two gates and also between each gate and post.
- In this case, the opening was 2125mm (85″). We, therefore, made each cedar gate frame 1050mm (42″) wide. That allowed for an 8mm (1/3″) gap between the two gates and also between each gate and post, ensuring proper alignment of the rails.
- When building the gate frames, plan so that the bottom horizontal frame member will line up with the bottom horizontal fence rail. Refer to Fig.1 on the previous page. This is important for the gate that requires an offset bottom hinge and the attachment of necessary hardware.
The gate frame and hinge offset block.
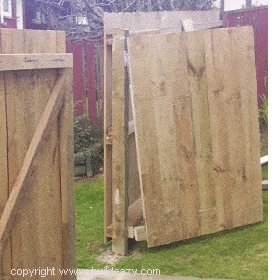
On even ground, make two rectangular cedar gate frames out of 75×50 (2×3) lumber, ensuring that all hardware is ready for attachment.
Square and brace the gate frames.
- Measure the two opposing diagonals of each cedar gate frame. Adjust each frame until the two opposing diagonal measurements are the same, then the corners of the rectangles will be at right angles.
- (In other words, the frames will be square and not be skew-whiff!)
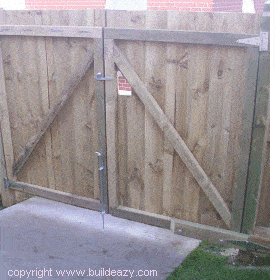
- For each gate bracing, lie a piece of 75×50 (2×3) lumber diagonally from corner to corner on the frames. Mark, cut, and fix in place with galvanized screws. (See picture).
- As shown in the picture, bolt a block of wood to the bottom horizontal frame member using appropriate hardware. The thickness of the block and the overhang will depend on the required hinge offset. Refer to the previous page.
Nail the vertical gate boards to the frames and fix the hinges.
- Turn the gate frames over and nail the 150×25 (1×6) cedar vertical fence boards to the frames using 60mm (2 1/2″) flat head galvanized screws. Make the boards flush (even) with the sides of the frames and overhanging top and bottom to suit. The last fence board on each gate might need to be cut (ripped) down the length of the board to fit flush with the edge of the gate frame.
- Turn the gate frames back over, and attach the hinges using sturdy screws. Make sure the top and bottom hinges are in alignment with the hardware. See picture.
How to fit double gates
Fix the gates in place
- Place the double gates in between the two gate posts and sit them on a level board packed up off the ground to the required height (see above picture). Place wedges or packers at the sides of the gates and the middle of the gates to ensure the gaps between the gates and posts are even, and the gates are ‘jammed in place’ securely.
- The gates should be able to stay in full position by themselves while the hinges are screwed in place with appropriate hardware.
Check that the gate opens.
- Take out all wedges and packers and see how the double gates open smoothly.
- The gate with the offset hinge should lift above raised ground when opened, ensuring proper alignment with the hardware.
Finishing touches to the gates
- Close the double gates and add the necessary hardware, ensuring all components are securely attached.
- Fit the bolt and gate latch using appropriate screws. Note that usually the latch should be put half-way up the gate, but if the gate is to keep little kids in or out, then place the gate latch toward the top of the gate for better accessibility.
- Finally, cut an inch-sized hole in the gate near the latch and big enough to put a hand through. This allows the gate to be opened from inside or outside without additional tools.
Note: There is also another benefit to the “offset hinge”: the gate will always swing shut by itself, merely because of gravity, without the need for additional hardware or screws.


I need the name of the hinges shown long silver ones please