Contents
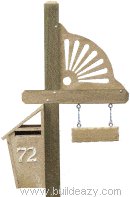
This attractive mailbox stand is made out of 100×100 (4×4) lumber for the post and arm, and 100×50 (2×4) for the name plaque.
Mailbox stand plans

Take note that in some places there are strict postal regulations as to the structure of mailboxes and dimensions including height off ground. Check to see what requirements are required in your area.
Material
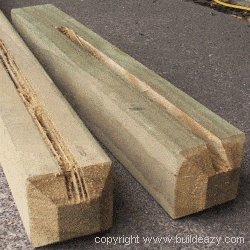
Wood: Altogether you will need approximately 3300mm (11ft) of 100mm x100mm (4″x4″) lumber for the post and arm, 300mm (12″) of 100mm x50m (2″x4″) for the name plaque and a piece of 18mm (3/4″) plywood about 450mm x 450mm (18″x 18″) for the decorative bracket. There is a separate section on how to make the decorative bracket
You will also need 4 carriage bolts with nuts and washers 8mm (5/16″) x 110mm (4 1/2″) long for the stand and for the name plaque you will need four 8mm (5/16″) screw eye bolts, four 18mm (3/4″) key rings and chain to suit.
Of course….. You will also need a mailbox and there is a separate section how to build a mailbox
Step 1. Instructions – Making the groves
- Cut the post and arm to length and cut a 45° angle around the top of the post [a] and around both ends of the arm [b] as shown in the plan above.
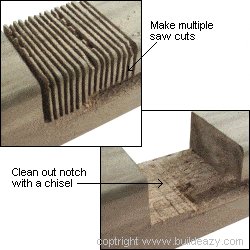
- Make a groove 25mm (1″) deep and 18mm (3/4″) wide in both the post [a] and the arm [b] to house the decorative bracket.
- Make the groove 600mm (24″) long on the post and 500mm (16″) long on the arm.
- The grove can be made with a router or by making multiple saw cuts with a circular saw and then by cleaning the grooves out with a chisel.(see picture)
Step 2. Instructions – Making the notches and assembling the stand
- Make a notch in both the post and the arm to ensure a flush fit at the joint.
- Make the depth of the notches half the thickness of the post.
- The notches can be cut by making multiple saw cuts with a circular saw and then by cleaning the notches out with a chisel.(see picture)
- Bolt the arm to the post ensuring the arm is at right angles to the post, insert the decorative bracket into the grooves and secure with bolts.
- Use 8mm (5/16″) x 110mm (4 1/2″) long carriage bolts.
- Refer to the plan above for bolt placement.
Step 3. Instructions – The name plaque and the mailbox
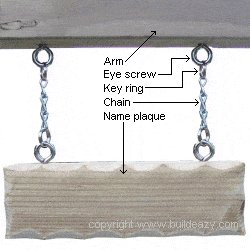
- Make the name plaque from a piece of 100mm x50mm (4″ x2″) approximately 300mm (12″) long.
- Make a series of decorative scallop type notches around the plaque. This can be done with a chisel or a disc sander.
- Hang the plaque from the arm using 8mm (5/16″) screw eye bolts and chain. The chain can be attached to the eye bolts with key rings.
- Bolt a mailbox to the side of the post either above or below the arm, it is just personal preference.
- For instructions on how to build a mailbox.
- Next just a matter of concreting the post in the ground and finally a bit of paint for added protection.


