Contents
Introduction
Managing a small flock of chickens is much easier if you do not have to get up and open the chicken coop door in the morning and close the chicken door after dusk.
Also, the chickens are safer, if the door opens and closes automatically.
One of the facts that one learns when taking care of chickens is that everything (foxes, coyotes, raccoons, possums, hawks, dogs, humans…) loves to eat chicken.
To keep the chickens safe, it is a good idea to shut the coop door just after dusk (most chicken predators are nocturnal).
Having an automatic chicken coop door makes shutting the door easier and more reliable.
It also makes one’s life easier, when you want to go to a movie, go shopping; come home late from the office, or a myriad of other things you do at dusk.
Concept Design
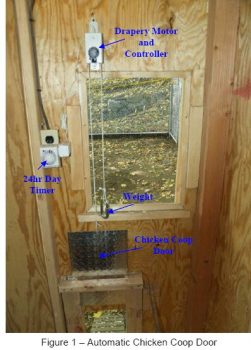
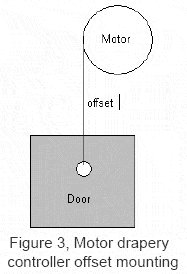
Having decided to design and build an automatic chicken coop door, I went to the World Wide Web and used Google I tried to find a commercial product or someone’s home made design for an automatic door. I found a commercial product (attached to a chicken coop), but it was too expensive. I also found a home made design that was clever and a reasonable cost. I decided to pursue the home made design and reengineer it for my situation. Figure 1 shows the reengineered, finished configuration.
It is composed of the following list of parts:
1). Chicken coop door, aluminum 1/8″ thick cut to fit opening.
2). Motor drapery controller, model no: AAM80
3). Cord between the motor and the door, nylon 1/8″
4). Intermatic appliance timer, model no: TN311C
5). Weight (~ the weight of the door)
And cost about $120 in parts. We won’t discuss the cost of labor.
Continuing the design concept description, the coop must have electricity w/two electrical plugs. The Motor Drapery Controller automatically changes the direction of the motor when it reaches the end of drive. One sets the distance of the drive (to open the chicken door ~1 ft).
When it raises the door ~1 ft. it automatically stops and switches the direction of the motor.
The next time the motor drapery controller is turned on, it drives in the opposite direction ~1 ft, that is, it closes the door.
It is important for the operation of the motor drapery controller to drive a load in both directions. When it opens the door it is lifting the weight of the door. It needs a weight on the opposite end of the cord, so when it closes the door, it lifts the weight and keeps the cord taught.
To energize the motor drapery controller, an Appliance Timer is used.
One sets the Appliance Timer (with supplied plastic inserts) for sun rise and dusk. As the electric clock moves through it daily rotation the motor drapery controller is activated by the clock switch at dawn and dusk and the door opens and closes, respectively.
The chickens roost according to the time of day, so it is important to set the timing of the door according to the chicken’s internal clock or you will have some unhappy and unprotected chickens.
If you are far from the equator, dawn and dusk change summer, fall, winter and spring, so you need to change the switching time twice or four times a year.
Design
The following description will include specific details of the design required to make the automatic chicken door design operate reliably.
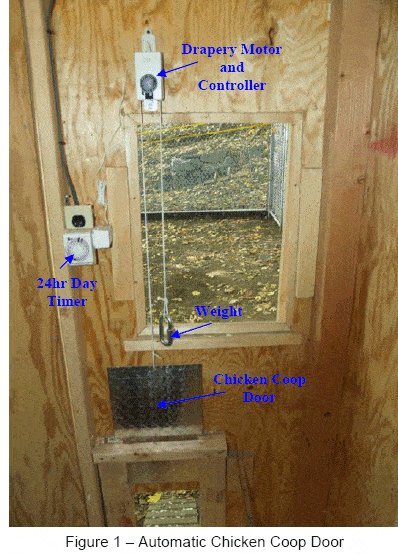
- First, the chicken coop door must operate easily and reliably. My aluminum sheet door (1/8″ aluminum) is not bent and slides in a 3/8″ slide.
- The door has a hole drilled about 1/2″ from the top in the center.
- It is important that the whole be in the center, so the door draws up and slides down easily without canting in one direction or the other and catching on one of the slides.
- Figure 2 shows a cross section of the door and slides. Attach the cord to the door and make sure the door opens and closes easily and reliably.
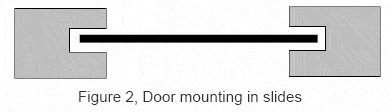
- Mount the motor drapery controller above the door. The cord should go directly vertical, which means the motor will be mounted with a slight offset (the size of the diameter of the motor pulley), as shown in Figure 3.
- The length of the cord needed and the length of the motor drive (time motor is on) need to be matched with the amount the door must move to open and close.
- It is possible to set the motor drive by changing the little plastic arms on the motor pulley. The closer they are to the switch, the shorter the drive time and the smaller the door movement.
- The little plastic arms rotate around the diameter of the motor pulley. They can be easily adjusted. If you plug in the motor drapery controller power supply to 110 VAC plug, the motor will move.
- Wait till the movement is complete. Un-plugging and re-plugging the power supply will drive the motor in the opposite direction.
- Adjust the little plastic arms until the door opens and closes enough to let the chickens in an out.
- Attach the weight to the opposite end of the drive cord so it does not interfere with the door, as it moves up and down. Plug in the appliance timer into the socket in the coop. Set the timer for the correct time of day. Determine when you want the door to open and close the door, for example in the Spring in New England (Boston) 6:00 am and 7:30 pm. Place the black (or green) inserts into the clock wheel at those locations. Place the red inserts into the wheel about half an hour later. The black (or green) inserts energize the plug in the side of the timer. The red inserts deactivate the plug in the side of the timer. The motor controller has to be turned off or it will not see the next turn on.
- Plug the drapery motor controller power supply into the plug on the timer. Try your settings by manually rotating the timer wheel and watch the door move up and down. After the door starts to move, let it complete its movement before you continue to move the timer. If the experiment works, and the door moves up and down, as you want it to move, reset your appliance time to the correct time and let it do its work.
- You may have to make some adjustments to get your door movement in synchronization with the chicken’s internal clocks. Such is the way of the world. Chickens get up with the sun and go to roost after the sun sets. You do not have to train them. They are hard wired, but there is variation in every flock and you do not want to trap a chicken outside. When I first set up the system, I locked a chicken outside the coop and she was upset. I changed the setting on the timer and have never locked a chicken outside again.
Add-A-Motor Drapery Control
- Part Number: AAM80
Motorize Drapery
- Open-close up to 15 feet wide
- Center-open up to 30 feet
- Fabric weights up to 60 pounds
Motorize Vertical Blinds
- Rotate or traverse
- Rotate to virtually any angle
- Traverse up to 15 feet wide
- Center-open up to 30 feet
Motorize Shades and Mini-Blinds
- Lift and lower shades up to 12 feet tall
- Most widths and fabric weights
- Tilt mini-blinds that have chain control instead of a wand
Easy to Install
- The Model 80 attaches to the loop-end of any size cord, or metal or plastic bead-chain, without modification. Chain connector can pass through motor without affecting operation. Motor affixes to wall with supplied “Fast Anchors”…no drilling.
CORRECTIVE UPDATE POST: RE THE ADD-A-MOTOR
Please note the following
My company manufactures the Add-a-Motor Model 80 motor featured in your guideline. The Model 80 is not approved for this application. Many people see your webpage and then purchase the wrong motor from our dealers. The Model 80 can fail in a few months when used with a chicken coop door. The correct motor for this application is our Model D20 motor which is specifically designed to operate chicken coop doors.
I respectfully request that you modify your webpage and provide the correct motor information. If you are interested in detailed D20 product information, please visit www.add-a-motor.com/Model D20 Motor for Chicken Coop Doors.htm
Mike Zerillo
Add-a-Motor, Inc.
Features:
- Automatically moves window covering to fully opened, closed or any two desired positions.
- Opens and closes at a natural speed.
- Set-n-Forget. Plug-in ready. No electrician required.
- Compact size: 2 x 3 x 4 inches (approximate).
- Heavy-duty appliance quality.
- Includes power supply.
Child Safety Features:
- Cord/chain loop is secured inside case.
- Low voltage DC motor.
- Maximum run duration 45 seconds.
- Sensor can interrupt or prevent cycle.
- Patented stop security.
- No-tools wall mount release.
Benefits:
- Versatile: Operate and window covering that has a loop-end cord or bead-chain (new or existing).
- Practical: Combine various types of controllers for multiple benefits. Example: Remote, plus a timer offers convenience, security and energy savings.
- Operate hard to reach window coverings.
- Aid the elderly and disabled.
- Light-feed plants. Prevent fading.
- Affordable automation anywhere: home, office, rental property, vacation home.
Drapery Controller Operation
- The Model 80 Add-A-Motor opens and closes draperies, vertical blinds, horizontal blinds, roman shades, and shades that have a pull cord (or ball-chain) with a “U’ shaped end-loop. Its drive wheel fits cord (chain) supplied by all window covering manufacturers. It can be operated on a time schedule, or by remote control according to the features of the control switch supplied by the consumer.
- The Model 80 opens and closes window coverings (WC) to all positions that can be selected by hand operating the WC cord (chain). It can be set to open and close a WC partway, all-the way, and all positions between. Virtually any two positions can be set as Automatic Open and Close stop positions. It does not have a built in timer.
HOW THE MODEL 80 WORKS
- Similar to hand operating the Window Covering, the Motor can pull the cord (chain) in 2-directions to open and close the WC. The Motor “knows” to reverse the direction of travel for each new operating Cycle. The Motor is controlled by two adjustable Stop Position Screws that allow you to set virtually any two Automatic Stop Positions.
- The Model 80 runs until an Automatic Stop Position is reached, or until the WC is all-the-way open or closed. The normal run time is about 20 seconds. To prevent the Motor from running continuously it has an electronic “supervisor’ that automatically turns it OFF after 45 to 60 seconds. It also has a Drive Wheel designed to slip if certain conditions exist.
CONNECTING TO THE DESIRED CONTROL SWITCH
- Automatic Clock-Switch, or Sensor
- Clock- switch with 4 or more ON/OFF settings.
- Sound (clap), motion, temperature activated switch.
- Sound (clap), motion, temperature activated switch.
- Remote Control Wall Switch, or Wireless
- Wall switch that controls power to a wall outlet.
- Radio frequency (RF) or infrared (IR) Receiver-Switch plugged into an AC wall outlet, and controlled by a hand-held Transmitter.
- Automatic + Remote Programmable Switch
- Programmable wall switch that controls a wall outlet. These offer time and manual operation.
- Programmable Controller (X-10 protocol) that transmits ON/OFF signals through house wiring. These control a Receiver-Switch plugged into a wall outlet.
- Same features as above.
Central Systems: home automation, electric power management – Smart House, CEBus, LONworks
TIME SCHEDULE OPERATIONS
Select a Clock-switch with 2 ON plus 2 OFF settings, or more. Set it to the current time. Proceed as follows:
EXAMPLE:To automatically open window covering at 7:45 AM, and close it at 8:30 PM, set four (4) actuation times as follows:
1. Set a 7:45 AM ON actuation time.
2. Set a 7:46 AM OFF actuation time, or as soon as possible after.
3. Set a 8:30 PM ON actuation time.
4. Set a 8:31 PM OFF actuation time, or as soon as possible after.
The number of “ON” settings determines the number of times the WC can be opened and closed daily. A clock-switch with 6 ON settings can open the WC up to 3 times daily, plus close them 3 times daily; a total of 6 movements. Each ON causes the Motor to move the WC to the next Stop Position. Some switches permit 12 or more WC movements daily, with different times on weekends.
Intermatic 120V Appliance Timer
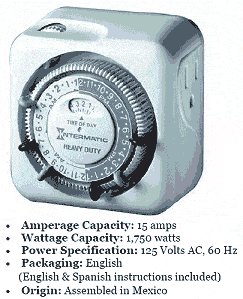
- This heavy duty grounded timer from Intermatic allows for automatic control of air conditioners, heaters, and heavy-duty lamps and appliances. It plugs directly into standard 120V 3-prong wall outlets and permits up to 2 on/off settings per day.
- Placement of the green trippers determines when the connected appliance is turned on, and placement of the red trippers determines when the appliance is turned off.


