Contents

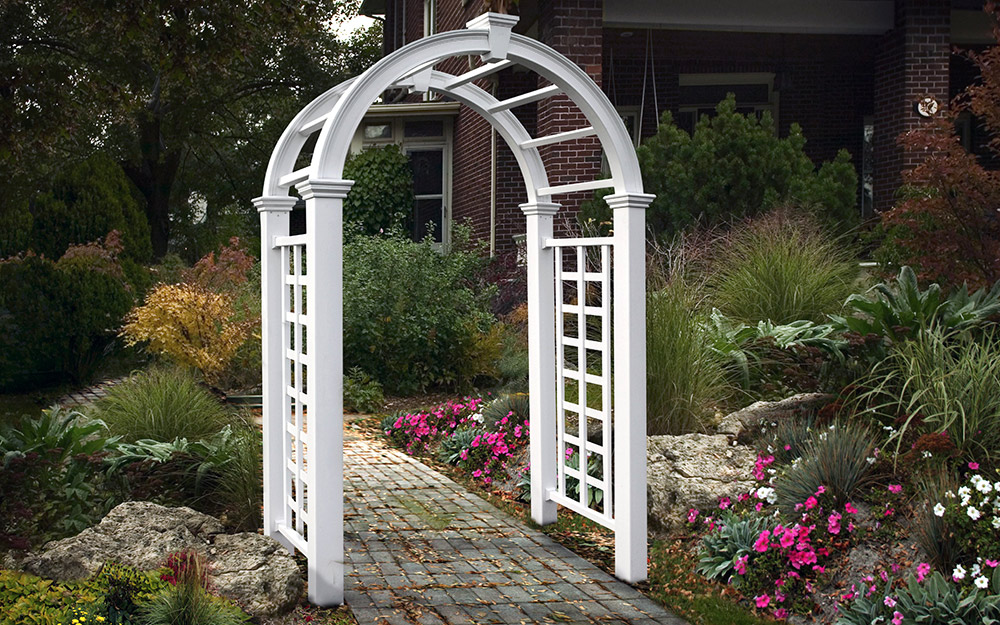
To enjoy beautiful garden scenery doesn’t necessarily mean that you have to visit the park or public botanical gardens. You can easily beautify your garden through a wide selection of DIY craft projects without having to dig deep into your pockets. One of the many things you can build is a garden arch.
Learning how to build a garden arch goes a long way as you can use it for a myriad of applications – whether it’s to simply make your garden aesthetically pleasing entryway to your garden, support for climbing plants in the garden, or even as a decorative prop for when you host an intimate party in your home. Below is a simple, yet, detailed guide on how to build a garden arch in your home.
Tools And Materials
Before you learn the steps for building a garden arch, you must first know what need is. To ensure long lasting durability, you want to ensure all the equipment used in the building process is water and weather-resistant. Some of the essential tools and materials for the project include:
[su_spoiler title=”Required Tools for this Project:” open=”yes” style=”simple” icon=”plus” anchor=”” class=””]
[su_list icon=”icon: arrow-circle-right” icon_color=”#4f8901″]
[su_row class=””]
[su_column size=”1/2″ center=”no” class=””]
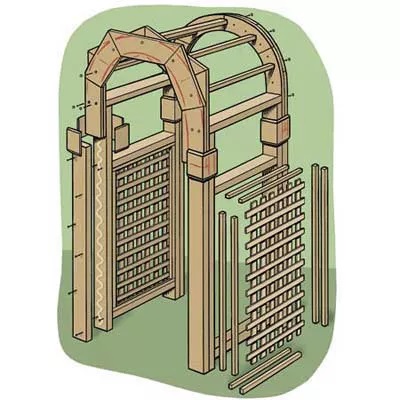
- Rot-resistant wood planks
- Two 1×6 planks
- Four 2×4 legs
- Four cross pieces four lattice stops
- Two short 2×4 legs
- Eight 2×2 purlins
- Two 4×4 posts
[/su_column]
[su_column size=”1/2″ center=”no” class=””]
- Milter saw
- Drill & 2×2 drill bits
- Jigsaw
- Mitered trim
- Clamps
- Water-resistant Wood glue
- Screws
[/su_column]
[/su_row]
[/su_list]
[/su_spoiler]
Steps To Build A Garden Arch
Garden arches come in different shapes and styles. So, it comes with no surprise that you will find different techniques of how to build them. You can even use your router at home to create more designs through trimming and edging. However, the basics are always the same. The basics are what the steps below will cover.
You can choose any type of hardwood you want. Additionally, you can paint the wood or apply an outdoor-friendly wood primer or sealer to give it a distinctive and aesthetically attractive look. Sand and apply primer to the wood before assembly and then, paint the arch after the assembly process. This is because during assembly some parts will most likely get scratched.
[su_divider top=”no” style=”default” divider_color=”#444″ size=”3″ margin=”15″ class=””]
[su_dropcap style=”flat” size=”2″ class=”” dropcap_color=”#fa5738″]1[/su_dropcap]
Step
[su_divider top=”no” style=”default” divider_color=”#444″ size=”3″ margin=”15″ class=””]
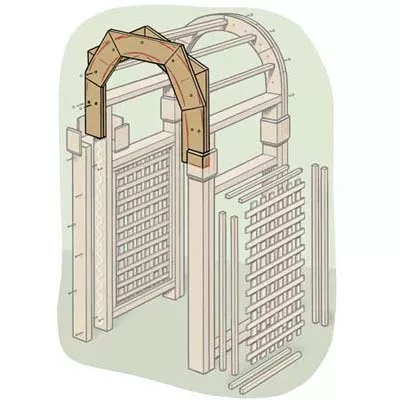
The first step involves making arches. Start by cutting and gluing two 1×6 wood planks (they should be bent to at least 22.5 inches angle and measure 21 inches long). Trace a half curve n the glued wood and then, using a jigsaw cut through the traced part through both layers of the wood and repeat the step for a second arch. You can trace the second arch as you cut using the first one to ensure precision sizing.
[su_divider top=”no” style=”default” divider_color=”#444″ size=”3″ margin=”15″ class=””]
[su_dropcap style=”flat” size=”2″ class=”” dropcap_color=”#fa5738″]2[/su_dropcap]
Step
[su_divider top=”no” style=”default” divider_color=”#444″ size=”3″ margin=”15″ class=””]
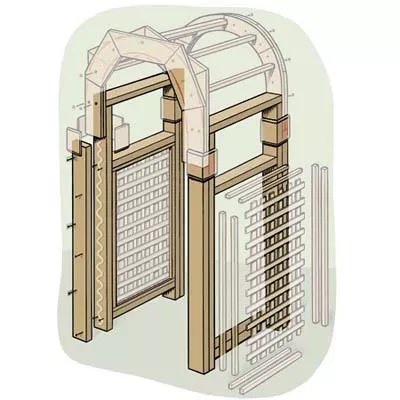
The next step is to put together the side frames. This second step is divided into two. The first sub step is to create the other frames followed by the filling inside the frames. For the first sub step, you want to create two frames for either side of the arch. Start by attaching dual center cross pieces between two vertical 2×4 legs. The next step is to attach the lattice stop to the inside of the frame.
The lattice should ideally be fitted about half an inch away from the top part. Turn the frame onto the other side and place another lattice stop. The lattice stop is what will hold the lattice (interior filling) to be added in the second sub step. After inserting the lattice stops on the first frame, do the same for the second one. Then, on either frame, insert a short 2×4 leg to function as posts at the bottom.
[su_divider top=”no” style=”default” divider_color=”#444″ size=”3″ margin=”15″ class=””]
[su_dropcap style=”flat” size=”2″ class=”” dropcap_color=”#fa5738″]3[/su_dropcap]
Step
[su_divider top=”no” style=”default” divider_color=”#444″ size=”3″ margin=”15″ class=””]
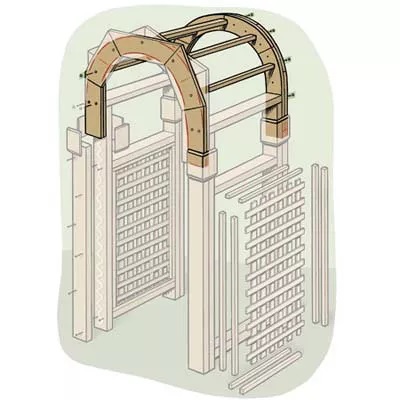
Before you jump on the frame building’s second sub step, you want to first do the third step. This step involves the installation of purlins. Purlins are the long and thin horizontal planks or beams that offer structural support to the arch. Whilst the purlins offer structural support, their gapped installation also comes in handy during rainy days – allowing the rainy to easily drain through.
To install the purlins, first lay the arches on top of one another. Then, using a drill, drill pilot holes for purlins (2×2) through the arches. Then, using glue and screws, attach the purlins through the pilot holes. You can choose to do so using the hole filling or plugging method.
[su_divider top=”no” style=”default” divider_color=”#444″ size=”3″ margin=”15″ class=””]
[su_dropcap style=”flat” size=”2″ class=”” dropcap_color=”#fa5738″]4[/su_dropcap]
Step
[su_divider top=”no” style=”default” divider_color=”#444″ size=”3″ margin=”15″ class=””]
This final step involves the assembly of the entire garden arch including the installation of the lattices. To do so, set the assembled components on 2×4 legs first (this includes the longer legs, frames, and arches). Then, use a mitered trim to clean up and cover the joint area between the arch assembly and the posts. After you are done, install the garden arch where you want using 4x 4 posts.