Contents

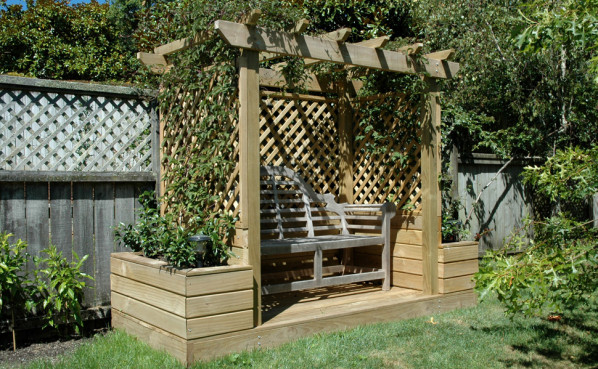
Wondering how you can improve the look and aesthetics in your garden? Well, we may just have an idea for you. Learning how to build a garden arbor bench is one way to improve your garden look. Building a garden arbor bench doesn’t only save a buck.
It also comes with the advantage of having multiple uses. You will not only save on investing in separate seating. A garden arbor bench can also be used as support for climbing plants, amongst other uses. Below is a detailed and brief guide on how to build a garden arbor bench on your own at home.
Tools And Materials
Before you begin to build your bench, you must first know the tools required for the task. These include:
[su_spoiler title=”Required Tools for this Project:” open=”yes” style=”simple” icon=”plus” anchor=”” class=””]
[su_list icon=”icon: arrow-circle-right” icon_color=”#4f8901″]
[su_row class=””]
[su_column size=”1/2″ center=”no” class=””]
-
- Good quality and straight lumber with no visible cracks or flaws
- Twelve long 2×4 planks (about 48 inches)
- Three short 2×4 planks (about 16.5 inches long)
- Four long 4×4 planks (about 80 inches long)
- Four long 2×6 planks (about 68 inches long)
- Four long 2×3 planks (about 26.5 inches long)
- Five long1x 2 planks (about 24.5 inches long
- Spirit level for plumbing and aligning all lumber components
[/su_column]
[su_column size=”1/2″ center=”no” class=””]
-
-
- Hammer
- Framing square
- Milter saw
- Screwdriver
- Sander and 120 fine grit sanding paper
- Measuring tape and pencil
- Water-resistant wood glue
- 2.5-inch screws
- 4.5-inch screws
- 7inch carriage bolts
- Drill
- Protective gear – gloves and safety goggles
-
[/su_column]
[/su_row]
[/su_list]
[/su_spoiler]
Steps To Build A Garden Arbor Bench
Garden arbor benches come in different styles. You will find some with more detailed arbor designs or some with lattices on the side to further accentuate their aesthetics. In the steps below, you will learn the basics of building a garden arbor bench. With these skills, you can then add-on extra designs or lattices you want.
[su_divider top=”no” style=”default” divider_color=”#444″ size=”3″ margin=”15″ class=””]
[su_dropcap style=”flat” size=”2″ class=”” dropcap_color=”#fa5738″]1[/su_dropcap]
Step
[su_divider top=”no” style=”default” divider_color=”#444″ size=”3″ margin=”15″ class=””]
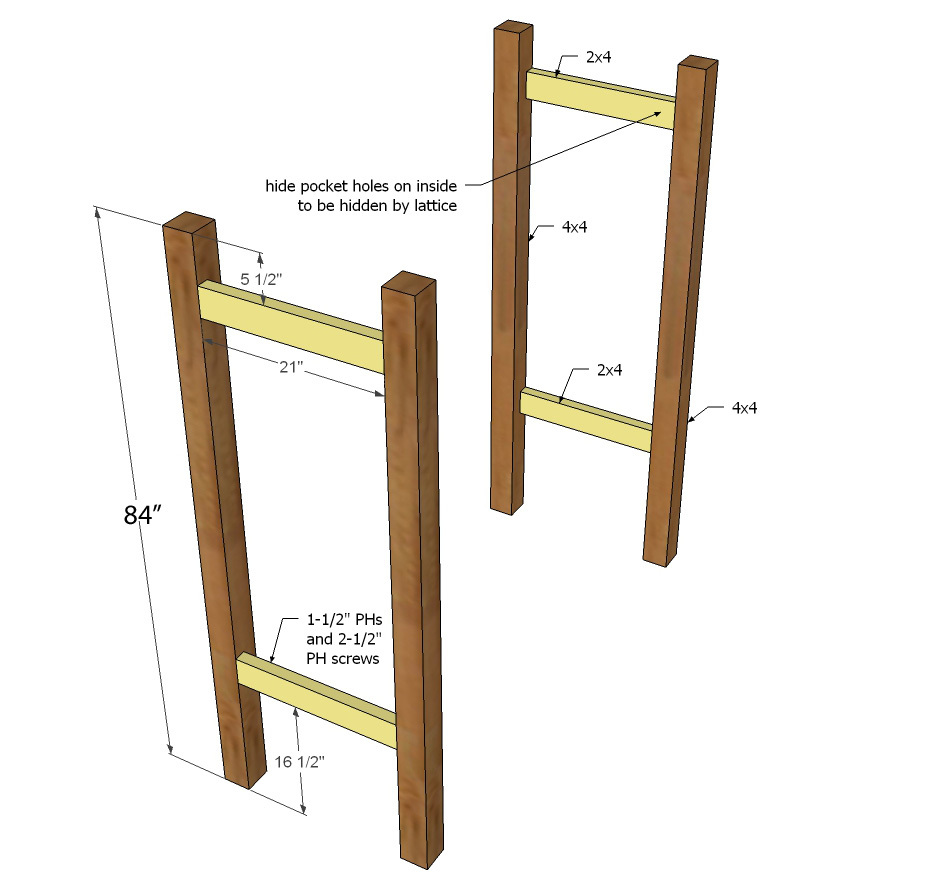
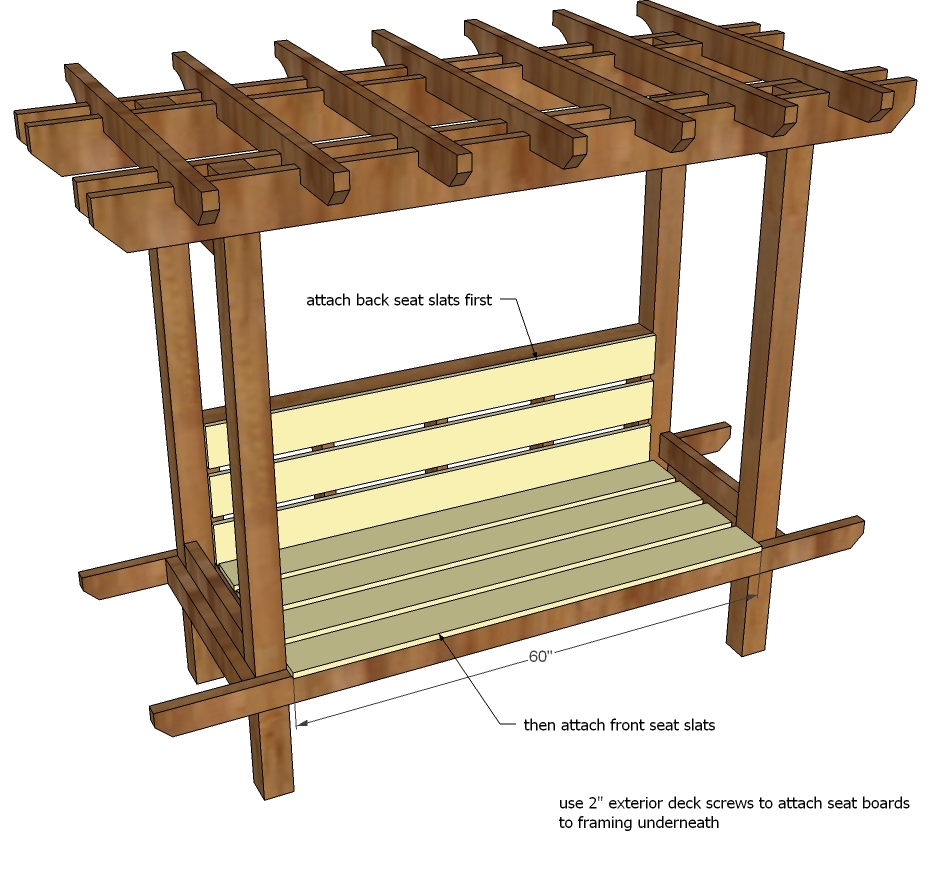
The first step involves building the seat’s back support. In this case, you will need wood glue and a couple of 2.5-inch screws. Put together long, narrow wood planks (measuring at least 15 inches long) vertically and 12 inches away from each other.
Then, within either end of the gaps put together, thick, short wood planks to form a frame. Hold the wood together by countersinking the screws into the wood. To hold them together, you can opt for the pocket hold joinery method or drive the screws through.
[su_divider top=”no” style=”default” divider_color=”#444″ size=”3″ margin=”15″ class=””]
[su_dropcap style=”flat” size=”2″ class=”” dropcap_color=”#fa5738″]2[/su_dropcap]
Step
[su_divider top=”no” style=”default” divider_color=”#444″ size=”3″ margin=”15″ class=””]
The first step involves putting together the seating frame. Take two 2×4 wood planks (about 48 inches long) and three 2×4 planks (about 16.5-inches long)then, using 2.5inch screws and wood glue, create the frame with the longer longs on the vertical sides and short ones on the horizontal size. You can also opt to drill pilot holes and insert the screws. The third short plank should be added to the center to create partitioned sides (each measuring about 21.75 inches).
[su_divider top=”no” style=”default” divider_color=”#444″ size=”3″ margin=”15″ class=””]
[su_dropcap style=”flat” size=”2″ class=”” dropcap_color=”#fa5738″]2[/su_dropcap]
Step
[su_divider top=”no” style=”default” divider_color=”#444″ size=”3″ margin=”15″ class=””]
Next, fill the seating frame with wood slats. To do so, cut your 2x 4 wood to fit the width of the frame (around 48 inches). Then, pre-drill holes on the slates and insert 2.5-inch screws to securely fit them into the frame and to prevent splitting. The seat frame should support about 6 or 7 slats.
[su_divider top=”no” style=”default” divider_color=”#444″ size=”3″ margin=”15″ class=””]
[su_dropcap style=”flat” size=”2″ class=”” dropcap_color=”#fa5738″]3[/su_dropcap]
Step
[su_divider top=”no” style=”default” divider_color=”#444″ size=”3″ margin=”15″ class=””]
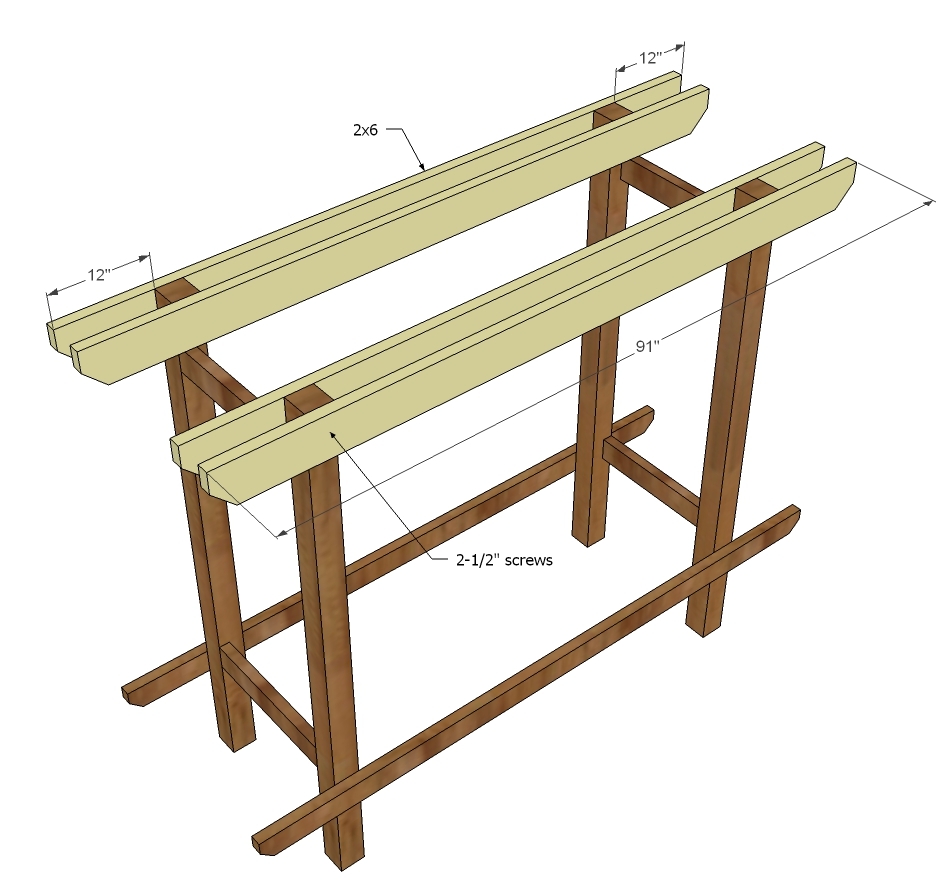
After inserting the slats, attach 4×4 legs to both four edges of the seat. The legs should be tall enough (about 80 inches long). To do so, drill pilot holes into the legs (about 16 inches from the bottom) and insert 4.5-inch screws – making sure there are no gaps left.
[su_divider top=”no” style=”default” divider_color=”#444″ size=”3″ margin=”15″ class=””]
[su_dropcap style=”flat” size=”2″ class=”” dropcap_color=”#fa5738″]4[/su_dropcap]
Step
[su_divider top=”no” style=”default” divider_color=”#444″ size=”3″ margin=”15″ class=””]
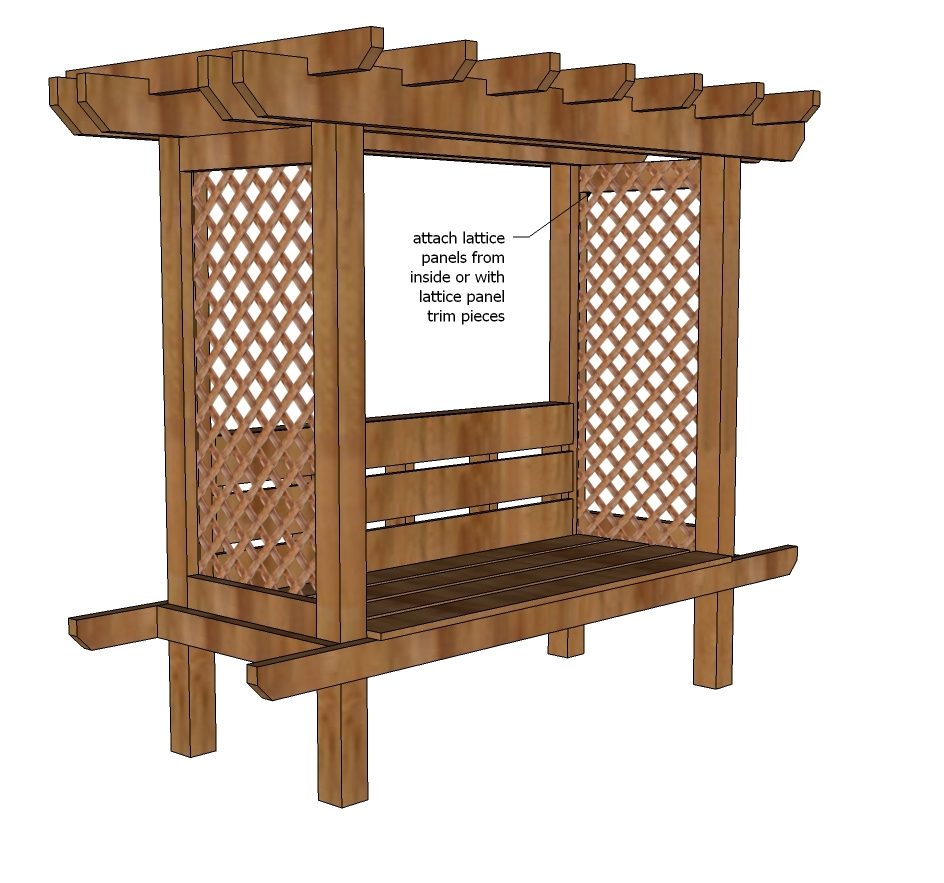
Then, install shade slats at the top – you will need about four of them. To do so, use 2×6 planks (about 86 inches long). If you want, you can make decorative patterns on either end of the beams using a jigsaw and then, smooth the cut edges with sandpaper. Then, attach the shade beams horizontally – attach two the sides of the front legs and two on the sides of the back legs. Use clamps to hold them tightly, drill pilot holes, and insert 7-inch carriage bolts.
[su_divider top=”no” style=”default” divider_color=”#444″ size=”3″ margin=”15″ class=””]
[su_dropcap style=”flat” size=”2″ class=”” dropcap_color=”#fa5738″]5[/su_dropcap]
Step
[su_divider top=”no” style=”default” divider_color=”#444″ size=”3″ margin=”15″ class=””]
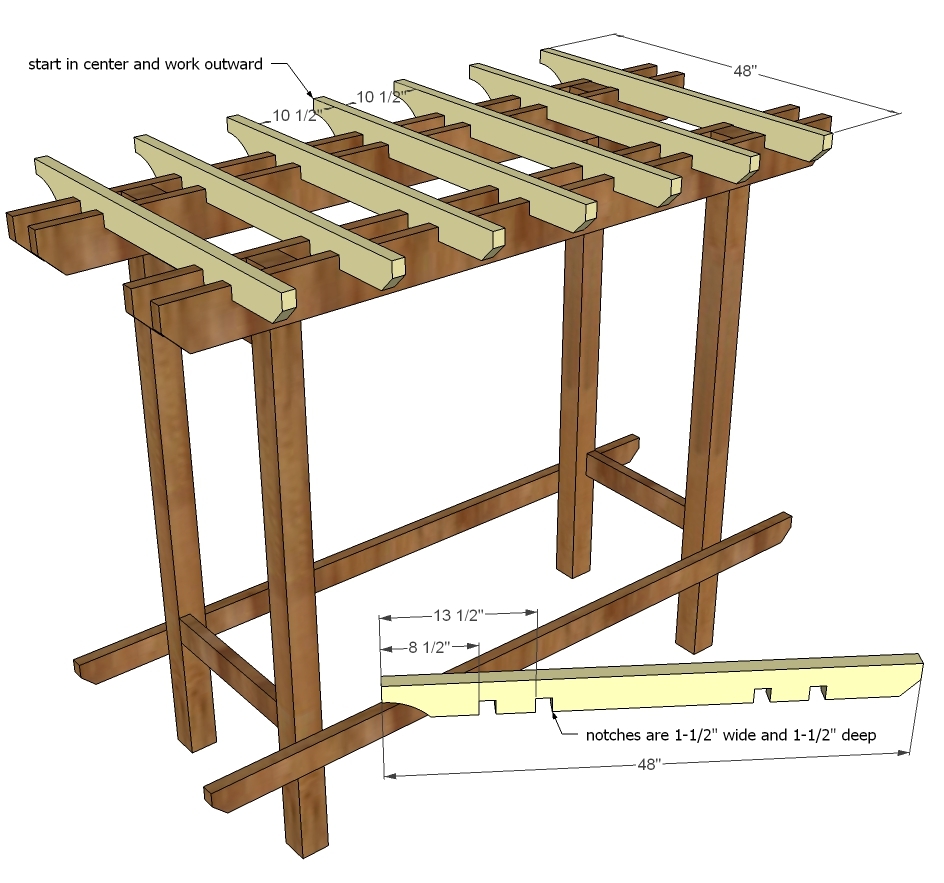
After installing the shade beams, fit in supporting slats underneath – again, they should be four in total. Two should be placed on either side of the left front and back leg and the same for the right side. The slats should be made from 2×3 planks (measuring about 26.5 inches long). You can also create smooth and rounded edges on the support slats using a jigsaw and sander. To install them, drill pilot holes and insert 2.5-inch screws.
[su_divider top=”no” style=”default” divider_color=”#444″ size=”3″ margin=”15″ class=””]
[su_dropcap style=”flat” size=”2″ class=”” dropcap_color=”#fa5738″]6[/su_dropcap]
Step
[su_divider top=”no” style=”default” divider_color=”#444″ size=”3″ margin=”15″ class=””]
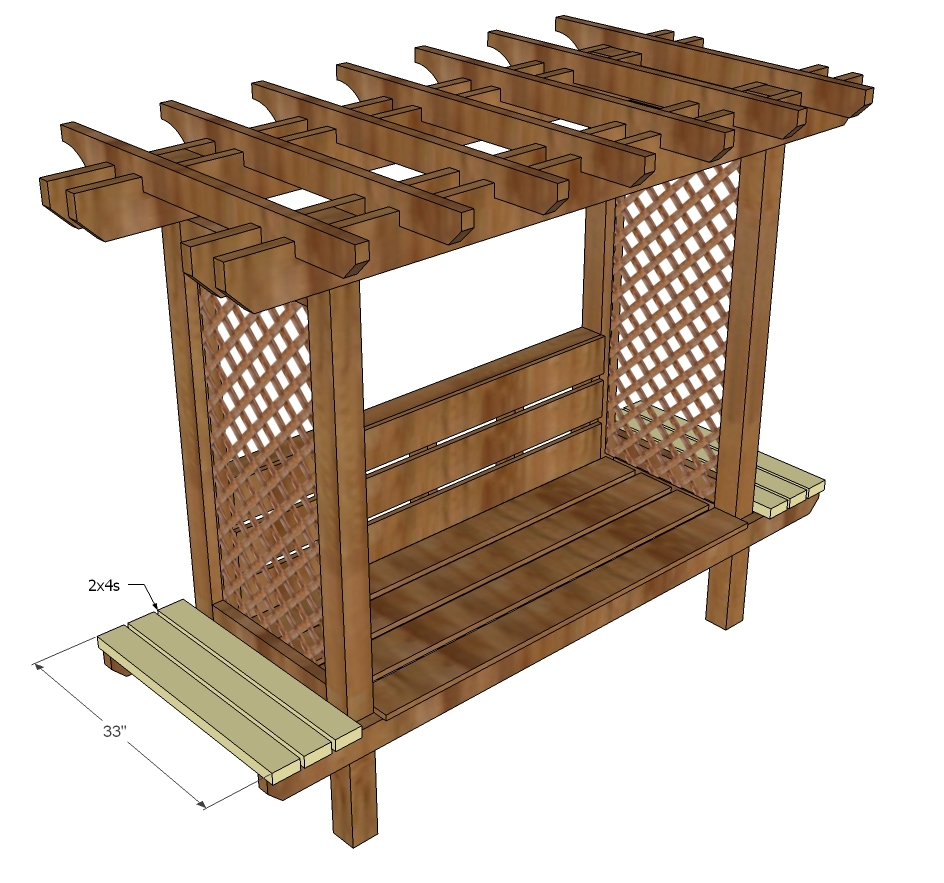
Finally, attach top slats on top of the beams. The top slats should be made from 1×2 planks (measuring about 24.5 inches long) and placed perpendicular to the beams underneath. There should be a total of five slats. Between each plank, you should leave a gap of about 11.5 inches. Secure them to the beams underneath using 2.5-inch screws.
[su_divider top=”no” style=”default” divider_color=”#444″ size=”3″ margin=”15″ class=””]
[su_dropcap style=”flat” size=”2″ class=”” dropcap_color=”#fa5738″]7[/su_dropcap]
Step
[su_divider top=”no” style=”default” divider_color=”#444″ size=”3″ margin=”15″ class=””]
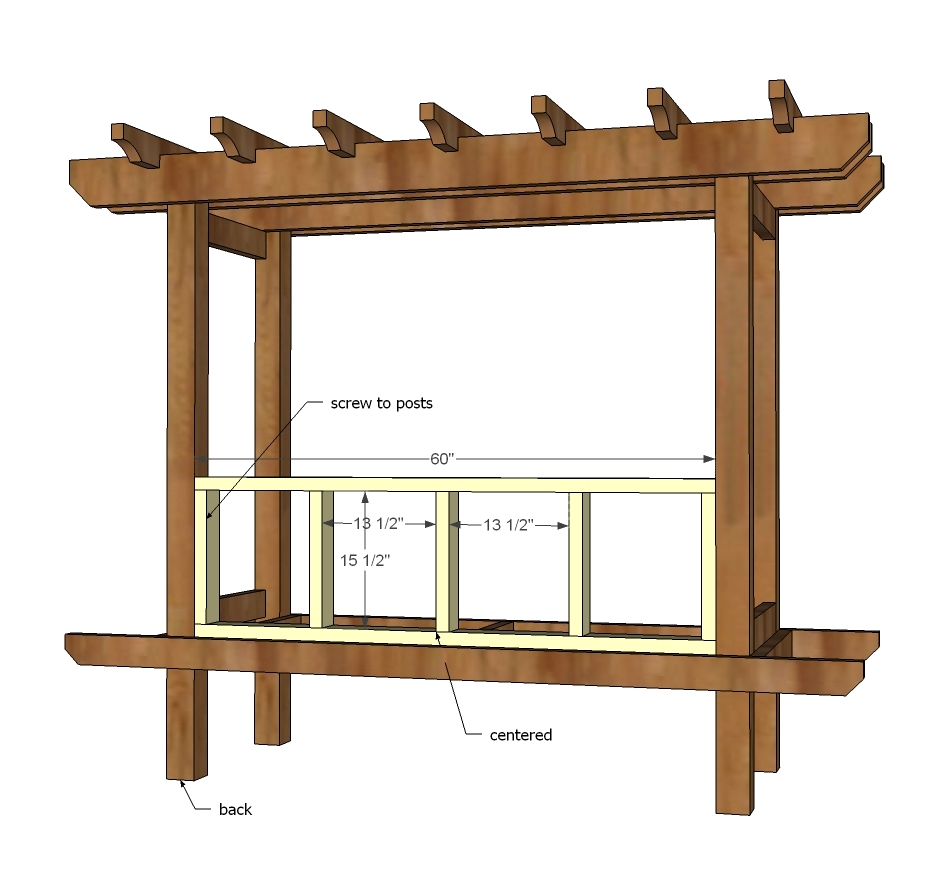
The final step is to attach the backrests if you want one. To do so, drill holes on either end of three 2×4 planks. The plan lengths should be equal to the width of the seat frame (about 48 inches long). Align them into the frame and secure them using 2.5-inch screws.
When you are done, fill up any gaps or holes with putty and smooth the surface with the sander. Additionally, you can even paint or stain the bench for an even more distinct look. Then, your garden arbor bench should be ready for use.