Are you looking for a permanent way to keep insects and bugs out of the inside of your home? Well, we may have the solution for you. This in-depth guide shares tips and steps on how to build a screen door. Building your own screen door from scratch is not only cost-effective.
It also gives you the freedom and creativity to build the design and door you want. After all, who doesn’t want to try out a hand in building their own things – with this screen door building guide, you cannot find a simpler DIY task.
Tools And Materials
Some people choose to list down all the components needed for a screen door and then, shop for them one by one. After compiling the components, they build the door from complete scratch. However, this process may be more time-consuming and expensive.
Instead, you can opt for a screen door kit. After all, you will still have to put the components in the kit together – so, you will still have that element of fun building. Along with a screen door kit, other tools and materials required include:
[su_spoiler title=”Required Tools for this Project:” open=”yes” style=”simple” icon=”plus” anchor=”” class=””]
[su_list icon=”icon: arrow-circle-right” icon_color=”#4f8901″]
[su_row class=””]
[su_column size=”1/2″ center=”no” class=””]
- Screen door kit
- Glue
- Insect screen
- Spline
- Hinges
- Latch sets
- Wood router
- Pencil
[/su_column]
[su_column size=”1/2″ center=”no” class=””]
- Electric drill
- Bar clamps
- Wiping cloth
- Finisher nails
- Sanding paper
- Screen or spline roller
- Utility knife
- Wood shims
[/su_column]
[/su_row]
[/su_list]
[/su_spoiler]
Step-By-Step Instructions
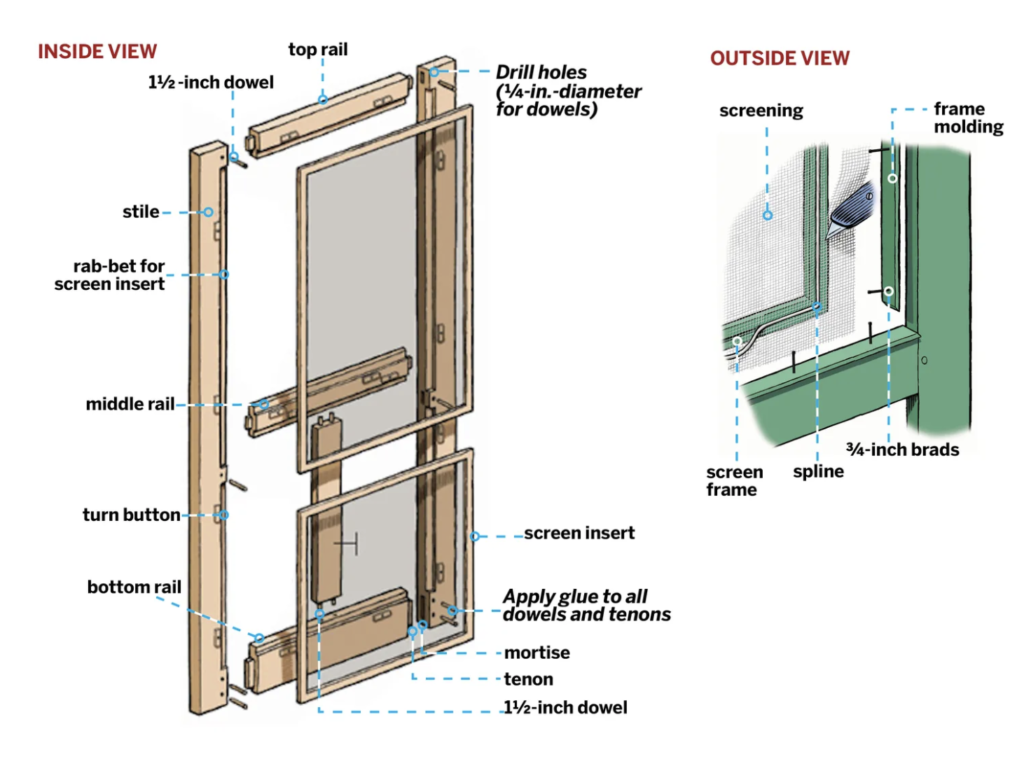
- Pull out the manufacturer’s instructions to guide you on putting the door together. Practice the assembling process by putting all the components together on the floor and assembling the door without using any glue or screws. As you test the fit of each component, pay attention to the tenon. If a tenon doesn’t fit its mortise, pair it with a chisel.
- Whilst the door is still assembled on the floor, move the center stile on top of the middle and bottom rail. Mark either side of the stile that overlaps on top of the rails.
- Use a drill to make holes in the two marked places. Each hole should measure 0.25 inches in diameter and 0.875 inches deep. The holes should be corresponding on the two rails.
- Once done, attach hardwood dowels that measure 0.25 inches in diameter and 1.5 inches deep into the stile holes and fit the dowels with the two rails.
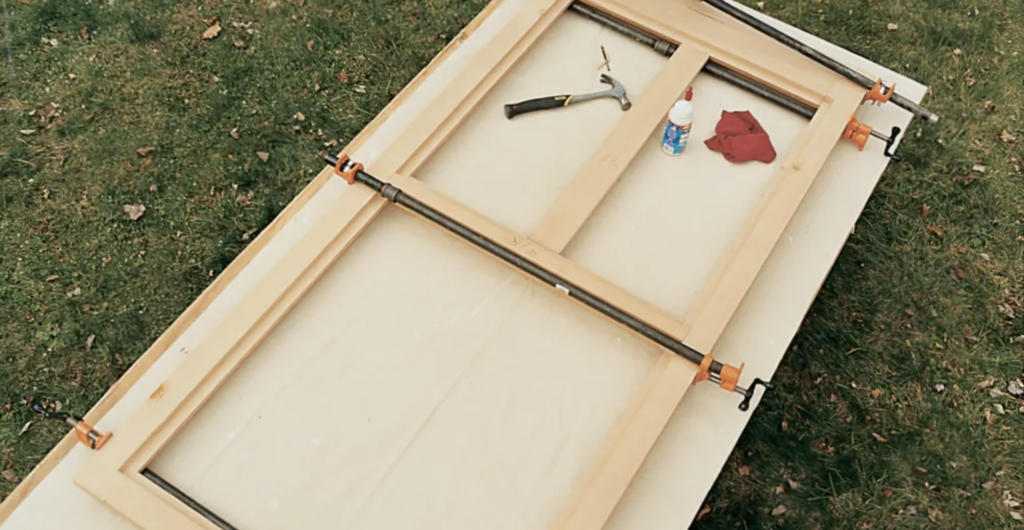
- On the railing tenon, apply glue and attach the door frame.
- The next step is to clamp down the door frame by using bar clamps. Position half of the clamps at the front face and the other half at the back face of the door. This will help to hold all the components together horizontally. During this time, the glue will be slow drying, so you want to work in speed to ensure it doesn’t dry up before you are done.
- Measure the door from one corner to the other in a crossway direction to check for square. Move the clamps to ensure the frame dimensions are equal.
- After confirming that the frame dimensions are equal, use a damp cloth to rub off any excess glue from the surface.
- The next step is to hook up the door joints using dowels. To do so, drill holes on either side of the three stiles where there the mortise and tenon join. The diameters of the holes should be 1.5inches whilst the holes from inside the edges should be 0.5 inches.
- Take another set of 1.5-inch dowels and glue them onto the holes and let them dry overnight.
- From the screen door kit, you will find frame molding for the screen. If not, use a router to create a wooden frame molding to fit the perimeter of the front door face. Use glue and nail finishers to hold the frame.
- The next step is to assemble and fit in the screen insert frame using glue and nail finishers to permanently hold it.
- Once done, sand the frame parts. Then, apply paint, stain, or polyurethane finish and allow them to dry.
- Measure the perimeter inside the screen frame and then, select an insect screen that measures two inches more than the frame’s perimeter on either side. Using a spline or screen roller, insert the screen into the frame’s groove. Move the roller around the frame to ensure the insect screen is inserted deep into the frame. After you have fit all sides of the frame with the screen, use a utility knife to trim off the excess screen. Trim the screen off from closer to the spline.
- Next, align the door with the door face casing using its face flush. Leave the screens on the floor.
- To hold the door in place, attach tapered wood wedges to help plump and level it. The wood wedges (shims) should leave 0.75 inches of space on the sides and about 0.1875 inches of space at the top and bottom.
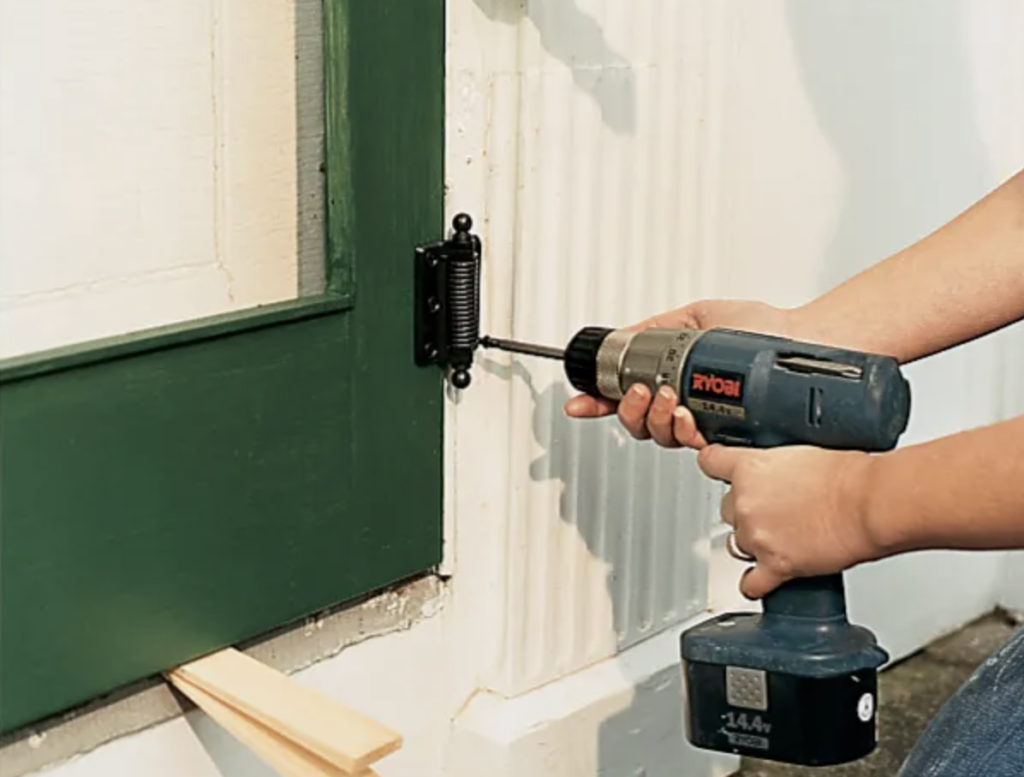
- The next step is to install the door hinges. To do so, first, measure about 5 inches from the bottom of your door and mark the area. On the area, screw the hinge between the door and case. Then, do the same, at the top of the door.
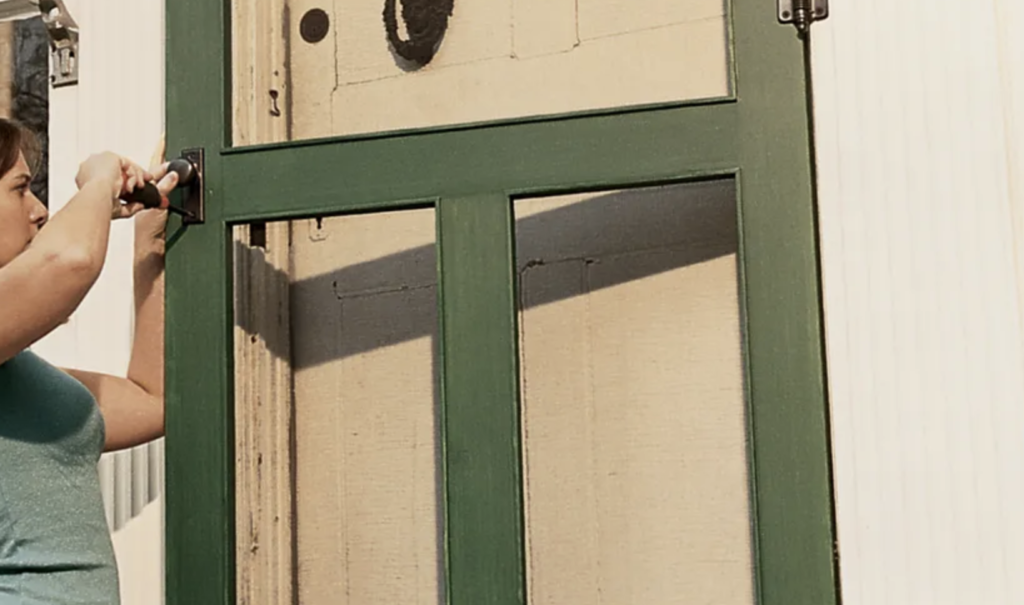
Lastly, you want to finish up the installations with the screens and other hardware. Attach the screen inserts into the middle of the door and use mounted turn buttons to hold the screens in place. On the middle rail, install a latch set so you don’t have to make cuts into the wood for a hinge. Position it on the railing edge inside the door and mark this area. Drill a hole into the marked area (the hole should measure about 0.5625 inches in diameter). Attach the lever’s spindle into the hole and case the latch set down. Your screen door should be done and ready for use!