Contents


Nothing brings back nostalgic memories like childhood swinging. The best thing about swings is that you don’t have to spend hundreds of dollars on them. You can set up your own home project to build a safe baby swing for your little one. To help you ensure you employ all the safety precautions, we’ve shared a detailed guide on how to make DIY outdoor baby swings below.
Tools And Materials
Before you start building your little one’s baby swing, you have to ensure you have the right tools. Below, we’ve outlined the essential tools to have during the building process.
[su_spoiler title=”Required Tools for this Project:” open=”yes” style=”simple” icon=”plus” anchor=”” class=””]
[su_list icon=”icon: arrow-circle-right” icon_color=”#4f8901″]
[su_row class=””]
[su_column size=”1/2″ center=”no” class=””]
- Wood planks
- Wood glue
- 2.5-inch screws for the exterior wood
- Stationeries – Pencil and measuring tape
- Woodcutter
- Finish nailer and 2-inch nails
- 2-inch brad nails
[/su_column]
[su_column size=”1/2″ center=”no” class=””]
- Drill
- 0.5-inch Forstner bits
- Sander and sanding paper
- Outdoor friendly wood finish and paintbrushes
- 0.5-inch rope
- Protective gear – safety glasses and hearing protection
[/su_column]
[/su_row]
[/su_list]
[/su_spoiler]
Steps To Make DIY Outdoor Baby Swing
This step covers a basic tree rope swing with a seat. Whilst it offers basic guidelines on how to build the swing and seat, the sizing will depend on your preferences. However, generally, for a baby or toddler, the ideal seat size would be around 144 square inches. Additionally, this process features a basic criss cross back design, however, you can use your router to create other patterns, grooves, and designs to your liking.
[su_divider top=”no” style=”default” divider_color=”#444″ size=”3″ margin=”15″ class=””]
[su_dropcap style=”flat” size=”2″ class=”” dropcap_color=”#fa5738″]1[/su_dropcap]
Step
[su_divider top=”no” style=”default” divider_color=”#444″ size=”3″ margin=”15″ class=””]
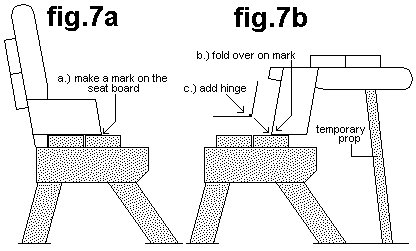
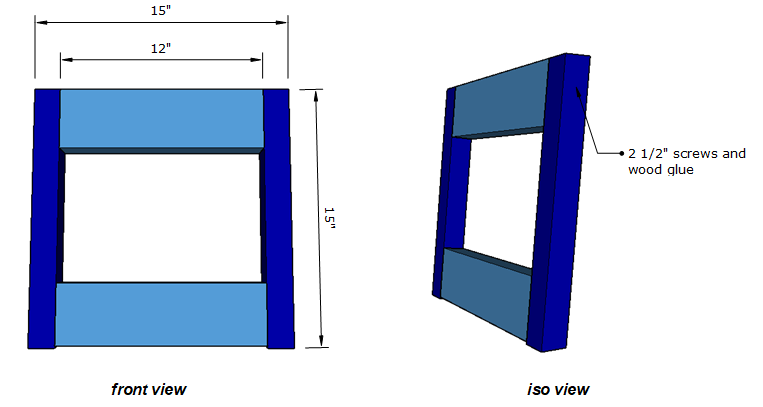
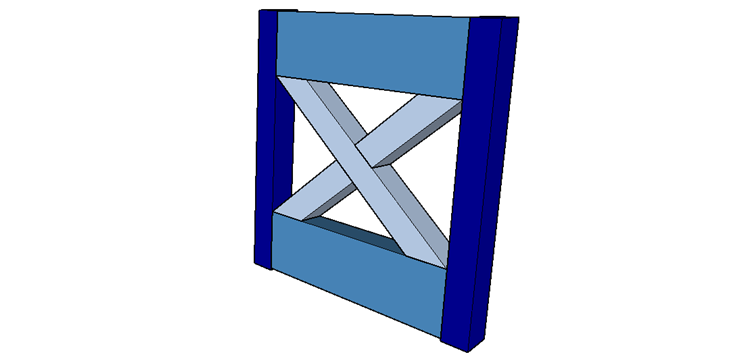
The first step involves building the seat’s back support. In this case, you will need wood glue and a couple of 2.5-inch screws. Put together long, narrow wood planks (measuring at least 15 inches long) vertically and 12 inches away from each other.
Then, within either end of the gaps put together, thick, short wood planks to form a frame. Hold the wood together by countersinking the screws into the wood. To hold them together, you can opt for the pocket hold joinery method or drive the screws through.
[su_divider top=”no” style=”default” divider_color=”#444″ size=”3″ margin=”15″ class=””]
[su_dropcap style=”flat” size=”2″ class=”” dropcap_color=”#fa5738″]2[/su_dropcap]
Step
[su_divider top=”no” style=”default” divider_color=”#444″ size=”3″ margin=”15″ class=””]
Cut additional into two long and narrow wood planks that would fit into the in a criss cross manner. You can check the right sizing by lining the wood planks before you cut them to ensure precise sizing. Remember, one plank will be shorter than the other because you will have to cut out its center to create the criss cross shape. After cutting the wood, to attach them to the frame, simply use the wood glue and drive nails at an angle.
[su_divider top=”no” style=”default” divider_color=”#444″ size=”3″ margin=”15″ class=””]
[su_dropcap style=”flat” size=”2″ class=”” dropcap_color=”#fa5738″]3[/su_dropcap]
Step
[su_divider top=”no” style=”default” divider_color=”#444″ size=”3″ margin=”15″ class=””]
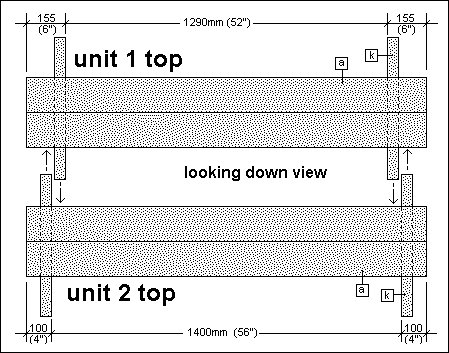
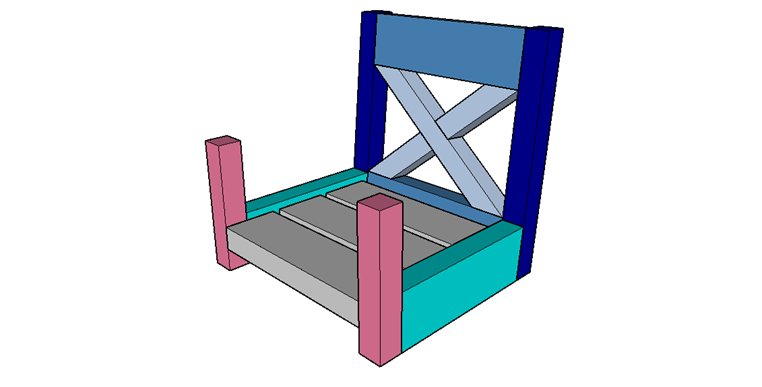
The next step is to work on the farm. To do so, cut two thick and short planks (about 10.25 inches long) for the bottom part and two thin and long wood planks (about 8.25 inches) for the front part. Then, hold them together using wood glue and 2.5-inch screws.

[su_divider top=”no” style=”default” divider_color=”#444″ size=”3″ margin=”15″ class=””]
[su_dropcap style=”flat” size=”2″ class=”” dropcap_color=”#fa5738″]4[/su_dropcap]
Step
[su_divider top=”no” style=”default” divider_color=”#444″ size=”3″ margin=”15″ class=””]
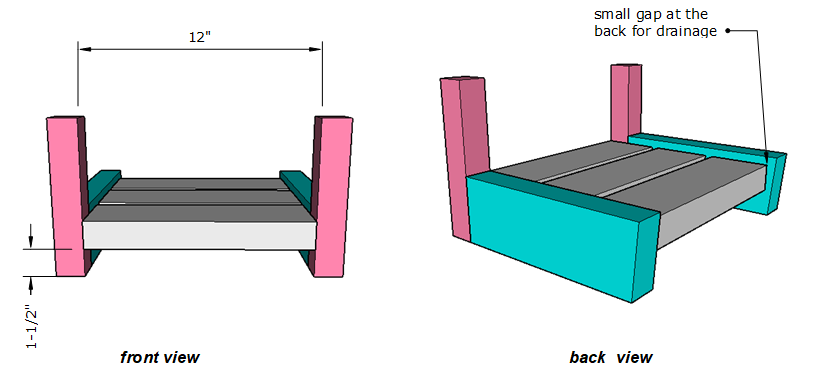
This step involves attaching the arms from step three to the actual sitting surface, also known as the slats. To do so, cut the planks to the size of the frame width (about 12 inches). Start by pointing the front part of the arms with the first wood slat using wood glue and 2.5-inch screws.
The slat should be positioned around the center part of the arm – about an inch from the top. Then, leave some space between (about half an inch), and continue to place the second slat, then, the third one.
Leaving some space between each slat comes in handy on rainy days or in case of accidents when it necessary for the seat to rainwater. After you are done, attach this bottom part to the bottom part of the frame using wood glue and 2.5-inch screws to make the seat.
[su_divider top=”no” style=”default” divider_color=”#444″ size=”3″ margin=”15″ class=””]
[su_dropcap style=”flat” size=”2″ class=”” dropcap_color=”#fa5738″]5[/su_dropcap]
Step
[su_divider top=”no” style=”default” divider_color=”#444″ size=”3″ margin=”15″ class=””]
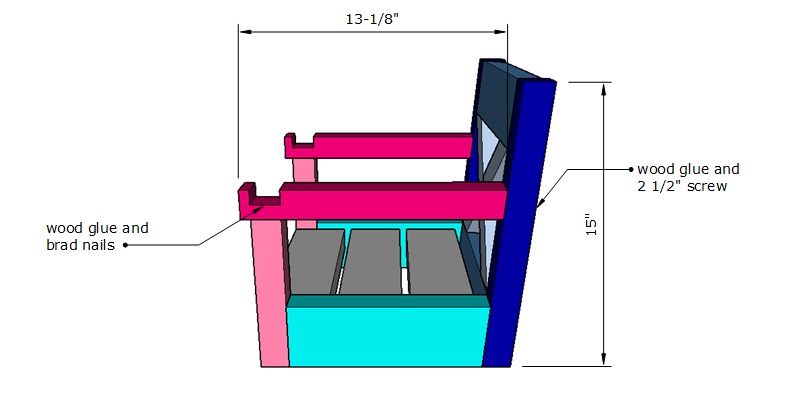
Lastly, you want to attach the top part of the arms to the chair. To do so, cut two long and thin planks (measuring around 13.15 inches long). Then, using wood glue and 2.5-inch screws, attach the arm to the chairs at the back through the frame sides and onto the front arms using 2-inch brad nails.
To keep your child safe, you can add a front guard. To do so, cut small sections at the front part of the arms to create square-like gaps. Then, measure a long thin plank that will fit into the gaps and run from one end to the end and simply insert it into the gaps.
[su_divider top=”no” style=”default” divider_color=”#444″ size=”3″ margin=”15″ class=””]
[su_dropcap style=”flat” size=”2″ class=”” dropcap_color=”#fa5738″]6[/su_dropcap]
Step
[su_divider top=”no” style=”default” divider_color=”#444″ size=”3″ margin=”15″ class=””]
On both sides where the front guard attaches to the arms, mark where the tree rope will run through and then, drill holes on the marked areas using half-inch Forstner bits.
[su_divider top=”no” style=”default” divider_color=”#444″ size=”3″ margin=”15″ class=””]
[su_dropcap style=”flat” size=”2″ class=”” dropcap_color=”#fa5738″]7[/su_dropcap]
Step
[su_divider top=”no” style=”default” divider_color=”#444″ size=”3″ margin=”15″ class=””]
This step is to sand, finish and coat the seat. First, sand the entire seat, wipe off the dust, and then, use an outdoor-friendly wood finish. If you want to apply multiple coats, you will have to leave at least 3 to 4 hours between the application of each coat. After the finish has dried, run a half-inch rope through the holes and it will be ready for installation anywhere.