
Contents
Introduction and photos
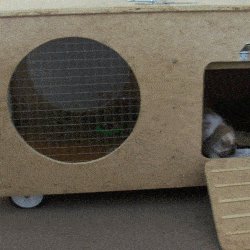
When asked to build granddaughter an indoor rabbit hutch for her second birthday, I was forced to acknowledge that I knew very little about rabbits and hutches and in fact I had never even heard of an indoor hutch.
“No problem,” said daughter-in-law who has had a few rabbits in her time. “Just make something the size of that box there,” she pointed to a large blanket chest, “make two equal-sized compartments in it: one like a cage with plenty of light and air, and one that can give the rabbit a little bit of privacy. Also make enough hinged hatches to allow for easy cleaning and an entry door that doubles as a ramp so the rabbit can get in or out.”
“Anything else?”
“Yes. If you could put wheels in the front and a handle at the back so it can be moved around, sort of like a wheelbarrow?”
“As it is an indoor hutch, the whole thing could be made out of untreated wood,” I suggested.
“But what about the floor? Wouldn’t the rabbit do stuff and spill stuff that could eventually cause an untreated floor to rot?”
“Don’t worry about that,” she said. “I’ll cover the floor with a self-adhesive vinyl film that will be waterproof and also easy to clean.”
So! Off to the local pet store to have a look at an indoor rabbit hutch, only to be told that there are currently only outdoor hutches in stock. Although I was informed that bunnies for indoor pets are becoming increasingly popular and that the main difference between an indoor and outdoor hutch is that the indoor hutch has a floor throughout the whole structure. Anyway, back home to see what sort of possible building materials can be found lying around the house and to commence with design and structure.
NOTE: Rabbits, as with most pets, require care and attention. If you are not familiar with rabbits, pop down to your local pet center to find out the dos and don’ts before purchasing a rabbit or making a rabbit hutch.
How did the rabbit fare two weeks down the track?
Scroll down the page to see.


Two weeks down the track.
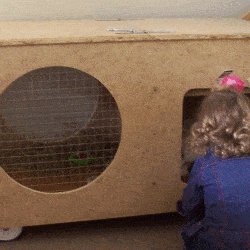
The rabbit, a male lop-eared called Bosley, gets on pretty well with the two-year-old girl called Allie. Bosley is let out to run around certain parts of the house twice a day, for an hour in the morning when Allie is awake and an hour in the evening when Allie is asleep. At first Allie would chase the rabbit but the novelty soon wore off and anyway, Bosley is too quick for Allie.
Bosley likes being out of the hutch and only goes back if he needs to wee or if he is put back.
He always wees in the litter box and mostly poohs either inside the litter box or hutch. Occasionally he drops the odd pellet-like pooh around the house, but these are no problem to pick up.
The litter box is in the private compartment of the hutch and has pine shavings in it. Straw is put on the floor throughout the rest of the hutch. The waste in the hutch is cleaned up every day and the hutch is completely cleaned out every second day.
Bosley sleeps on the hay as well as eating a bit of it. He also eats rabbit pellets, fresh lettuce, broccoli and spinach and always has a supply of fresh water. He also has a few plastic-like toys inside the hutch that he plays with.
Any electric cords or such, around the house have to be out of Bosley’s way, otherwise he might chew on them.
All and all, the rabbit seems pretty happy, although I don’t know exactly how you can tell for sure. But he is certainly looking healthy and is a lot of fun to have around. Especially for little Allie.
Plans and materials list
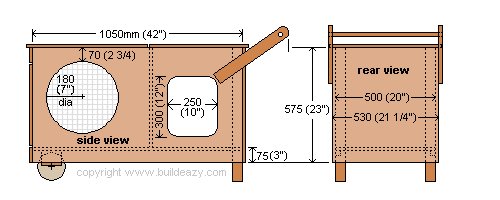
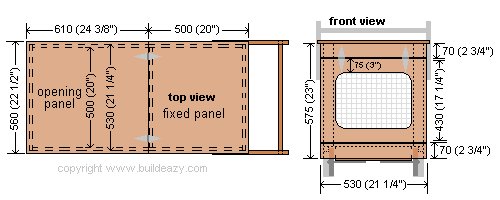
Below are the plans and materials and cutting list for the indoor rabbit hutch.
Use as reference in conjunction with the instructions in the next page.
Materials list
| Material | Used For | Amount and size |
| 15mm (5/8″) or thicker sheet panel such as plywood, mdf board or any other similar type of sheet panel wood. | Side panels | 2 pieces @ 1050mm (42″) x 575mm (23″) |
| 15mm (5/8″) or thicker sheet panel such as plywood, mdf board or any other similar type of sheet panel wood. | Floor panel | 1 piece @ 1050mm (42″) x 500mm (20″) |
| 15mm (5/8″) or thicker sheet panel such as plywood, mdf board or any other similar type of sheet panel wood. | Front panel | 1 piece @ 530mm (21 1/4″) x 430mm (17 1/4″) |
| 15mm (5/8″) or thicker sheet panel such as plywood, mdf board or any other similar type of sheet panel wood. | Rear panel | 1 piece @ 530mm (21 1/4″) x 575mm (23″) |
| 15mm (5/8″) or thicker sheet panel such as plywood, mdf board or any other similar type of sheet panel wood. | Top panels | 1 piece @ 610mm (24 3/8″) x 560mm (22 1/2″) 1 piece @ 500mm (20″) x 560mm (22 1/2″) |
| 15mm (5/8″) or thicker sheet panel such as plywood, mdf board or any other similar type of sheet panel wood. | Middle panel | 1 piece @ 500mm (20″) x 500mm (20″) |
| 50mm x 50mm (2″x2″) wood | Rear legs | 2 pieces @ approximately 675mm (27″) long |
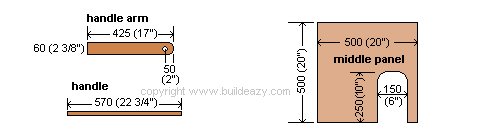
| 70mm (2 3/4″) wood | Horizontal members above and below the front panel and for the handle arms | 2 pieces @ approximately 530mm (21 1/4″) long 2 pieces @ 425mm (17″) long |
| 25mm (1″) diameter dowel (round wood) | Handle | 1 piece @ 570mm (22 3/4″) long |
| 90mm x 70mm (2 1/2″ x 3 1/2″) wood | Wheel and axle support | 1 piece @ approximately 380mm (15 3/8″) long |
| Hinges | Front hatch, top hatch and side door | 6 |
| 25mm (1″) gap welded mesh | Front and side panel openings | 3 pieces @ approximately 450mm (18″) x 450mm (18″) |
| OTHER STUFF…… You will also need a couple of wheels, a couple of bolts at least 150mm (6″) long to use as axles, a bit of metal strap to fix the axles to the wheel and axle support , assorted screws, a bit of glue and three door and hatch latches or something similar that can keep the hatches and door shut.. |
Instructions
Step 1.
- First cut all the panels and then the openings to the dimensions as shown in the Plans and materials list (Page 2).
- Save the cut-out from the door opening at the rear of the side panel as that will later become the door.
Step 2.
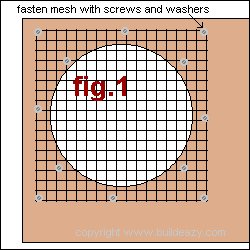
- Cut the 3 pieces of mesh bigger than their respective openings so they can be screwed to the inside of the panels (see fig.1). For this project 25mm (1″) gap welded mesh was used, but different sized mesh can also be used.
- Fix the mesh in place with screws and washers. Fold in any end bits of the mesh that might be sticking out which could be a possible hazard for the rabbit.
Step 3.
- Screw and glue the following: the side panels to the floor; the rear panel to the floor and side panels, and finally, the horizontal members that go above and below the front panel to the side panels. Then screw the middle panel in place.
- Pre-drill the holes before screwing. Make the hole in the outer panel the same diameter as the screw shank and a starter hole in the inner panel smaller diameter than the screw shank.
- DO NOT fix the top panels in place until the wheel and axle support has been screwed in place.
Step 4.
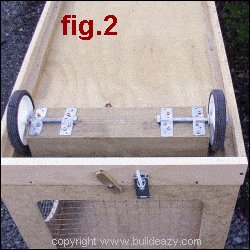
- The wheel section consists of a block of wood, two wheels, two bolts and a bit of metal strap.
- The bolts (axles) go through the wheels and are fixed to the block of wood (wheel and axle support ) with metal strap (see fig.2).
Note: The block of wood should be at least as thick as the radius of a wheel to ensure the wheel does not rub on the underside of the floor, and the bolts (axles) should be at least 150mm (6″) long to achieve maximum stability.
Having a nut on the end of each bolt, checked into the block of wood, will stop the bolt moving in or out.
- When the bolts are fixed to the block of wood with metal strap (see fig.2), the block of wood can then be fixed to the underside of the floor.
- Screw through the floor (from the inside of the hutch) into the block of wood.
Step 5.
- Screw and glue the fixed top panel in place. Hinge the opening panels (which are top panel, front panel and side door) in place. The side door also doubles as a ramp. Glue a few thin sticks of wood to the inside of the side door (ramp) so the rabbit can get a bit of a grip.
- Assemble the handle.


