Introduction – Materials list
Introduction, about the measurements and the material requirements
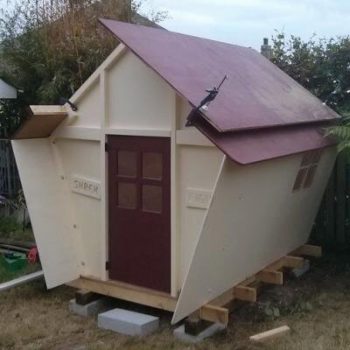
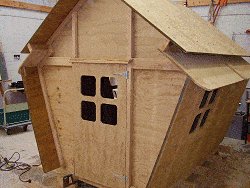
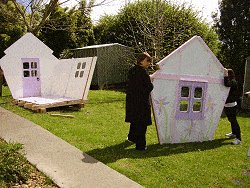
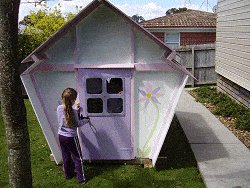
This plywood playhouse can be dismantled and reassembled.
I made this playhouse for my granddaughter’s sixth birthday.
A little bit of thought had to go into the design, as it was to go into a backyard with access through a narrow gate and along an equally narrow garden path.
There was really no way of getting a playhouse of any size into the backyard in one piece, short of building it on site. This was not a preferred option as I did not want the playhouse to be a permanent structure locked inside the backyard. After all, you never know when a move is on the cards.
So…
I had to design a playhouse that could be easily dismantled and then just as easily reassembled. This would allow me to make the playhouse in my workshop.
I could then dismantle it, move it in segments to my granddaughter’s backyard via the narrow gate, and then reassemble it in place.
A lesson learnt. I had built a playhouse in the past (see it here) for another granddaughter, that was pretty much a permanent fixture (the playhouse, not the granddaughter). A couple of years later the house was sold and the playhouse had to be left behind – much to the pleasure of the new owners and the anguish of my granddaughter.
About the measurements
The measurements throughout this project are given in both standard (inches) and metric (mm).
The standard measurements are given first, followed by the metric measurements in parentheses ( ).
The standard measurements are best suited to North America and the metric measurements are best suited to Australasia and other countries.
The inch sizes given in this project do not convert exactly to their corresponding metric (mm) equivalents. So use one or the other.
For this project you will need…
Note: Use wood that is suitable for outside.
- Plywood – 9 of 4ft x 8ft (1200mm x 2400mm) sheets 3/4″ (18mm) thick.
- 4″x4″ (100mm x 100mm) wood – 2 pieces at 86″ (2150mm) long.
- 1 1/2″ x 3 1/2″ (90mm x 45mm) wood – 57 ft (17 meters)
- 1 1/2″ x 1 1/2″ (45mm x 45mm) wood – 90ft (27m)
- 3/4″ x 1 1/2″ (45mm x 18mm) wood – 20ft (6m)
- Acrylic sheet (plastic glass) 4mm (3/16″) thick – 3 pieces @ 19 1/2″ x 19 1/2″ (490mm x 490mm), 2 pieces @ 9 3/4″ x 19 1/2″ (245mm x 490mm).
- Carriage bolts 3/8″ (10mm) diameter with nuts and washers – 12 @ 5 1/2″ (135mm)long, 46 @ 3″ (75mm) long, 4 @ 4″ (100mm) long.
Other bits and pieces you will need…
- An 8ft (2400mm) length of 2″ x 2″ (50mm x 50mm) galvanized angle for the roof ridge,
- 12 screw tie angle brackets about 1″ x 2″ (25mm x 50mm) by 1″ (25mm) wide, but any similar size will do,
- 12 galvanized metal strap ties about 6″ (150mm) long,
- some adhesive clear sealant for the windows,
- some wood glue,
- 6 hinges for the windows and door,
- a latch for the door,
- a handful or two of 4″ (100mm) galvanized nails for the floor frame,
- a handful or two of 3″ (75mm) galvanized nails for the floor,
- a variety of screws,
- a few 1/4″ (6mm) bolts 1″ (25mm) long,
- and some paint of your choice.
The plans and instructions with pictures included, are on successive pages.
Use the menu at the top to jump back and forth as need be.
The Plans – Cutting detail 1
The plans and cutting detail plans
Below are the plans and cutting detail plans for all the plywood panels that make up the floor, walls, roof and windows, and door.
Scroll down to see the plans or click on a hyperlink below to jump straight to that particular plan.
Floor plan

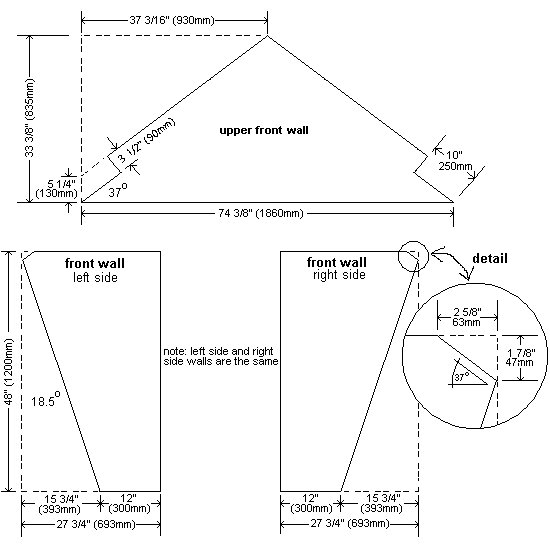
Front wall cutting detail plan
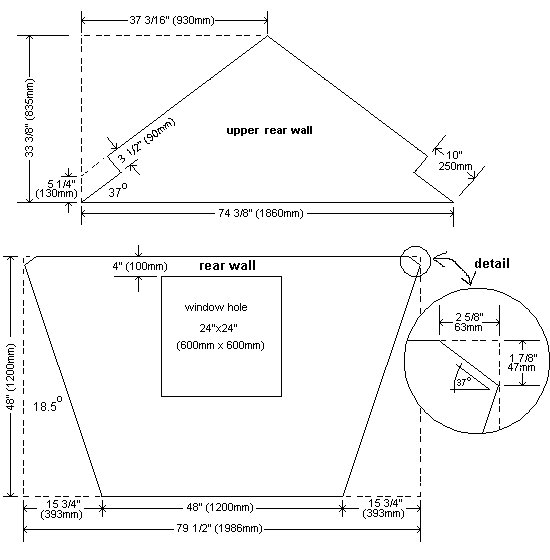
Rear wall cutting detail plan
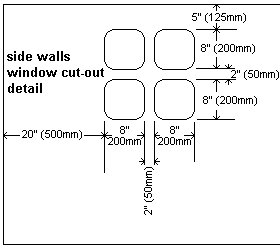
Side wall cutting detail plan

The Plans – Cutting detail 2
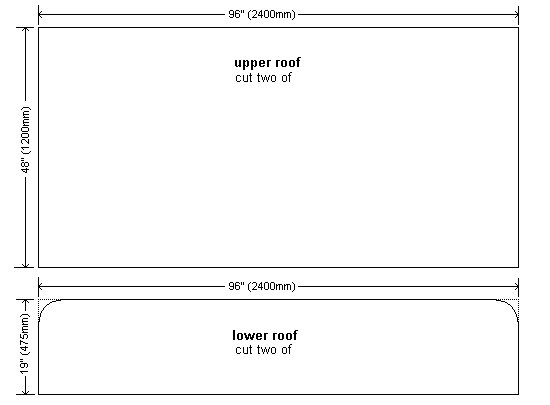
Roof cutting detail plan
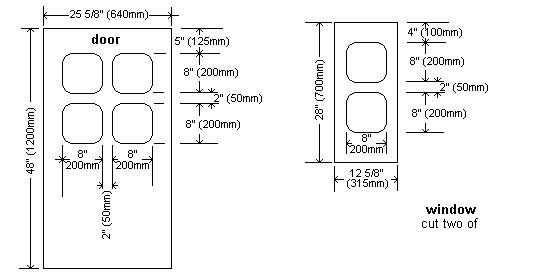
Door and window cutting detail plan
Front-elevation

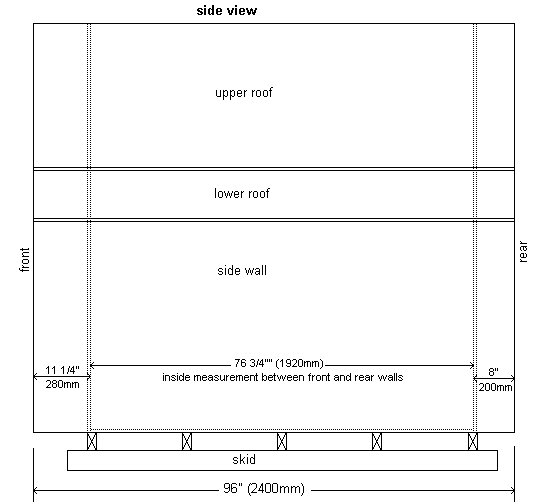
Side elevation
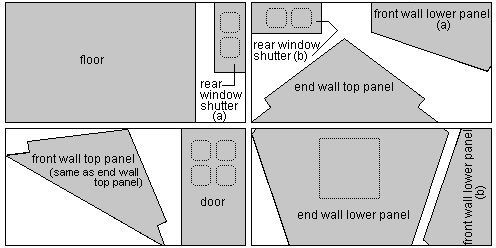
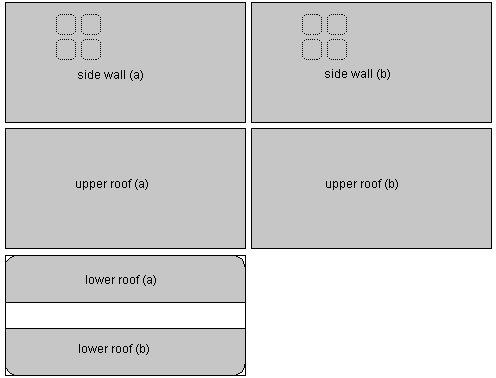
Cutting Ideas from Full Sheets
The drawings below show how to best cut the panels from full plywood sheets to minimize waste.
For cutting details of each individual panel (Page 2).
Making the Floor
- It’s a good idea to skim through all the pages before you start to see what is involved and to get a feel for the project.
- Refer to the plans and cutting detail plans (Plan 2) when necessary and use the menu at the top to jump back and forth as need be.
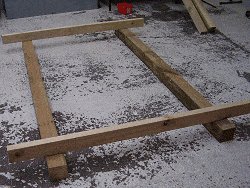
Step 1. The skids (bearers)
- Cut two 4″ x 4″ (100mm x 100mm) skids at 86″ (2150mm) long.
- Lay them parallel on a flat surface so that they are 48″ (1200mm) apart overall.
Step 2. The floor joists

- Cut five 1 1/2″ x 3 1/2″ (90mm x 45mm) joists 64″ (1600mm) long.
- Fix the two end joists (one each end) to the skids, 4″ (100mm) in from each end.
- Attach a string-line to one side, giving a straight line to set the intermediate joists to.
- Cut six blocks of wood out of 1 1/2″ x 3 1/2″ (90mm x 45mm) at 17 1/4″ (430mm) long.
- Fix the first two against an end joist so both of them are parallel and flush with the outside edges of the skids.
- Then place an intermediate joist against the blocks and the string-line and nail in place.
- Repeat the procedure until the final intermediate joist is fixed in place.
- Measure, cut, and fix the last two blocks into position.
- Check that the floor frame is square by measuring diagonally from corner to corner.
- Make any necessary adjustments.
- When the diagonal measurements are equal, then the frame is square.
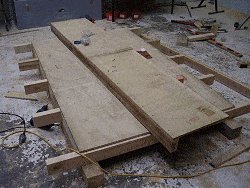
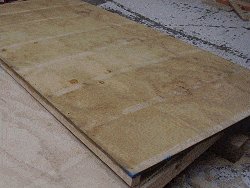
Step 3. The floor
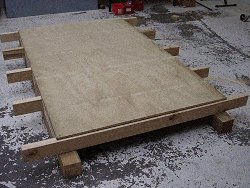
- Cut a sheet of plywood 76 3/4″ (1920mm) long by 48″ (1200mm) wide and sit it on top of the floor joists.
- The sides of the plywood should be flush with the outside edges of the blocking, and the two ends should be set back approximately 1/2″ (12mm) from each end joist, thus allowing a ledge for the front and end walls to sit on.
- Once positioned, nail the plywood floor in place.
Making the Walls and Roof
Step 4. Cut the plywood pieces

- You can now use the floor as a work platform.
- Measure, mark and cut all the plywood pieces. Refer to the “cutting detail plans”(Plan 2) and the “Cutting ideas from full sheets” (Page 4) page for dimensions and cutting detail.
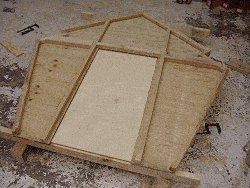
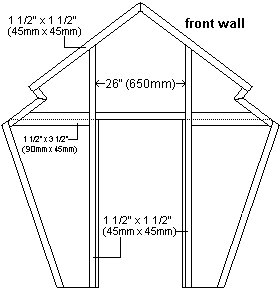
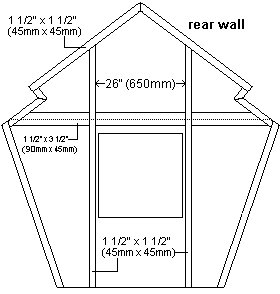
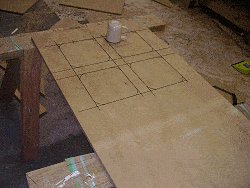
Step 5. Assemble the front and rear walls
- Lay the pieces that make up the front and rear walls together.
- Cut 1 1/2″ x 1 1/2″ (45mm x 45mm) battens to go around the perimeter of the front and rear walls and other intermediate pieces, as show in the drawings below.
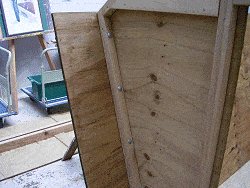
- Glue the battens in place and hold with the occasional nail until the glue dries. Then turn the walls over and screw the plywood to the battens from the other side.
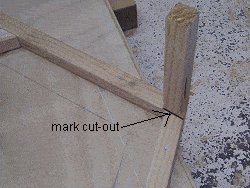
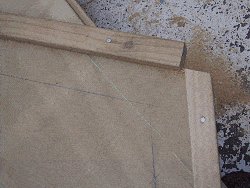
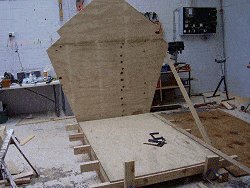
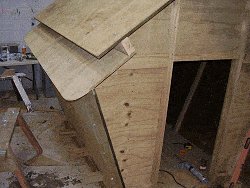
Step 6. Cut a notch in the apex
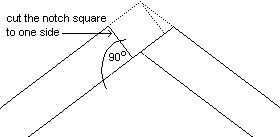
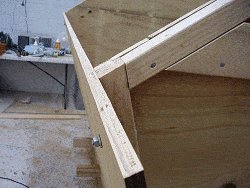
- Cut a notch in the apex of both the front and rear walls. Use an off-cut of batten for a pattern (see third picture down on the right-hand-side).
- Note that the roof apex is not 90°, so make the cut square with one rake (see drawing below) and be sure that the front wall notch is consistent with the back wall notch.> >>
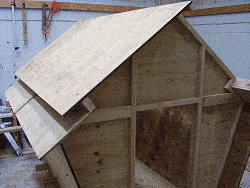
Step 7. Make up the roof pieces
- Glue and screw a an 8ft (2400mm) length of 1 1/2″ x 3 1/2″ (90mm x 45mm) wood along one edge of both lower roof panels (see picture to the right, fifth down).
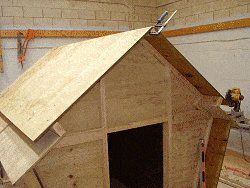
- Then glue and screw a an 8ft (2400mm) length of 1 1/2″ x 1 1/2″ (45mm x 45mm) wood along one edge of one upper roof panel (see sixth picture down on the right-hand-side). Only one upper roof panel needs doing.
Standing and Fixing the Walls
Step 8. Fixing the walls in place
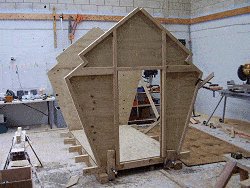

- Clamp a couple of blocks to both end joists to prevent the front and rear walls from slipping off the joists while they are being worked on.
- Stand up the rear frame and hold it in place with a temporary brace.
- Do the same with the front wall.
- Mark a couple of pencil lines across each of the two side walls 11 1/4″ (280mm) in from the front end and 8″ (200mm) in from the rear end (see drawing below). Also refer to the side elevation plan (Page 3).
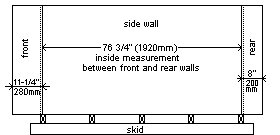
- Clamp the side walls in place ensuring that the insides of the front and rear walls line up with the pencil lines on the side wall (as mentioned above).
- Bolt the side walls to the 1 1/2″ x 1 1/2″ (45mm x 45mm) battens on the front and rear walls using 3/8″ (10mm) galvanized bolts. Pre-drill the bolt holes first.
- Allow for four bolts at each corner.
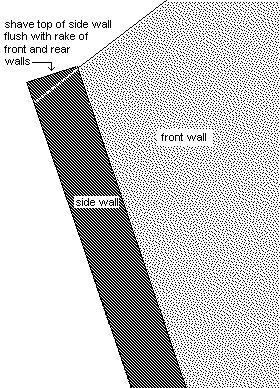
- Shave or shape (with a planer or sander) the top of the side walls to be flush with the rake of the top of the front and rear walls (see drawing below).
Attaching the Roof
Step 9. Fixing the lower roof

- Lift the two lower roof pieces in position and hold them in place with a couple of clamps each side.
- Drill and bolt through the 1 1/2″ x 3 1/2″ (90mm x 45mm) wood, and the batten it rests against.
- There will be a bolt each end of both lower roof pieces, four altogether.
- Use 4″ (100mm) long bolts.
Step 10. Fixing the upper roof
- Lift the roof piece with the attached batten in place.
- The batten should sit neatly into the apex notch.
- Bolt the upper roof to the lower roof, through the 1 1/2″ x 3 1/2″ (90mm x 45mm) wood that runs the length of the lower roof.
- Use six galvanized bolts 5 1/2″ (135mm) long spread out evenly along the length of the roof.
- Next put the other side upper roof on. You will need someone to help hold it in place until you get a couple of clamps on.
- Fix it in place with six bolts to the lower roof (the same as was done on the other side) and six bolts along the apex.
- Use 5 1/2″ (135mm) long bolts at the lower roof and 3″ (75mm) bolts at the apex.
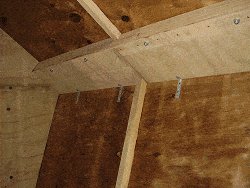
Step 11. Inside fastening and strengthening
- Add 12 angle screw ties (six each side) on the inside of the playhouse where the side walls meet the roof.
- Then measure and cut 1 1/2″ x 1 1/2″ (45mm x 45mm) wood to go all around (walls and roof) the middle of the inside of the playhouse.
- This is to add a bit of strength to the plywood walls and roof.
- Fix the strengtheners with glue and screws BUT DO NOT screw or glue the ends of any of the strengthener pieces, as doing so would prevent the playhouse from being easily dismantled.
Step 12. Round the lower roof corners
- Round the lower roof corners with a jig-saw.
Making the Door and Windows
Step 13. Making the door and windows
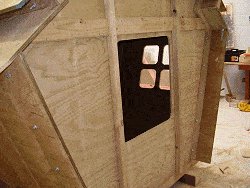
- Make the door, two window shutters, and cut out the windows to the dimensions given in the drawings below.
- First cut the plywood door and window shutters to size and then cut out the window holes.
- Also cut out the window holes in the two side walls to the dimensions given below.
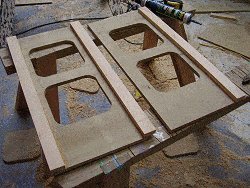
- Next glue and screw the 3/4″ x 1 1/2″ (45mm x 18mm) wood around the perimeter of the door.
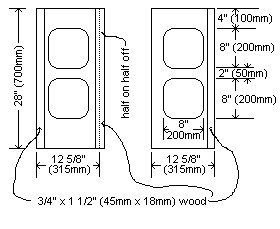
- Also glue and screw the pieces required for the two window shutters as per drawings below.
- Take note that one shutter has one piece of 3/4″ x 1 1/2″ (45mm x 18mm) wood running lengthwise flush with the edge, and the other shutter has two pieces, one running lengthwise flush with the edge and the other overlapping the edge by half of its width. See the drawings below and the pictures for a better understanding.


Step 14. Fit the door and shutters
- Simply hinge the door and shutters and hang them in place.
Dismantling and adding the panes
Step 15. Bit of an undercoat
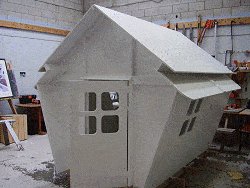
- Give the playhouse an undercoat of paint while it is together.
Step 16. Dismantle and more paint
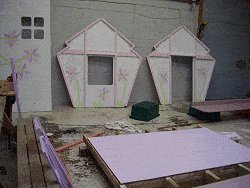
- When the paint had dried, then dismantle the playhouse.
- Take it down the same way it was put up. Make sure you keep all the bolts, washers, nuts, and anything else safely tucked away in a box to save buying them again.
- Spread all the playhouse segments around the place and do some more painting – only limited by your imagination.
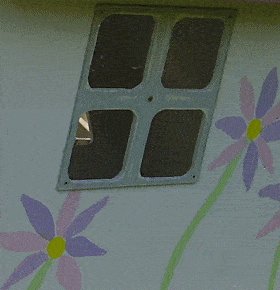
Step 17. Fitting the window pane
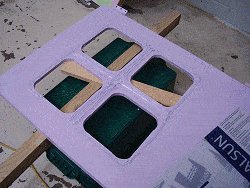
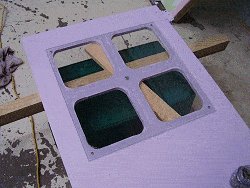
- Cut or acquire 5 pieces of 4mm (3/16″) thick acrylic sheet (clear plastic glass) to cover the window holes.
- 3 pieces @ 19 1/2″ x 19 1/2″ (490mm x 490mm) and 2 pieces @ 9 3/4″ x 19 1/2″ (245mm x 490mm).
- The acrylic sheets (panes) are slightly bigger than the window area they cover.
- Carefully drill some 1/4″ (6mm) screw holes in from each corner and also one in the middle.
- Then place the acrylic sheets (panes) in place over the window holes and lightly pencil mark around the perimeter.
- Take the panes off and apply a clear adhesive sealant to the plywood inside the penciled area.
- Position the panes back in place.
- Screw the corners and the middle.
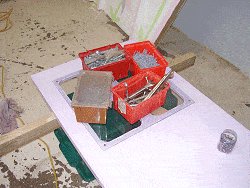
- If need be, place some weights on top of the acrylic sheets (panes) to keep a bit of pressure on the panes until the adhesive sealant dries.
Re-assembling the playhouse
Step 18. Put it all back together again

- By now you have already assembled the playhouse once, so second time around shouldn’t be a problem.
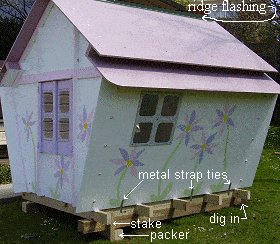
- Most important is to ensure that the floor is made level. It may need digging in parts, or packing up in parts, but make sure it is level. Secure it to the ground – perhaps with a couple of stakes hammered into the ground and nailed to the skids.
- Also… once the playhouse is fully assembled, fasten the walls to the skids and end joists with a dozen or so pieces of 6″ (150mm) long galvanized metal strap, just to make sure a gust of wind can’t pick the playhouse up and drop it in another part of the yard.
- Finally, fix a length of 2″ x 2″ (50mm x 50mm) galvanized angle flashing along the roof ridge.


Hello there,
First of all thanks for posting the plans for this project on the web for all to use. The friends kids love it when they come round for the garden parties etc.
It is quite a lot of work and took me a whole week to complete, after all the parts were delivered. I was working approx 8 hours a day for 7 days. It is a good idea to make sure all the tools you require are sharp and in good condition so that you don’t have to stop in the middle of a cut etc.
The one point I would like to highlight is that the 90mm cut in the end panels for the lower roof sections doesn’t take into account the 18mm of board that forms the lower roof section.
To clarify. If you measure up 130mm along the vertical edge of the end panel and join this to a point 930mm to the right of the vertical edge, it will be the correct distance from the parallel line drawn from the lower left corner. Those calculations will work out correct. The parallel lines will end up at approx 108mm apart.
What is incorrect is the number shown on the drawing stating that the parallel lines will be 90mm apart. When constructing the playhouse you will be using a 90mm piece of lumber screwed to a 18mm piece of plywood which means the parallel lines should be approx 108mm apart.
I have got some pictures attached here and will be completing a blog about it at http://www.bunglesmate.co.uk/blog/2014/10/04/saturday-27th-september-2014-playhouse/
Hi, I built the plywood playhouse from these plans: https://www.buildeazy.com/plywood-playhouse/ Just finished a couple days ago.
I don’t recommend this project for someone with no prior carpentry experience as there are a number of cuts that require angled mitre cuts and some of the plywood cuts are really long. The instructions were fairly easy to follow with only a couple of dimensional hiccups. Foremost, the side walls, using standard 4×8 plywood, do not quite reach the lower roof. I didn’t have to trim that edge to fit the slope, which was kind of a relief. However, there is about a 1″ gap. Everything else worked pretty well and I love the design. Here are some other changes and comments:
– I used 5/8 plywood on the roof/ceiling to save some money and because 3/4 everywhere seemed a bit overkill. You could run a truck into this thing and the truck would break first.
– I didn’t have a workshop space with a tall enough ceiling to finish initial construction inside, so I had to finish installing the roof on-site. This was no problem except for the painting. I definitely recommend painting this thing in panels (per the plans) instead of assembled like I did.
– I skipped the plexi windows because they seemed like the one afterthought in the design, plus I thought it would be better to maintain air flow and keep it cooler inside. We’ll see how that works out in the winter. I may change my mind.
– I used one of the scrap pieces of plywood to make a little desk in the back corner.
– I used a router to round most of the plywood edges. They seem less splinter prone this way and seemed to take paint better.
Here are a few pictures.
Thanks for the plans and your website. My 3-year-old son loves it and it’s big enough to keep him happy for years!
Ben Malouf