Contents
Welcome to our comprehensive guide on constructing a simple garden pond. This article provides detailed, step-by-step instructions and essential insights to help you create a beautiful and functional water feature in your garden.
From the initial design and tool selection to the final touches and maintenance, we cover everything you need to know. Whether you’re a beginner or an experienced DIY enthusiast, our guide is designed to assist you in building a pond that not only enhances the beauty of your outdoor space but also supports a thriving ecosystem. Let’s dive in and transform your garden into a serene, picturesque haven.
Tools
- Spade or Shovel: For digging and shaping the pond.
- Concrete Mixer or Wheelbarrow: A concrete mixer is ideal for larger ponds, while a wheelbarrow suffices for smaller ones.
- Garden Hose with Spray Nozzle: Essential for adding water and cleaning the area.
- Bucket and Hose Water Level or Carpenter’s Level: To ensure your pond’s edges are level.
Materials
- Heavy Gauge Polythene Sheet: Select a size that comfortably lines your pond and extends at least 150mm (6 inches) beyond its perimeter.
- Gravel/Sand Mix and Cement: For a 5 square metre (6 square yard) pond, you will need approximately 0.3 cubic metres (0.4 cubic yards) of gravel/sand mix and one and a half 40 kg (80 lb) bags of cement.
- Flat Stones: A sufficient quantity to neatly edge around the pond.
- Spray Paint: For accurately marking the pond’s perimeter.
Step 1: Designing Your Pond’s Layout
- Outline the Pond: Begin by marking the desired shape of your pond using a can of spray paint. This step helps you visualize the final size and placement, ensuring it complements your garden’s layout.
Special Considerations for Varying Climates
- Ted’s Insights for Extreme Weather Conditions: “For those of us in the Great White North [Canada], where temperatures vary greatly, the pond – especially if being used for fish and plants should be at a depth of 900mm with a shelf area for some species of plants at approximately 300mm from the top. Although in Canada, this will not stop the pond from becoming a large ice cube, it will prevent broiled fish in the summer from excessive heat. Again, in northern climes, one would have to add wire mesh to keep the pond together. A far better solution would be to use the heavy rubberized liners that are available for fish ponds, eliminating the need for cement. As for the pump – if you are adding one for aeration or a decorative waterfall, that will do the trick.” – Ted L., Stratford, PE
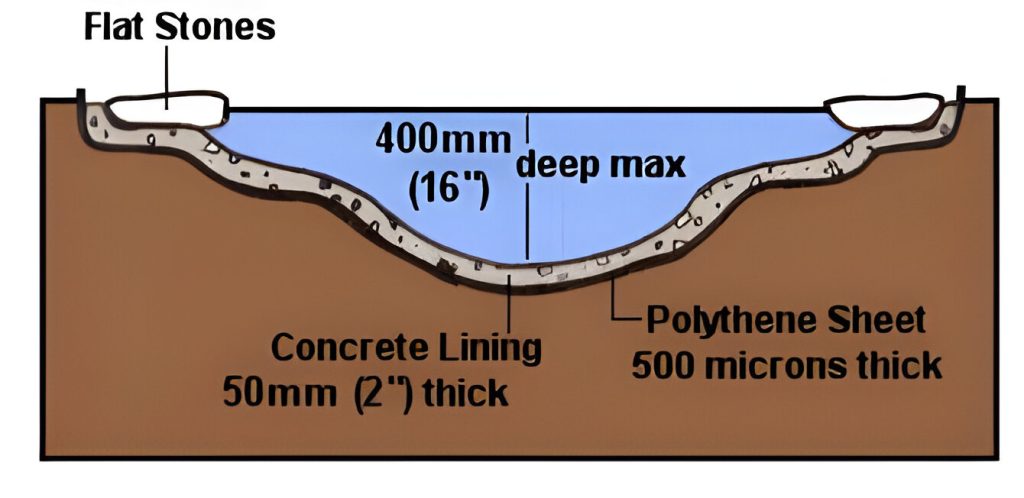
- Local Regulations Reminder: Remember, in many areas, ponds deeper than 400mm (approximately 16 inches) may require fencing and a permit for safety and compliance. Always check with your local authority to adhere to regulations.
Step 2: Ensuring Level Ground
- Measure Ground Elevation: Along the spray-painted outline of your pond, measure the ground height at intervals of approximately 600mm (2 feet). This step is critical to ensure that all points along the perimeter are level with each other, which is essential for a uniformly shaped pond.
- Use the Bucket and Hose Water Level Method: For accurate leveling, employ the bucket and hose water level technique. This simple yet effective method allows you to determine if the ground is even all around your pond. If you’re not familiar with this method or need a refresher, refer to our detailed guide: How to Make and Use a Bucket and Hose Water Level.
- Why It’s Important: An evenly leveled ground is crucial not only for the aesthetic appeal of your pond but also for its structural integrity and water distribution.
Step 3: Preparing the Pond Shelf
- Leveling the Perimeter: Begin by using a spade to level the ground along the marked outline of your pond. This step ensures that the entire perimeter follows the predetermined shape and is even.
- Creating the Pond Shelf: Proceed to dig a trench around this perimeter. This trench should be about 200mm (8 inches) wide and 50mm (2 inches) deep, relative to the lowest ground level in the area.
- What is a Pond Shelf?: This trench will form a ‘shelf’ around the pond’s edge. The pond shelf is a crucial structural feature that provides a base for placing flat stones after the concrete has been laid. It helps in framing the pond and contributes to its overall stability and aesthetic appeal.
- Consistency is Key: As you dig, ensure that the width and depth of the shelf are consistent all the way around the pond. This uniformity is vital for a balanced and visually pleasing pond edge.
- Smooth and Even Finish: Take extra care to smooth out the shelf. Any unevenness or rough patches can be adjusted by adding or removing soil as needed. A smooth, even shelf will make laying the concrete and stones easier and more effective.

Step 4: Excavating the Pond and Laying the Liner
- Excavate the Pond Interior: With the shelf established, it’s time to dig out the central area of the pond. Start from the edge of the shelf and excavate towards the center, creating a gradual slope. Aim for a saucer-like shape with a maximum depth of 400mm (16 inches) at the center.
- Why a Saucer Shape?: This shape ensures even water depth, which is crucial for the health of any plants and aquatic life in the pond. It also facilitates easier cleaning and maintenance.
- Position the Polythene Liner: After the excavation, lay a heavy gauge polythene sheet across the bottom of the pond. Extend it up over the pond shelf, making sure that it overhangs the pond’s edge by at least 150mm (6 inches).
- Securing the Liner: This overhang is essential for securing the liner in place. It will be covered by the flat stones later, which will keep the liner anchored and prevent it from slipping into the pond.
- Avoiding Wrinkles and Folds: Carefully smooth out the liner to avoid large wrinkles or folds. While some small creases are inevitable, minimizing them helps to ensure a neat appearance and reduces the risk of damage to the liner.
- Check for Coverage: Make sure the liner covers the entire excavated area uniformly, with no gaps or exposed soil. This uniform coverage is critical to prevent leaks and ensure the longevity of your pond.
Step 5: Preparing for Stone Edging
- Test Placement of Flat Stones: Begin by laying out the flat stones around the pond’s shelf. This step is crucial for two reasons:
- Ensuring a Perfect Fit: Arrange the stones temporarily to make sure they fit neatly along the shelf’s edge. This test arrangement helps in visualizing the final look and ensures that you have enough stones to cover the entire perimeter.
- Spacing and Design: Use this opportunity to decide on the spacing and pattern of the stones. You can rearrange them until you are satisfied with the design. Remember, this is the decorative edge of your pond, so take your time to get the look you desire.
- Clear the Area for Concrete Pouring: Once you are happy with the arrangement of the stones, carefully remove them and set them aside. Clear an area approximately 400mm (16 inches) away from the shelf edge.
- Why Clear the Area?: This space is necessary to provide room for pouring the concrete. It ensures that the stones are not in the way during this process, which can be messy and might disturb the stones’ setup.
- Organize the Stones: As you remove the stones, organize them in the order they were laid. This will make it easier to replace them in the same arrangement after the concrete has been poured.
- Safety Tip: When moving the stones, be mindful of their weight and your lifting technique to prevent injury.
Step 6: Mixing and Applying Concrete
- Preparing the Concrete Mix:
- Choosing the Right Equipment: Use a concrete mixer for larger ponds or a wheelbarrow for smaller ones.
- Mixing Ratio: Combine four parts of a fine gravel and sand mix with one part of cement. This ratio is crucial for achieving the right consistency and strength of the concrete.
- Adding Water: Gradually pour clean water into the mix. Aim for a fairly stiff consistency. The mixture should hold together without being overly wet or crumbly.
- Adjustments: If the mix is too dry and crumbly, add more water sparingly. Conversely, if it’s too wet or sludgy, add more gravel/sand mix and cement maintaining the same 4:1 ratio.
- Applying the Concrete:
- Start at the Bottom: Begin spreading the concrete over the polythene liner at the bottom of the pond, working your way up to the pond shelf.
- Thickness: Ensure that the layer of concrete is at least 50mm (2 inches) thick throughout. This thickness is vital for durability and to prevent potential cracks or leaks.
- Using a Block of Wood as a Trowel: Instead of a conventional trowel, use a block of wood to spread and smooth the concrete. The softer edges of the wood are less likely to tear or pierce the polythene liner.
- Smooth and Even Application: Carefully smooth the concrete to avoid creating sharp edges or uneven surfaces. This step is important not only for the pond’s appearance but also for the safety of any wildlife or plants.
Step 7: Setting the Stone Edging
- Placing the Flat Stones:
- Begin Placement: Once the concrete is sufficiently set (but still pliable), start laying the flat stones around the edge of the pond shelf.
- Securing the Stones: Gently press each stone into the concrete. This ensures that the stones are firmly embedded and will stay in place.
- Alignment and Positioning: Align the stones in the pre-planned arrangement, ensuring they are evenly spaced and level with each other. This uniformity is key for both aesthetic appeal and structural integrity.
- Incorporating a Feature Stone for Shade:
- Selecting a Large Overhanging Stone: Choose a large flat stone that can overhang the water’s edge. This stone can serve as a shade provider for fish and add a naturalistic element to your pond.
- Strategic Placement: Position this stone in an area where it will cast shade effectively, considering the path of the sun across your garden.
- Ensuring Stability: Make sure this stone is securely fixed in the concrete. It should be stable enough to bear any weight that might be placed on it in the future, whether from wildlife, plants, or incidental contact.
- Finishing Touches:
- Check for Gaps and Alignment: After laying all the stones, step back and examine the pond from various angles. Look for any gaps or misalignments and adjust as necessary.
- Final Setting Period: Allow the concrete to fully cure with the stones in place. This waiting period is crucial to ensure that everything sets firmly and stays in position.
Step 8: Filling the Pond and Final Settling
- Waiting for Concrete to Set:
- Check the Concrete’s Readiness: Wait for a couple of hours for the concrete to stiffen. The exact time may vary depending on the weather and temperature conditions. The concrete should be firm enough not to be disturbed by the addition of water.
- Filling the Pond Carefully:
- Preventing Scouring: Before adding water, lay an old sheet, a piece of polythene, or a similar protective layer in the pond. This layer helps to distribute the water flow gently and prevents it from directly hitting and eroding the fresh concrete.
- Gradual Filling: Turn on the water at a low pressure to slowly fill the pond. This gradual process helps preserve the integrity of your newly set concrete and stone work.
- Allowing the Pond to Settle:
- Remove the Sheet: Once the pond is filled, carefully remove the protective sheet.
- Settling Period: Leave the pond filled with water for about a week. This settling period allows the concrete to cure fully and the entire structure to stabilize.
- Adjusting Water Quality:
- Reducing Alkalinity: After a week, empty and refill the pond three or four times. This process helps to reduce the alkaline levels in the water, making it more suitable for plants and aquatic life.
- How to Empty the Pond:
- Small Pond: For a small pond, you can use a bucket to manually remove the water.
- Larger Pond: For larger ponds, consider hiring a pump from a tool or garden center.
- Using a Garden Hose to Siphon:
- Connect one end of the hose to a garden tap and place the other end at the bottom of the pond, weighed down by a rock or similar object.
- Fill the hose with water by turning on the tap. Once the water starts to flow into the pond, turn off the tap.
- Disconnect the hose from the tap, sealing the end with your thumb to prevent water from escaping.
- Move the sealed end to a lower area than the bottom of the pond. Remove your thumb to start the siphoning process. The lower this end of the hose is, the faster the water will siphon out.
Enjoy Your New Garden Pond!
Congratulations on completing your garden pond! As you watch the water settle and nature take its course, remember that each day might bring a little change or a new surprise to your garden.
If questions or challenges arise, don’t hesitate to reach out for advice. Gardening is a learning process, and sharing experiences can be incredibly rewarding.
We hope your pond brings a refreshing touch to your garden, becoming a cherished space for relaxation and enjoyment. Here’s to many peaceful moments by your new pond!
Happy gardening!


