Steps
In this tutorial we show you an example of how to make lumber exterior steps 900mm (36″) wide, coming off a deck 900mm (36″) high.
Practical Safety Rules for Lumber Steps :
- Treads must be at least 280mm (11 1/2″) deep.
- Rises must be a maximum of 185mm (7 3/8″) high.
- Front of tread must overlap the back of tread below by between 15mm (5/8″) to 25mm (1″).
- There should be no gap more than 100mm (4″) between the vertical distance of treads, therefore riser boards will be needed to close any gaps. see Fig1 below

Getting Started:
- To start off find the overall height from the top to the bottom of the steps.
- We know the height of the deck is 900mm (36″) above ground, but the ground coming away from the deck might not necessarily be level and the slope of the ground will affect the overall height of the steps.
- To find the true overall height of the steps first measure the height of the deck from the ground where the steps are to fit. We know that measurement is 900mm (36″). Then measure out from the deck (in the direction the steps are to go) in a level line, one and a half times the deck height measurement (approximately). In this case, 1350mm. (54″)
See Fig 2
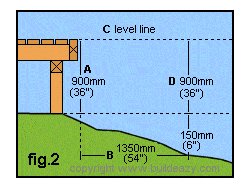
(A) Height of deck off ground. 900mm (36″)
(B) Distance out from deck where steps will finish. This measurement is 1.5x measurement A. 900 (36″)x1.5 = 1350mm (54″)
(C) Level line from top of deck.
(D) This height is the overall height of steps. 900mm (36″) + 150mm (6″) ground slope = 1050mm (42″). Now we know the overall height of our steps which is 1050mm (42″). Next work out the height of each rise. This is the vertical distance from the top of one tread, to the top of the tread above it. We know the maximum height of each rise can be 185mm (7 3/8″) max. Knowing this we need to divide into 1050mm (42″) which is the overall height of the steps, to get an even measurement of 185mm (7 3/8″) or less. In this case, the even measurement is 175mm (7″), as 175 (7″) divides into 1050mm (42″) 6 times. This means that there will be six rises, each 175mm (7″), which gives us a total height of 1050mm. (42″)
We have now established the dimensions of out steps.
Six Rises at 175mm (7″) and five treads at 280mm (11 1/2″) deep. Always make the treads 280mm (11 1/2″) regardless of the rise measurements.
The Lumber to Use
- Stringers – Surfaced/dressed treated Pine, 250×50 (2×10) finishes approximately 240×46 (1 1/2x 9 1/2)
- Treads – Surfaced/dressed treated Pine, 150×50 (2×6), two per tread. Finishes approximately 145×46 (1 1/2x 5 1/2).
- Riser boards – Surfaced/dressed treated Pine, 150×19 (3/4x 5 1/2).
Quantities
- Stringers – 250×50 (2×10), two at 2.1m (7ft)
- Treads – 150×50 (2×6), ten at 0.9m (36″)
- Riser Boards – 150×19 (3/4x 5 1/2), three at 1.8m (72″)
Building the Steps:
Step 1
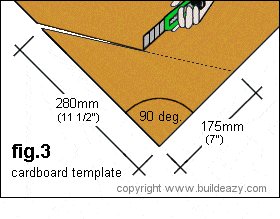
- Make a simple template in order too mark out on the stringers, the tread positions.
- This is a relatively simple task, take a piece of cardboard 300mm (12″) square or larger (alternatively you can use hardboard, thin plywood or anything similar). From the cardboard cut out a triangular piece as shown in the following diagram. fig. 3
Step 2
- Lay out the two stringers 250×50 (2×10) flat on a couple of saw stools, on even ground or on the floor.
- Hold the cardboard template, with its longest edge flush to one edge of the stringer, approx 300mm (12″) in from one end, and pencil mark around the template. Repeat this action five times on each stringer, as shown in the diagram below. fig. 4

- Stringer 1 must be marked mirroring stringer 2.
Step 3
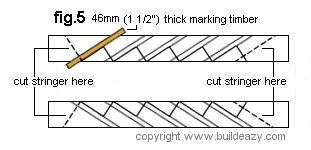
- To continue marking out for the treads, use a piece of lumber about 600mm (24″) long, and the same thickness as the treads which is approximately 46mm (1 1/2″) This piece of timber is to be used only for marking and can then be discarded.
- Hold this piece of lumber flush on one of the tread pencil lines marked on the stringer.
- Mark each side of the 46mm (1 1/2″) thick lumber across full width of the stringers, as on fig.5 below.
- Repeat this action to all tread lines, on both stringers to get an effect as in the diagram below. fig.5
Building the Steps Continued
Step 5
- Now that we have the tread lines marked out on the stringers, we need to notch (check out, rebate) them. This can be achieved by setting the blade depth on our circular saw approximately 12mm (1/2″) and making repeated cuts along and between the tread markings on the stringers. See diagram below. fig.6

- Repeat this action to all tread markings on both stringers.
- Finish by chiseling out the grooves with a sharp chisel. The more saw cuts, the easier the chiseling.
Step 6
Cut all tread lumber, 150×50 (2×6), to the required length, in this case 832mm (34″), 10 in all, 2 per tread.
Step 7
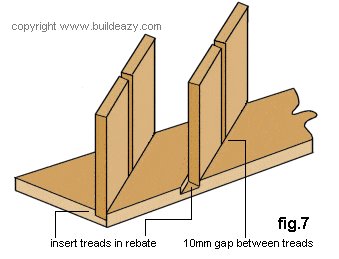
Lay one of the stringers on even ground or the floor and insert the treads into the rebated grooves. fig.7
Step 8
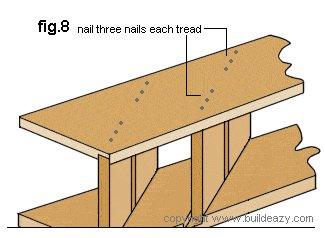
- Place the other stringer on top of the treads mirroring the bottom stringer.
- Nail through the stringer into the treads using 100mm (4″) or 90mm (3 1/2″) galvanized nails. 3 nails per side per piece of tread timber. see fig.8
Step 9
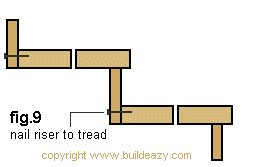
- Cut riser boards and nail against back of treads. see fig.9
Step 10
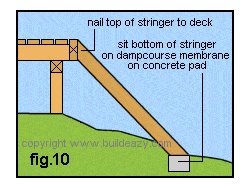
- Fix the steps in place. Nail the top of the stringers to the deck structure.
- Temporarily pack with blocks of wood under the bottom tread until treads are level.
- Dig a hole 250x250x250 (10″x10″x10″) under each stringer and fill with concrete. Place a galvanized wire or bracket into the wet concrete against the two stringers.
- When the concrete has cured place a piece of damp course membrane, melthoid or similar under the stringer and on top of the concrete pad. This prevents moisture from the concrete pad going to the lumber. See fig.10