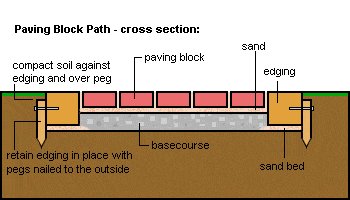
In this tutorial we explain how to lay a paving block path. For added style and ease we have replaced traditional paving stone concrete edging with 100×100 (4×4) treated lumber. This method of edging not only creates a great look, but also makes the project easier for those attempting it.
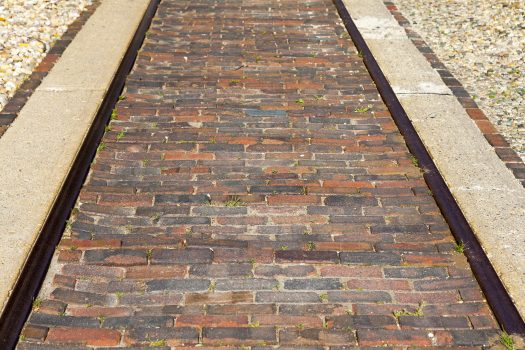
We are using solid concrete cobblestone paving blocks 230mm long x 190mm wide x 60mm thick (approximately 9 1/2″ long x 7 1/2″ wide x 2 3/8″ thick). Other sizes will also do. Pavers come in a variety of colors for individual tastes.
Other materials required include base course metal and sand.
This project is suitable for moderate to firm ground. If your ground is soft, you will need to excavate deeper and replace with base course metal.
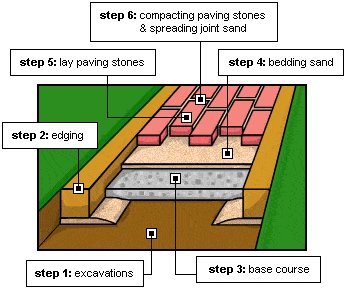
Step 1: Excavations
- Dig out the proposed pathway to a depth of 125mm (5″) below finished path height (usually existing ground level) and the required path width. Try to plan the width of the path so that full pavers can be placed without the need for cutting. When working out the overall path width, allow an extra 3mm between each paver (spacings that allow sand to penetrate around the pavers). Some pavers have space nibs (packers) already on them.
Step 2: Putting down the edging
- Lay a bed of sand along each side of the path excavation approximately 40mm (1 1/2″)thick and about 200mm (8″) wide.
- Lay the 100×100 (4×4) edge boards on top of the sand and tamp down into place until the top of the edge boards are at the required path finished height. Retain them in place with stakes nailed to the outside and trim the stakes off slightly below the top of the edging board. (see drawing below)
Step 3: Base course
- Add a layer of 20mm (3/4″) graded base course metal in between the edging boards. 20mm (3/4″) graded means the metal is graded to 20mm (3/4″), and everything below this size is included in the product.
- Add and compact the base course with a mechanical plate vibrator until the finished height is 85mm (3 1/2″) down from the top of the edge boards. At the same time compact the soil against the outside of the edge boards thus ensuring they stay in place parallel.
- You can hire a plate vibrator from your local hire center.
Step 4: Bedding sand
- Add a 35mm (1 1/2″) layer of bedding or paving sand, and level with a screeding board so the finished height is 50mm (2″) down from the top of the edge boards.
Step 5: Laying the paving stones
- Commence laying the pavers from one end of the path. (work uphill). Space the pavers approx 3 mm (1/8″) to allow filling sand to penetrate around the pavers. Kneel on a board across the area you have already laid. Use full pavers only, go back later and fill in with the cut ones.
Step 6: Compacting and putting in joint sand
- The pavers should now be, prior to compacting, 10mm (3/8″) above required finished height. Compact the pavers consistently with the plate vibrator. The final step is to brush jointing or filling sand over the surface. This fills the joints and binds the pavers together. Vibrate again.


