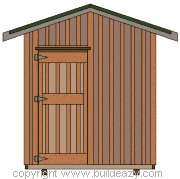
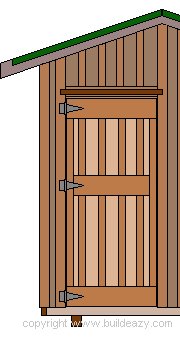
This board-and-batten door is specifically designed for the 8’x10′ storage shed but can be adapted to suit almost any shed. Instructions on how to measure for the door and installation details can be viewed here.
This door is constructed solely out of 200×25 (1×8) boards and 75×25 (1×3) battens.
Either surfaced (smooth) or sawn (rough) lumber can be used for this project but it must be a stock that is suitable for exterior use such as cedar or treated lumber.
This particular door size is 900mm (36″) wide x 2075mm (83″) which is a good size to get most implements into a shed however you can change the door size to fit any opening at all.
You will need…
- 5 of 200×25 (1×8) boards that are 2075mm (83″) long for the vertical door slats.
- 3 of 200×25 (1×8) boards that are 900mm (36″) long for the horizontal door rails
- 10 meters (33ft) of 75×25 (1×3) batten.
- 130 of 45mm (1 3/4″) galvanized wood screws.
- Exterior type wood glue.
Instructions
Step 1.
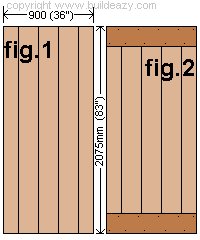
Lay the five 200×25 x2075mm (1×8 x83″) vertical door slats next to each other on a flat surface forming a rectangular panel. See fig.1.
The width of the rectangular panel will be wider than the required door width at this stage.
Measure and mark the required door width of 900mm (36″) central on the panel and cut off (rip down) the excess each side.
Step 2.
Glue and screw two 200×25(1×8) horizontal boards (rails) to the vertical door slats, one at the top and one at the bottom. See fig.2.
The length of the screws should be slightly less than the combined thickness of the rails and slats.
Screw diagonally with two screws at each meeting as shown in fig.2.
Step 3.
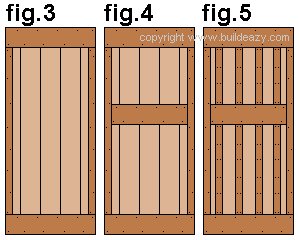
Cut to length and glue and screw two 75×25 (1×3) battens to the slats at each side of the door ensuring that the edges are flush. Screw in a zig-zag pattern as shown in fig.3.
Step 4.
Cut to length and glue and screw the middle horizontal rail in place between the two side vertical battens. The height placement is just personal preference although middle rails are usually placed within the top half of the door. See fig.4.
Step 5.
It is now just a matter of cutting to length, gluing and screwing the intermediate 75×25 (1×3) battens to the door slats covering all of the joins. See fig.5.
For instructions on how to install the door go here.


