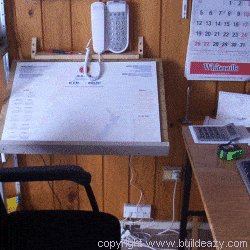
This wall mounted drafting table is designed to take an A2 size paper sheet or pad.
Note: A2 paper size is 420mm x 594mm (16 1/2″x 23 3/8″)
This is a most practical desk to have in an office and positioned handy to the work area with an A2 pad sitting on top of it to jot down notes, memos etc as well as conveniently write and draw, you will soon wonder how you ever managed before without one.
This page contains the plans followed by materials required and instructions

[a] 50×25 (1×2) stock. Two pieces at 550mm (22″) long
[b] 50×25 (1×2) stock. Two pieces at 370mm (14 3/4″) long
[c] 50×25 (1×2) stock. Two pieces at 500mm (20″) long
[d] 75×25 (1×3) stock. One piece at 650mm (26″) long
[e] 75×25 (1×3) stock. One piece at 450mm (18″) long
[f] 18mm (3/4″) plywood. One rectangular piece 650mm x 450mm (26″x 18″)
Materials required
Please note: Surfaced or dressed (smooth) lumber will be of a smaller size (width and thickness) than the sizes nominated above. For example, 50×25 (1×2) stock when dressed will finish approximately 45×18 (3/4″ x 1 1/2″) which is called the actual size. This will not make any difference to the lengths of the lumber or any of the dimensions as shown in the plans.
You will need……
- 3000mm (10ft) of 50×25 (1×2) stock
- 1200mm (4ft) of 75×25 (1×3) stock
- One rectangular piece of 18mm (3/4″) plywood 650mm (26″) x 450mm (18″)
You will also need……
- Necessary wall fixings, assorted nails and/or screws and some glue.
DIY Drafting Table Plans:
1). Cut all the members, length and profile according to the plans above.
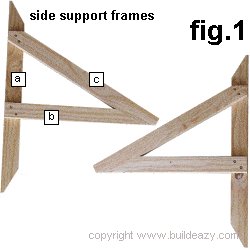
2). Make the two side support frames up comprising of members [a], [b] and [c]. Use screws and glue. Pre-drill the screw holes first.
Note: The two side support frames will be a mirror image of one another as shown in the picture. See fig.1.

3). Sit the two side support frames upright on a narrow bench or wide plank so that the members [b] can sit level on the bench/plank with the bottoms of members [a] hanging down. See fig.2.
Position the support frames so that they are 450mm (18″) apart and ensure that they are parallel.
Glue and screw the plywood panel to members [c] ensuring the bottom edge of the panel is flush (even) with the bottom of members [c].
Ensure that each end of the plywood panel overhangs the two side support frames equally.
4). Glue and screw member [d] to [c] and [f] making the bottom of member [d] flush with the bottom of member [c].
The top of member [d] should rise above the top of the plywood sheet [f] by about 25mm (1″).
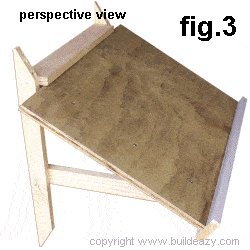
5). Glue and screw member [e] in place in between members [a] and sitting hard on top of the plywood panel [f].
THE UNIT IS NOW READY TO BE FIXED TO THE WALL
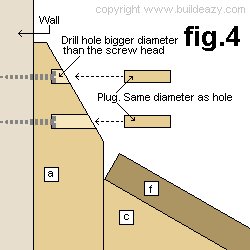
6). Drill holes, two partially into the tops and two partially into the bottoms of members [a] with diameters slightly bigger than the diameters of the screws heads. See fig.4.
There will be eight holes altogether.
7). Determine the proposed height and position of the completed wall desk unit.
The upright members [a] will need to be fixed securely to the wall with appropriate screws or anchors through the pre-drilled holes.
In a standard lumber frame wall the upright members [a] should be fixed directly to a vertical stud or horizontal block within the frame.
In a masonry wall the upright members [a] can be fixed directly to the wall using appropriate anchor bolts or similar types of masonry screws or bolts.
Covering the screw holes and screw heads
This can be done in a number of ways.
Where the screws are counter-sunk or in bedded in the wood……
The holes can be plugged with round wood the same diameter as the hole and then trimmed flush and sanded or the holes can be filled with various types of wood filler. The option sometimes depends on whether the unit is going to be stained or painted.
Where the screw heads are flush with the wood……
Screws can be obtained that have plastic caps that can be attached to the screw head.
Alternatively there are screw head cups and covers which consist basically of cup type washers that go under the screws heads and covers that go over the screws heads and clip onto the cups.


