Contents
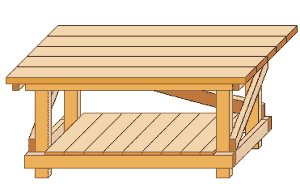
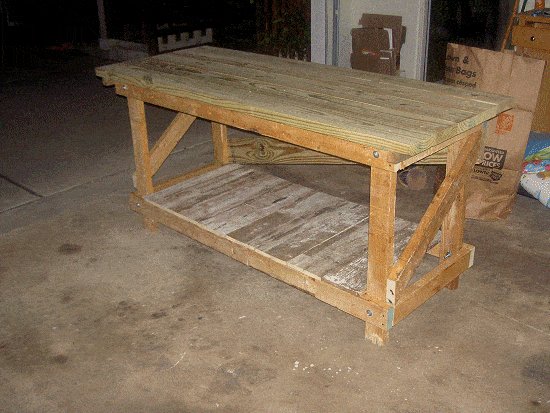
Simple but sturdy! A simple, strong, no frills workbench
Introduction
The average DIYer would probably be content with a less elaborate woodworking bench than a woodworker might otherwise demand.
The average DIYer does not know what a mortise and tenon joint is, or a lapped dovetail joint, or a blind mitre joint, or a bridle joint. In fact, he doesn’t want to know.
The average DIYer secures all joints with bolts and nails.
He is usually a jack of all trades and generally useful at most of them.
This workbench is put together in typical DIY fashion. It is basic, requires the minimum of tools, is easy to construct and very, very sturdy.
There is also some helpful input from other people’s comments.
Identifying the members
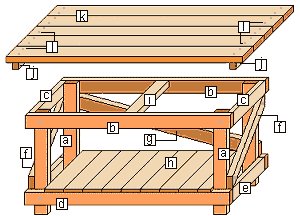
[a] Legs: 100 mm x 50 mm (2″ x 4″)
[b] Top front & back rails: 100 mm x 50 mm (2″ x 4″)
[c] Top side rails: 100 mm x 50 mm (2″ x 4″)
[d] Bottom front & back rails: 100 mm x 50 mm (2″ x 4″)
[e] Bottom side rails: 100 mm x 50 mm (2″ x 4″)
[f] Side diagonal bracing: 100 mm x 50 mm (2″ x 4″)
[g] Rear diagonal bracing: 100 mm x 50 mm (2″ x 4″)
[h] Shelf: 150 mm x 25 mm (1″ x 6″)
[i] Benchtop center support: 100 mm x 50 mm (2″ x 4″)
[j] Benchtop end supports: 50 mm x 50 mm (2″ x 2″)
[k] Benchtop: 150 mm x 50 mm (2″ x 6″)
[l] Galvanized coach/carriage bolts
Cutting list
| item | description | size | length | quantity |
| [a] | legs | 100mm x 50mm (2″x4″) | 800mm (32″) | 4 |
| [b] & [d] | front and back rails for top and bottom | 100mm x 50mm (2″x4″) | 1600mm (64″) | 4 |
| [c] & [e] | side rails top and bottom | 100mm x 50mm (2″x4″) | 550mm (22″) | 4 |
| [f] | side diagonal bracing | 100mm x 50mm (2″x4″) | 900mm (36″) (oversize) | 2 |
| [g] | rear diagonal bracing | 100mm x 50mm (2″x4″) | 1800mm (6ft) (oversize) | 1 |
| [h] | shelving | 150mm x 25mm (1″x6″) | 650mm (26″) | 9 |
| [i] | benchtop center support | 100mm x 50mm (2″x4″) | 550mm (22″) | 1 |
| [j] | benchtop end supports | 50mm x 50mm (2″x2″) | 750mm (30″) | 2 |
| [k] | benchtop | 150mm x 50mm (2″x6″) | 1800 (6ft) | 5 |
| [l] | Galvanized coach bolts | 10mm (3/8″) | 110mm (4-1/2″) 160mm (6-1/2″) | 34 4 |
The wood and wood sizes
Note: This project is written in both Metric (mm) and Imperial (inches).
The metric measurements are given first followed by the standard measurements in brackets ( ) – for example: 100 mm x 50 mm (2″ x 4″).
The wood sizes used for this project are sawn (rough) actual sizes. Dressed, gauged or planed wood is slightly smaller in width and thickness, and if used, make the necessary allowances.
A timber such as pine would be ideal.
Untreated timber may be used if the table is for inside use (garage, work shed etc.) whereas a treated timber is preferable for outside use.
All sizes in this project are standard sizes and should be readily available at most lumber merchants.
Four different stock sizes are used. They are…
- 50 mm x 50 mm (2″ x 2″) for the benchtop end supports.
- 100 mm x 50 mm (2″ x 4″) for the legs, bracing, rails and benchtop center support.
- 150 mm x 50 mm (2″ x 6″) for the benchtop.
- 150 mm x 25 mm (1″ x 6″) for the shelving.
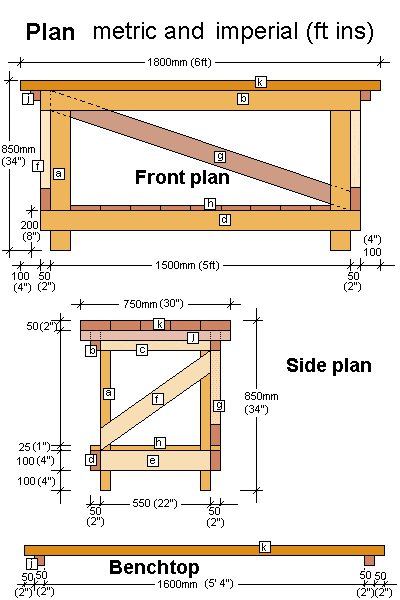
The Plans
Refer to these plans for any required measurements throughout the project.
The Instructions
Step 1. The frame

- Commence by making the frame upside down.
- On even ground nail the front and back top rails (b) to the side top rails (c) forming a rectangle 1600 mm x 650 mm (64″ x 26″).
- Clamp a leg (a) to the inside edge of each corner (note that the table is currently being built upside down) and secure the legs to the rails by first drilling a 10 mm (3/8″) diameter hole through the center of where the two members meet at each corner. Insert the bolts, add washers and nuts, then tighten.
- Then…
- Turn the frame upright and clamp the bottom rails (d) and (e) to the legs (a) so that the top of the rails are 200 mm (8″) up from the bottom of the legs. Fasten the bottom rails in a similar way to how the top rails were fastened.
- Nail the benchtop center support (i) in place. Refer to the drawing ‘Identifying the members’ at the top of the page, if necessary.
Note: About the bench height.
Most workbenches range in height from 800 mm (32″) to 900 mm (36″). The overall height of this bench is 850 mm (34″), however, the overall height can be changed to suit yourself by cutting the lengths of the legs accordingly.
Step 2. The bracing
- Ensure all parts of the workbench frame are square. Hold the bracing members (f) and (g) which are all over length, diagonally in place against the legs to enable each end to be marked. Cut to size, drill and bolt in place.
Note: About the bolts.
The bolts are a contributing factor in ensuring a sturdy workbench. They are also a major cost in relation to the overall project. If cost is a main consideration, then nails (90 mm (3-1/2″)) or screws can be used in place of the bolts. The workbench will still be sturdy, but not AS sturdy.
Step 3. The top
- Lay all the benchtop members (k) on level ground, upside down and so that all the pieces are hard up against each other and all the ends are flush.
- Place the two end benchtop supports (j) on the benchtop members (remember, the benchtop is upside down) so that each support (j) is in 50 mm (2″) from each end. Note that the two supports should also be 1600 mm (64″) apart which is the length of the bench frame. Refer to the plan above.
- Fix the bench supports (j) to the benchtop members (k) with nails. This is just to hold the top in place until it can be drilled and bolted, so ensure the nails are at a length that will not go all the way through the benchtop, and are placed so as not to be in the way of the bolts.
- Turn the benchtop over (upright) and sit off the ground on blocks to enable drilling.
- Mark for drilling, two holes at each meeting. (See the drawing ‘Identifying the members’ at the top of the page.)
- Start each hole with a diameter slightly bigger than the bolt head, about 10 mm (3/8″)deep. This is so the bolt head is countersunk into the benchtop, and does not protrude past the face of the benchtop.
- The remainder of the hole will be 10 mm (3/8″) diameter (or the thickness of the bolt shank).

Start each hole with a diameter slightly bigger than the bolt head
- When the benchtop is bolted firmly together, place it on top of the bench frame and fasten in place by bolting the benchtop end supports (j), to the top side rails (c), using two bolts (horizontally) each end.
Step 4. The shelving
- Nail the shelving (h) to the top of the bottom front and back rails (d).
- Use flathead nails 75 mm (3″) long. The last shelving member will need to be cut lengthwise to fit snugly in place.
All done. Eazy with a “Z”!


I built the workbench (Simple but Sturdy!) using your plans. Very sturdy and very economical.
With the exception of the top and 8 bolts, I used all reclaimed wood from another project.
Thanks.
See attached photos.
David Austin, TX 78746
I am building this bench for a second time after building it about 15 years ago for my basement workshop. I used nails and construction adhesive, so I couldn’t disassemble it to move it, so I had to leave it behind. This time, I will make it 8 feet long and will use nails and adhesive again. I plan to ad d an extra leg in the middle both front and back, and will most likely add some extra bracing and some stringers under the shelves. Wish me luck!
I have just completed building the workbench here:
https://www.buildeazy.com/workbench/
My shed isn’t really big enough for your version, so I changed the dimensions and made it a little shorter and a little less deep. I couldn’t get a commercial one that would suit my requirements, but it I prefer to build my own anyway. The bench is fantastic. So solid and imposing. Thanks for making the design, instructions and cutting sheet available – it was a huge help.
Cheers Duncan Martin
I made the workbench from your plans.
I am 10 years old and I built the workbench on my driveway in 8 hours.
The plans were easy to understand. I brought the plans with me to the store and they cut the wood for me.
I also used the 2 1/2″ and 3″ deck screws that someone had suggested instead of the carriage bolts.
I used a power drill-driver to help me get the screws in easily and my mom double-checked all my measurements.
I love my workbench. It is very strong. It is also very heavy so I decided not to attach to top. That way we can take the top off to make the workbench easier to move.
The top fits very well and doesn’t slide around. It is an outdoor workbench so I used pressure treated wood.
The project cost me $84. Thank you very much for the plans and instructions!
Aidan, Florida, August 2007
The workbench plans are great. I bought the lumber and made the workbench all in one day and I have no carpentry skills. Based on the comments of others I would do the following modifications to make it even easier to build:
1. Only buy (8) 4″ lag bolts/nuts/washers for each of the leg connections and then use 3.5″ dry wall screws for everything else (substitute two screws for every lag bolt). It will be less expensive and the workbench will still be solid as a rock (and it makes the job go quicker too).
2. Use MDF board for the tabletop and shelf. The stock size MDF comes in should cover both parts (the bottom shelf might have to be two pieces though). It’s smoother and it holds up well. I had the tabletop cut to 30″ W x 6′ L which gives it the perfect amount of outcropping for a vice.
3. If at all possible go to a lumberyard! Sure I go to the big box stores a lot, but all of the above modifications were made because the lumber guys took the time to look at the plans and give their opinion. They measured out how much lumber I would need so I ended up with very little waste. In addition their lumber is FAR better quality and they cut the MDF board exactly to my dimensions.
4. Practical advice, cut all the pieces to size first, but use the first piece you cut for each section as the template. This way you will be assured of even pieces. I couldn’t cut to measure to save my life, but doing it this way made the assembly a snap.
My total cost for everything was about $73 US.
JG, Cincinnati, OH, USA
I’ve built the workbench over two weekends and the result is really good.
Some points to add to the above comments:
At the start of the project select the straightest planks and set these aside to build the bench-top! This will save difficulties later in establishing a good flat surface with few gaps between the planks. Obvious with hindsight! I used 4 by 2 planks throughout.
Bolts – Buy these is standard sizes – that way they are significantly cheaper – I sourced 100 M10 by 100 coach bolts for about us $8; I also used M10 by 150 for the longer bolts.
Note you will need more of the longer bolts than detailed in the plan. Additionally, at various key points I used 2 bolts about 1 -2 inches apart since a I found that a single bolt tended to pivot and cause some movement.
The design information says you can use nails rather than bolts for the project -having completed this project I doubt that a version built with nails would be adequate. Use bolts!
Finally I added a cross strut at both ends of the bench to provide more strength over the single strut shown in the plan.
Colin. Scotland,UK August 2006
I built the bench and am very satisfied with the result. Sturdy indeed! I did make a couple minor changes which for me made the construction a bit easier:
All connecting points were joined with #10 SPAX wood and masonry construction screws (essentially deck screws). No bolts or nails were used. I used 3″ screws where a piece was joined thickness to width or thickness to end (as in the frame members B to I) and 2.5″ screws where pieces are joined thickness to thickness (as in frame member to leg, B to A). Joints B to C, B to I, & H to D received two screws, all others three screws. Also, I did not attach the top planks to end supports, but rather simply placed the boards in position, then screwed them directly to cross members C (at each end of the bench) + I. Lastly, I ran a 2×4 stringer lengthwise between lower frame members E, to provide center support for the shelf planks H & to further tie the lower portion together. No need to screw the shelves to this center beam. Total cost of screws was less than $20. I found pre-drilling the holes on the screw head side of a joint made for better/quicker clamping. My drill press made this quick & easy, but of course you can use a hand drill. It’s not necessary to pre-drill for the thread portion, the screws pull right in tightly with no splitting & countersink themselves. The diagonal braces F & G provide substantial strength, be sure to use them!
Dan, Seattle, WA
Hi, here’s my “user comments”
I just finished my bench, and I want to thank the people who put the plans online. The plans were very clear, and the project went smoothly for me.
I have a couple of suggestions. On the bracings, I’d suggest 29″ for the side braces f and 5’4″ for the back brace g. This way, you’ll just need to cut off the corners. Starting with 6′ and 3′ lengths means some wood will stick out when the wood is marked and cut, which changes the geometry enough so that you end up with a slightly short brace that won’t go completely corner to corner. I’d also remove the word “oversized”. I figured that meant they would be cut shorter later, but I wasn’t positive that it didn’t mean to make the pieces a little larger than 6′ and 3′.
There were also a couple of lengths that were oversized. Since a 6 X 2 is actually narrower than 6″ (5 5/8?), the 2 x 2s j should be around 28 3/8″, not 30″. Likewise, the shelving h should be 25″ not 26.
As far as the bolt lengths go, I’m glad went with 4″ and 6″ bolts per D. Popken’s suggestion. I’ll take this a little further and suggest even shorter bolts. The 4″ bolts worked fine for me, but there’s an extra inch sticking out from the nut that could snag on something. I think you could get away with 3 inch bolts. If not 3 inch, then 3 1/2 would still be better.
I also took the leftover 2×2 i had, and attached it to the center of the underside of the table top (about 20″ length). This helped pull the 6 x 2s together, making the table flatter. Basically a third j piece. I may add a sheet of MDF on top to create a smoother surface.
Last suggestion: I’d add nuts, washers, and nails to the list of parts.
Bryan Los Angeles, Ca
A good sturdy bench. But I have some suggestions. The first is that when the plans say adjustments should be made for dressed lumber that goes for the bolts too! If your standard 2×4 is actually 1 1/2” x 3 1/2”, I recommend no more than 4” and 6” bolts. This is especially critical when bolting the top to the bench top end supports. Since these are too be sunken into the top, too long a bolt leaves not enough thread to secure it all the way (I wound up using additional washers as spacers).
The second suggestion is regarding the bolts use to bolt the bench top end supports to the top side rails. The positioning requires holes through the 2×2 and into the top 1/2 of the wide side of the 2×4. Given the thickness of the bolt, this leaves very little space between the resulting hole and the top of the 2×4, especially if you don’t drill the hole dead straight. (If you actually have a 1 1/2 x 1 1/2 attached to a 1 1/2 x 3 1/2 it is only 3/8” from the top of the hole to the top of the board. ) I suggest smaller bolts (or nails) at that point.
Last, if you build it on your basement floor remember the floor is often not level! D. Popken, Highlands Ranch, CO
I would like to say that after searching the internet for some halfway decent workbench plans I would like to say that I’m glad I choose you guys plan. The bench worked out better than I had though. I liked the first one so much I made another bench with my scrap wood. Thanks for posting.
Jeremy, 25, McDonough, GA
After searching countless hours on the net for a decent looking workbench yours appealed the most and when finished what a bench it was. All l can say is thanks for a great plan.
Hus
Just a comment about this workbench. I have spent hours online looking for workbench plans, because I am not a woodworker. I know engines and electronics. So I wanted to find a bench that looked decent and was sturdy. I also wanted something simple because I didn’t want to have to learn another trade for a one time use thing. Your bench filled all of those needs and more. It was a great build and is a pretty darn sturdy bench. Thanks a lot for making my life easier and giving me a good project to build with my 4 year old!
Ron
Excellent plans! I built this over the weekend, with minor modifications – I substituted 3/4″ MDF board for the top of the workbench, and for the shelf. Makes for a smoother work surface, and less cutting.
Peter Worcester, MA
Just completed my workbench and these plans were a great resource. I made a few adjustments. First, I made my bench 8 feet wide. In doing so I thought it advisable to add a 3rd set of legs in the middle of the bench and I used two cross supports rather than the single support called for in the plans. For the bottom shelf I used 1/2 inch plywood. I bought a 4′ by 8′ foot sheet of ply, cut a piece for the shelf and used most of what was left as a back to prevent things on the shelf from slipping off. (As a result I did not need the back diagonal support.) I added a 2×4 standing up to the back of the top for the same reason. Finally, I used 4×4 material for the legs to provide added stability.
All in all a great weekend project for someone with limited carpentry skills and the end result was well worth the effort.
Gary
This workbench was very easy to construct… even for a lady! I would recommend this to any beginner (whether it be male or female) as one of the first projects of minor construction. Very easy to read. There were a few modifications, but the directions were extremely helpful. I hope that my husband enjoys his Christmas present!!
Mrs. Green, Ontario
Hi to all
Yesterday I’ve started and finished constructing the workbench. It took me about 5 hours. and a lot of fun. The workbench is VERY STABLE. I like it a lot.
The Plans are Excellent! Very clear and simple even to a beginner.
The wood I bought is Pine Planned, overall cost (wood & bolts) about 500 NIS (Like 115 US$)
I needed only 20 3/8″X100mm Long Bolts (Instead of 34). for drilling I’ve used a Metal HSS 9.5 mm drill instead of a wood drill which made the drilling like cutting butter.
Eden Orion, Qoranit, Israel
Hi, I built one of these and it’s great! Thanks for posting those plans. I made a few modifications: Total height is 36″ instead of 33″, which felt too low.
Used “California corners” (two 2x4s together on edge) for the corners. Added 5/8″ plywood on top of the 2x6s …
Chris Nelder,
Notes:
1) solid core interior door used as top (42$)
2) 2 side braces attached via 4x 4″ long, 3/8″ diameter screws, pre-drilled
3) side rails attached via 4″ screws, pre-drilled w/bevel bit
4) took 6 hours total for construction, cost was $64.76 total excluding tools Thanks for the plans!
Peter Holt