Contents
This section explains how to build a simple lumber deck, 2000mm (80″) wide x 5000mm (16′ 8″) long and less than one 1000mm (40″) above ground level.
Also see Anatomy of a Deck.
Construction Details
Note: These plans and/or instructions are to be used expressly as a guide only. If contemplating doing any building work inquire at your local building department to find out what specific needs are bound by local building code and what permits and/or consents may be required.
Note: All lumber should be suitable for exterior use and any lumber either touching the ground or going into the ground should be suitable for inground applications.
Lumber requirements.
Scroll down for step-by-step construction details.
| Item | Size | Quantity |
| Stringers | 150×50 (2×6) | 1 @ 5.1m (17ft) |
| Posts | 100×100 (4×4) | 5 @ 1.0m (40″) (confirm height) |
| Bearers | 100×100 (4×4) | 2 @ 2.7m (9ft) |
| Joists | 150×50 (2×6) | 12 @ 2.1m (7ft) |
| Boundary joists | 200×50 (2×8) | 2 @ 2.1m (7ft) 1 @ 5.4m (18ft) |
| Decking | 100×40 (1 1/4x 3 1/2) | 120m (400ft) |
| You will also need nails, bolts, connectors and concrete. |
Step 1. Fixing the stringer
- The stringer (also called ledger) is the beam that the joists sit on or are attached to and is bolted to the building. See Anatomy of a Deck for detail.
- Cut the stringer to length and fix level to the building at the required height using m12 (1/2″) bolts every 1200mm (48″) apart. Pack the stringer out from the wall approximately 6mm (1/4″) at every bolt fixing to prevent moisture being trapped between it and the building.
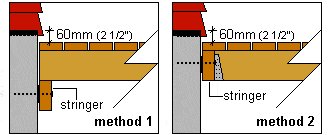
- The finished height of the deck should be at least 60mm (2 1/2″) below the building floor, so the stringer height depends on the thickness of the decking and the method of fixing the joists to the stringer. See the two options below. Insure the stringer is level by using a level or water level.
Step 2. The footing holes
- Dig five footing holes 300x300x450 deep (12″x 12″x 18″ deep) to the dimensions as shown in the drawing below. If the ground is less than firm, then the holes may need to be larger and deeper.
- Make a mix of concrete c and pour at least a 100mm (4″) pad in the bottom of each hole. Place the posts on top of the concrete pads and pour more concrete around the posts to hold in place. Ensure the posts are plumb (vertical), parallel, and longer than required. (The tops will be trimmed off later).
- Let the concrete cure.

Building a Deck
Step 3. Fixing the bearers to the posts
- Trim the top of the posts to the required height which will be 100mm (4″) (thickness of bearer) below the underside of the joists. Mark the underside of the joist height on the building in relation to the stringer and use a straight edge and level or water-level to obtain the required height of the posts.
- Sit the bearer on top of the posts and make sure any necessary join will be over a post.
- Fix the bearer to each post with two nails angled from each face. Use 100mm (4″) galvanized nails.
- Let the two ends of the bearer overhang the edge of the deck line at this stage. They will be cut later.
Step 4. Fixing the joists
- Fix the first joist to or on one end of the stringer depending on your choice of fixing. See diagram below.
- METHOD 1: Sit a joist on one end of the stringer leaving a gap between the end of the joist and the wall of the building. Fix the joist to the stringer with two nails angled from each face. Use 100mm (4″) galvanized nails. It is a good idea to drill the nail holes first to minimize the risk of splitting the end of the joist.
- The other end of the joist will be sitting on the bearer, but do not nail yet until the joist is at right angles (90 degrees) to the house.
- METHOD 2: Butt one end of a joist to one end of stringer so the top of the joist is flush (even) with the top of the stringer. Nail in place. Attach a joist hanger (a metal bracket with nail holes in it that fits around the end of the joist and against the stringer) and nail with the appropriate nails to the joist and the stringer.
- The other end of the joist will be sitting on the bearer, but do not nail yet until the joist is at right angles (90 degrees) to the house.
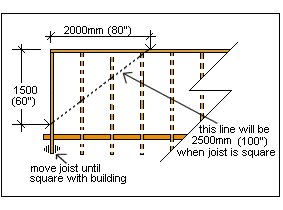
- Ensure the joist is at right angles (90 degrees) to the building before nailing to the bearer. This can be done by using the 3,4,5, method.
- Measure along the outside of the joist 1500mm (60″) from the building, mark (A).
- Measure along the building 2000mm (80″), mark (B).
- When the measurement from mark (A) to mark (B) is 2500mm (100″), then the first joist is at right angles to the building. See diagram below.
- Make any necessary adjustment to the joist in the way of sliding the end of the joist either way along the bearer until square and then fix the joist to the bearer with two nails angled from each face. Use 100mm (4″) galvanized nails.
- Fix the rest of the joists in place parallel to the first.
- Space the joists at 450mm crs (18″ O.C.). (crs/O.C. means the distance from the center of one joist to the center of the next joist.)
- All joists should be slightly longer than required at this stage and will be trimmed off later.
Note: Joists can be spaced further apart depending on the size of the decking boards.
Step 5. Laying the deck
- Start laying the deck from the building side out, making sure there is a gap between the first deck board and the building so moisture does not become entrapped. Any necessary joins should be made on joists and staggered between rows (no two joins should be next to each other). Continue laying and fixing the deck boards using a 5mm (3/16″) spacer to obtain an even gap between them. Check deck boards are straight and parallel to the building.
- Let the decking overhang both end joists while laying, and then trim them flush with the outside of the end joists.
- For an alternative method of laying a straight deck click here. An ideal method for long decks.
Step 6. Fixing the boundary joists
- Cut the joist ends vertical and flush with the outside edge of the last decking board.
- Nail the boundary joist around the perimeter of the deck making sure the top of the boundary joist is flush with the top of the decking. See diagram below.
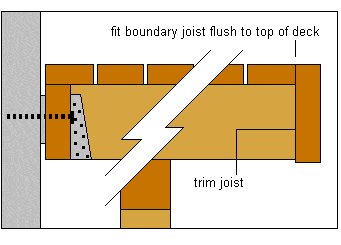
- Miter (angle) cut all exterior corners.
Have fun 🙂


