Contents
Building a carport is a low effort, low cost, high satisfaction project. Put a few pieces of wood together, and you enjoy the functionality of a garage on your property! And it’s even easier if you follow the instructions of this free carport plan!
Introduction
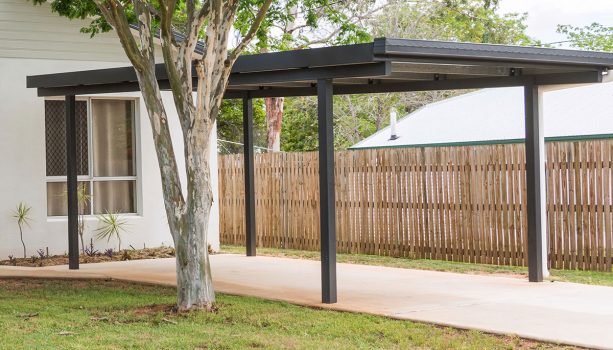
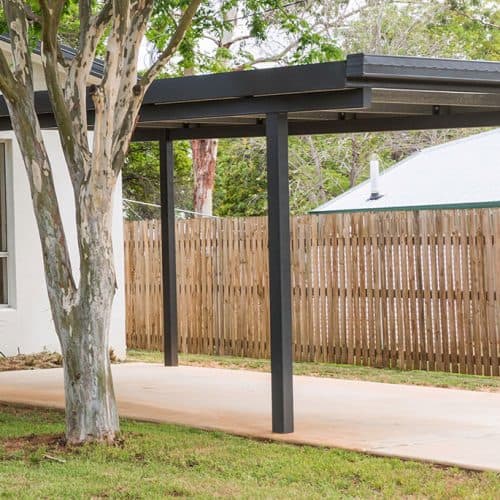
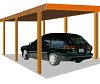
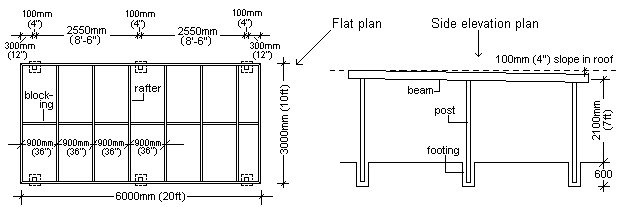
This single carport is 6000mm (20ft) long by 3000mm (10ft) wide. It is the most basic of carports.
Because each site is different, and individual preferences vary, we have given options for post installation and options for bracing.
The frame is made of wood. The roof has a minimal fall. The roof cover can be plastic PVC, tin or other metal. Choice of roof cover could well be decided by the type of conditions that the carport is likely to confront.
These plans make no allowances for extreme conditions.
Is your area subject to frosts? Find out the depth of the frost line and if applicable check to see if the footings require any special consideration. Usually the bottom of the footings should be below the frost line to prevent movement.
Check with your Local Authority to see what plans, permits, consents etc may be required to erect such a structure.
Free Standing Carport
$5.00- Pay online by credit card, debit card, or Paypal using Secure Server Paypal. You do not need a Paypal account if paying by credit or …
|
Wood sizes and measurements
The measurements throughout this project are given in both Metric (mm) and Standard/Imperial inches.
The metric measurements (mm) are given first followed by the imperial measurements (inch) in brackets (). For example 150mm x 50mm (2″ x 6″).
In the above example 150mm x 50mm means wood that is 150 millimeters wide by 50 millimeters thick.
And the equivalent in standard…
2″ x 6″ means wood that is 2 inches thick by 6 inches wide.
The wood used for this project can be either sawn (rough sawn) or dressed (gauged, surfaced, smooth finish). The measurements given throughout this project are for sawn wood.
If dressed wood is preferred, make allowances for the difference in wood thickness and width.
Use a wood suitable for in-ground applications for the posts and use a wood suitable for exterior applications for the rest of the carport structure. Any lumber merchant or supplier will be able to advise on the types of wood most suitable.
Identifying the members
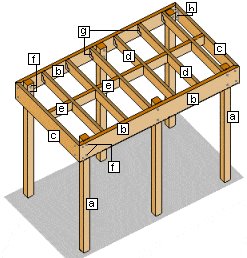
(a) Posts 100mm x 100mm (4″ x 4″)
(b) Beams 200mm x 50mm (2″ x 8″)
(c) End rafters 200mm x 50mm (2″ x 8″)
(d) Rafters 150mm x 50mm (2″ x 6″)
(e) Blocking 150mm x 50mm (2″ x 6″)
(f) Galvanized bolts
(g) Joist Hangers
(h) Galvanized Angle Bracket
The height
The height of a carport is in most cases, common sense. A tall person should be able to walk comfortably under the lowest end of the carport. 2100mm (7ft) from the finished ground to the underside of the lowest end rafter, is a good height.
The slope
The roof slope (fall) should be at least 100mm (4″).
If using a clear PVC roof, then a steeper slope is advisable, as a steeper fall means faster water run-off, and therefore a cleaner roof.
The plans
The plans show a flat plan “bird’s-eye view” and an elevation (side) plan giving all dimensions. Refer to these plans for any required measurements throughout the project.
Setting out
The carport is a 6000 mm x 3000mm (20ft x 10ft) rectangle.
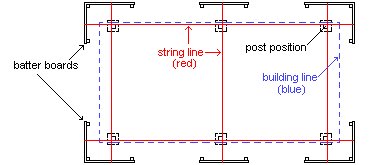
- Mark out the four corners, and erect wood profile boards (batter boards) out from each corner and also out from the middle to take in the two center posts.
- Set the profile boards (batter boards) back at least 600mm (2ft) from the building line (carport perimeter) to allow room for hole digging etc.
For instructions on setting the profiles go to here
The building line (in this case) is the perimeter of the carport (the very outside edge). It is a 6000 mm x 3000mm (20ft x 10ft) rectangle.
The posts however, will need to be off-set in from the building line, 50mm (2″) in from the sides and 300mm (12″) back from each end (front and back).
Use string lines (attached to the batter boards) to make a rectangle that will determine the post positions.
As mentioned, the posts will be off-set 50mm (2″) in from the sides of the building line, and 300mm (12″) back from the ends (front and back) of the building line, thus, the stringline should form a rectangle 5400mm x 2900mm (18ft x 9ft-8in).
Installing the posts
Method 1. Post set in concrete
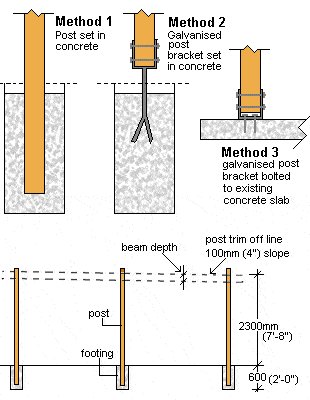
- Dig post holes 300mm (12″) square by 600mm (24″)deep.
- Place 100mm (4″) of concrete into the bottom of every hole.
- Commence putting the posts in the holes against (but not touching) the string line.
- Using a spirit-level on both a front and side face, check that each post is plumb (vertical) and almost, but not quite, touching the string line.
- Fill the hole with concrete to within 50mm (2″) of the finished ground level.
- Check again that the post is plumb and not quite touching the string line.
- Because of the depth of the hole, the concrete will support the post without the need for bracing, providing of course that the concrete mix isn’t too runny and there isn’t a gale blowing.
- Continue until all posts are concreted in.
Method 2. Galvanized post brackets set in concrete
- Dig post holes 300mm (12″) square by 600mm (24″) deep.
- Fill the holes with concrete and set the brackets in position while the concrete is still soft.
- Ensure the brackets are at the right height, taking the finished slab (carport floor) into consideration. Some temporary packing, props or bracing may be needed to support the brackets until the concrete stiffens up.
- Wait until the concrete has cured (usually at least four days) and then install the posts plumb (vertical) in the brackets and hold in place with temporary bracing.
Method 3. Galvanized post brackets bolted to existing concrete slab
- Fix the brackets to the slab, in position with masonry bolts or anchors.
- Install the posts plumb (vertical) in the brackets and hold in place with temporary bracing.
Trimming the posts
- Mark the rear posts a minimum of 2300mm (7′ 8″) above the slab, or finished ground level.
- Ensure the height marks on both rear posts are level. Use a spirit-level on a straight edge to achieve this or a water level. For instructions on how to make and use a water level go to here.
- Mark the front two posts 100mm (4″) higher than the rear posts.
- Fix a string line between the front and back posts to mark the height of the middle posts. Cut the tops of the posts off at these marks.
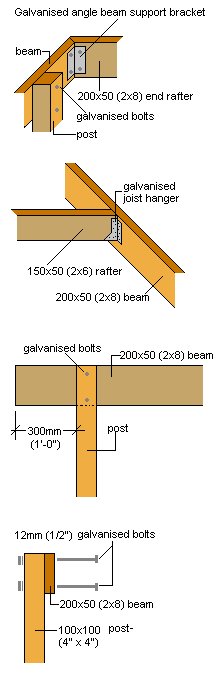
The beams and rafters
- Cut the two beams 6000mm (20ft) long with 45° miters each end and then clamp them in place to the posts so that the tops of the beams are flush with the tops of the posts and protrude past both the front and rear posts by 300mm (12″).
- Drill and bolt the beams to the posts with 12mm (1/2′) Galvanized bolts, (two at each meeting).
- Cut the two end rafters 3000mm long with 45° miters each end and fix them in place to the beams with 75mm (3″) Galvanized nails and then with Galvanized angle brackets, each bracket fixed with four 12mm (1/2″) Galvanized bolts, two through the beam and two through the rafter. (See diagram).
- Cut the six intermediate rafters 2900mm (9′ 8″) long and fix them in place to the beams with Galvanized metal joist hangers. Space the rafters at 900mm (3ft) centres (crs, o.c.). Refer to the plan.
- Finish off with a longitudinal row of blocking down the middle in between the rafters.

The bracing
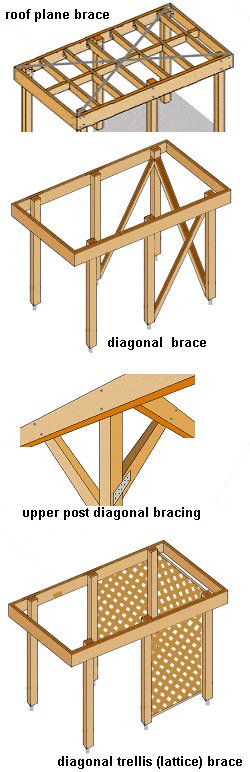
If the posts are concreted into the ground, and the posts are bolted to the beams with two bolts at each meeting, then no further bracing should be required. If, however, the posts are not in-ground, but supported by Galvanized post brackets, then additional bracing is required. One such scenario is to fix upper post diagonal bracing (see diagram), two to each post, each about 900mm (3ft) long (more or less), and fixed to the post with nail plates and fixed to the beam/rafter with bolts.
Another scenario is to fix full 100mm x 100mm (4″ x 4″) diagonal braces running from the bottoms of the middle posts to the tops of the end posts and secure with bolts, nail plates or Galvanized brackets at each end. A similar diagonal brace is also required between the two rear (end) posts. With this latter scenario, the diagonal braces could be replaced with diagonal trellis (lattice) between the two end posts and the end post and middle post each side (three panels in all).
Both bracing methods mentioned in this scenario also require roof plane bracing to ensure the front of the carport is rigid. This can be 25 mm (1″) wide flat Galvanized metal strapping stretched from corner to corner and fixed with Galvanized nails to the tops of each rafter.
The roof
You can now apply your chosen roof.
Different types of roof will have different fixing instructions from the manufacturers.
All done. Eazy with a “Z”!


Thank you for posting your on-line carport construction plans. They were helpful.
Craig
How do you estimate ,how many lumber do you need for example I’m gonna build a 10×12×18carport what I need is the amount of lumber that I need to use to build it.
Regarding your carport design….The only negative comment I have is the use of PVC roofing material. There are three drawbacks; #1. The sun will turn the timbers underneath charcoal black in the places the wood comes in close proximity with the PVC. #2. In the colder climates the PVC roofing is very brittle in the wintertime. If you are shovelling snow be very careful not to crack the roofing or damage it with your shovel. #3. PVC roofing will sweat in the days when there is a heavy frost on the roof. When the sun hits the roof condensation will build up underneath and start to “rain” inside the carport. An alternative suggestion is a tin roof. Sheath the roof and cover with heavy roofing felt. Then strap the roof with 2×4’s and install the tin. Much more durable and does not sweat, burn, or crack. Other than that, great site and good basic ideas….
Just one more point to add. The 4″ slope to the roof of the carport is not enough if you are using PVC roofing. The PVC has a tendency to bow downward and collect water between the rafters if there is not enough pitch to the roof. With tin I think you could get by with a 4″ slope but not PVC. Take care,
Langley, B.C. CANADA.
Thanks for the carport plans. I used it as a basis for constructing loose boxes-cum-stables for my horses.
Chris.
I built this carport after my first one collapsed because of snow. This was a very simple plan and I thank buildeasy for it. The only thing I did different was replaced the 4X4 with 4X6 for added support and I have to say it is perfect for an additional space. I built it with a friend in 2 days (because I needed the cement to dry) I use it to house my boat. And I have had 32″ of snow on it now for 3 weeks.
Bassinkurt.
Hi,
I used your plans for a cheap car port and it turned out well so far. I chose the dimensions of 12ft x 16ft because it was more suitable for me. I also reduced the dimensions of the lumber. Rather than using 2×8’s I used 2x6s, and I replaced the 2x6s with 2x4s. So the box on top was lighter in weight and because of this I was able to build it without any assistance. I figured the roof would be holding at most a 100 pounds of snow. I also bought shorter posts than I should have. I miscalculated the head room forgetting the 2x6s would bring the ceiling down 6 inches.
See pics. Initially I am just using a tarp as a roof. The polycarbonate roof panels would be around $300 so I’m postponing that for now. I looked into all sorts of roofing material and it seems that is this real cost factor in this project. Treated plywood is not much cheaper than polycarbonate panels.
The structure seems very solid. I have yet to test the pitch. Since my length is 4ft shorter, I went with the 4in pitch assuming it would be a steeper incline. But the incline is barely noticeable. I just finished so I have yet to see it in action. I can’t wait for some rain or snow to see how it holds up. It will be interesting to see if 6mil tarp will last the winter.
Total price was $250USD. A bit more than I had anticipated. Less than a car tent, but much more substantial. Thanks,
Drew from Michigan, USA
I love this site. Thank you for putting it up. So, here goes… I’d like to build this on a 24’x36′ existing concrete slab that we already have. The slab has 12″x12″ footers with 2 runs of #5 rebar in them. The inner slab is 4-1/2″ thick. I would like there to be a 1′ overhang on all four sides. We live in Tampa, Florida, USA where there are multiple bad tropical storms and hurricanes annually. My question is how will I know what size posts, rafters, beams and bolts to use? I need this to be up for years to come and not blow over in the first storm.
Approx how much should a 12×20 cost to build ?
I just purchased your carport plans but am not seeing a full materials list to give to my carpenter in order to price out wood and materials. Where do I find that? Thank you.
I bought the plans because I thought a materials list would be included for the basic carport. I don’t understand why this is missing from the information. If I decided to vary from the original plans, I can figure out what to change, but a starting point would have been great.