Contents
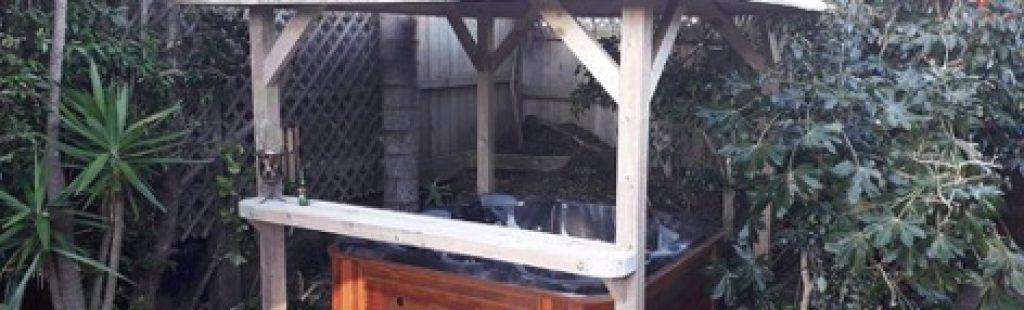
This is a rustic-looking square gazebo constructed out of rough wood (before the wood has been planned, dressed, etc) and is well suited placed amongst trees and plants in a bush-like setting.
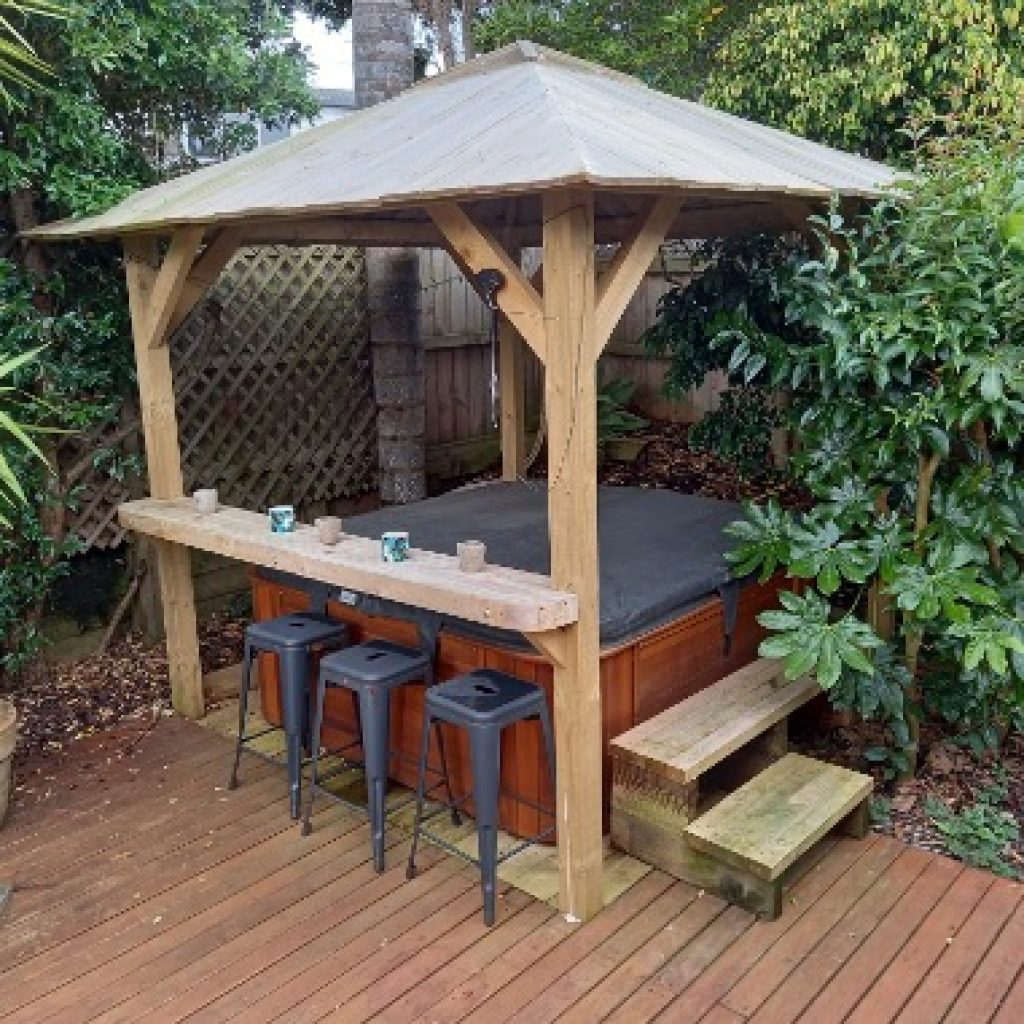

It is 8ft (2400mm) square with an overall height of 110-1/4″ (2800mm) and a clearance of 80-3/4″ (2050mm) from the ground to the lowest part of the roof.
It was made to house a 251 US gallon (950 liters) family hot tub 79-1/2″ (2020mm) square by 30″ (760mm) high.
It consists of 4″x4″ (100mm x 100mm) corner posts, 2″x4″ (50mm x 100mm) and 2″x3″ (50mm x 75mm) roof framing, and 1″x6″ (25mm x 150mm) roof boards with a plastic glass skylight.
All the wood is rough sawn and the sizes are common and should be obtainable in most places.
You can also buy this plan:
- 🛑 No ads
- 🖨 Printable PDF
- 🎗Support the author
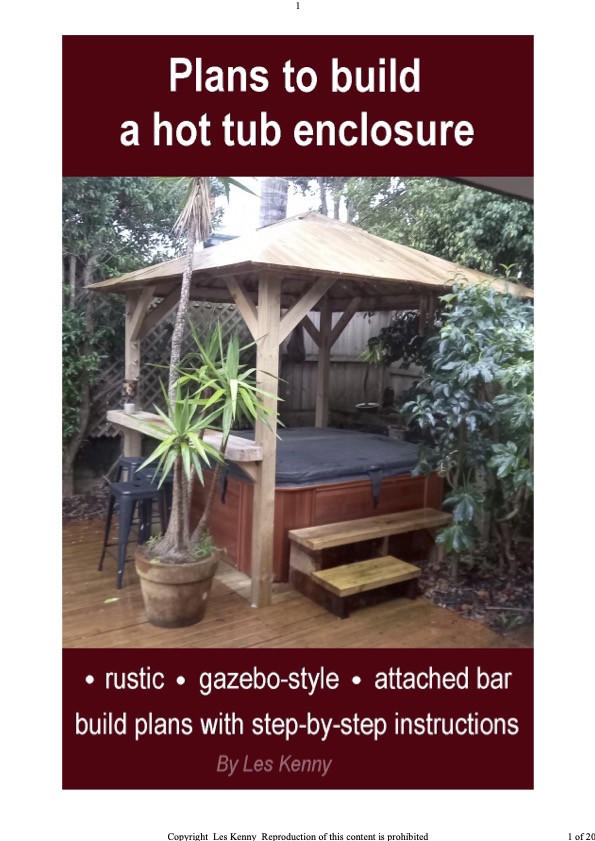
Plans to Build a Gazebo Hot Tub Enclosure
Original price was: $5.00.$3.00Current price is: $3.00. -40%
|
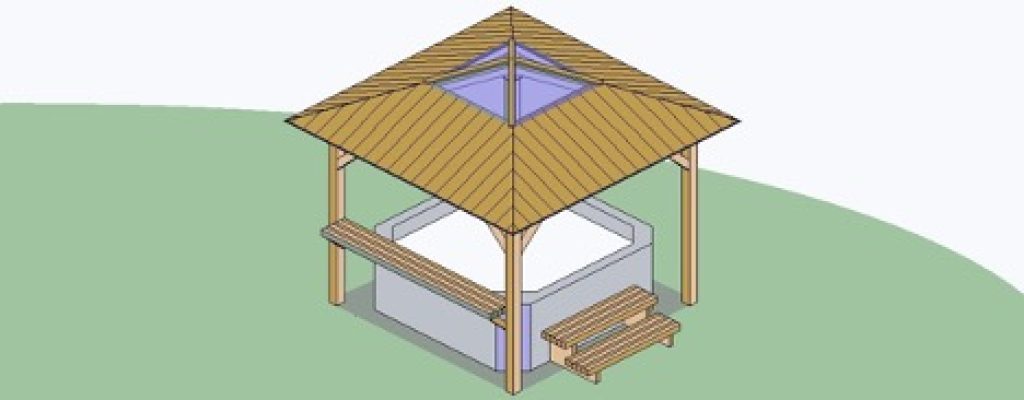
Gazebo plans – side elevation

Gazebo plans – roof plan corner view

Materials you will need
All lumber is rough sawn. I.e. before the wood has been dressed, dimensioned, or planed. The list allows for a bit of wastage.
4″ x 4″ (100mm x100mm) ROUGH SAWN TREATED:
- Posts: 4 @ 9ft (2700mm)
2″x4″ (50mm x 100mm) ROUGH SAWN TREATED:
- Beams:4 @ 9ft (2700mm) Braces: 4 @ 3ft (900mm)
2″x3″ (50mm x 75mm) ROUGH SAWN TREATED:
- Hip rafter: 4 @ 78″ (2000mm)
- Purlins: 4 @ 65″ (1650mm), 4 @ 30″ (760mm) Bar: 6 @ 8ft (2400mm)
- Bar brace: 2 @ 16″ (400mm)
1″x6″ (25mm x 150mm) ROUGH SAWN TREATED:
- Roof boards: Overall 230ft (70m). When ordering get the longest possible lengths and when cutting, always cut the longest pieces first to avoid wastage.
NAILS
- 4.5lb (2kg) of 3-1/2″ (90mm) galvanized flat head nails 4.5lb (2kg) of 2-1/2″ (60mm) galvanized flat head nails
GALVANIZED THREADED ROD
- 3 pieces of 1/2″ (12mm) galvanized threaded rod 12″ (300mm) long with 6 nuts and washers.
- To hold the bar pieces together.
PLASTIC GLASS (ACRYLIC SHEET)
- 1/8″ (3mm) thick, 1 piece @ 3ft (900mm) square.
Glue
- A thick type exterior wood glue
Misc
- You will also need a few assorted screws and some sort of strap metal strips or nail plates to help tie the beam corners, collar ties and rafter apex.
Step one – Set the posts
Set the posts as shown in the drawing below. The posts will form a true square if:
- The posts are spaced apart equal
- The posts are plumb
- The sides are parallel
- The diagonals are equal
Ensure the above requisites are met to avoid possible roof problems.

The post hole depth (or any other holding method) is not that important as far as “wobble” goes.
It mainly serves to hold the post in position until the beams and braces have been fixed in place.
It is the beams and braces that hold the structure rigid.
However, the posts do need something solid to sit on to prevent sinkage.

Step two – Fix the beams and braces

Trim the tops of the post level, 85-3/4″ (2176mm) off the ground.
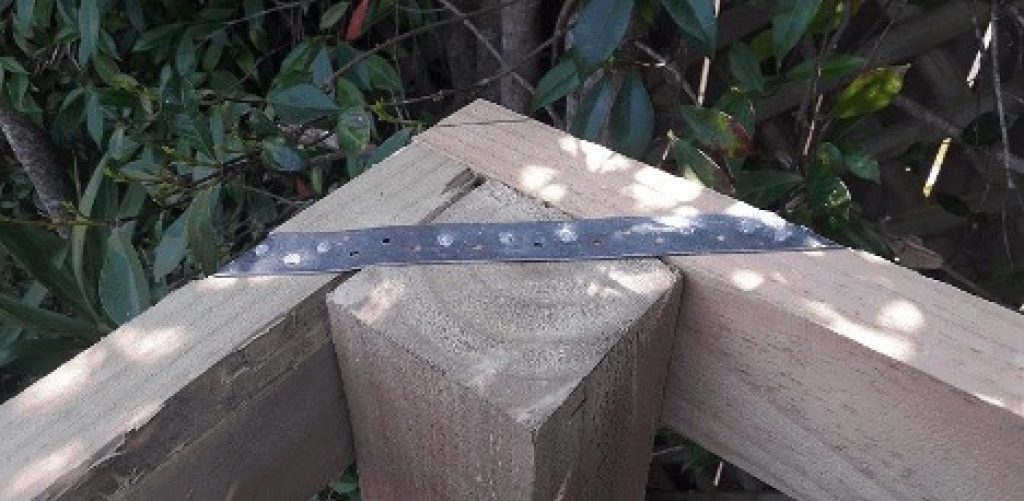
Referring to the plans, cut and fix the 2″x4″ (50 x 100mm) beams flush with the tops of the posts. Cut the 8 braces and fix them in place.
Add a metal strap or similar fixing to the corners for additional holding. See the picture below.
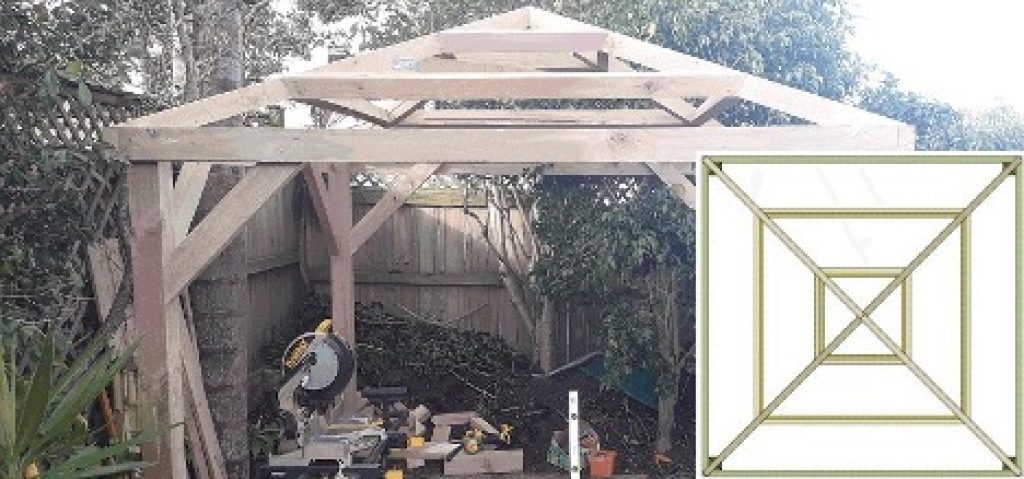
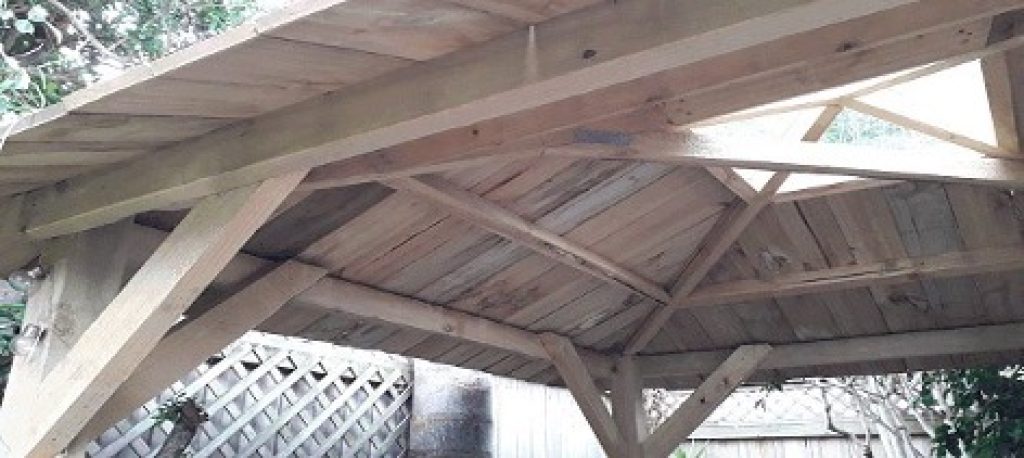
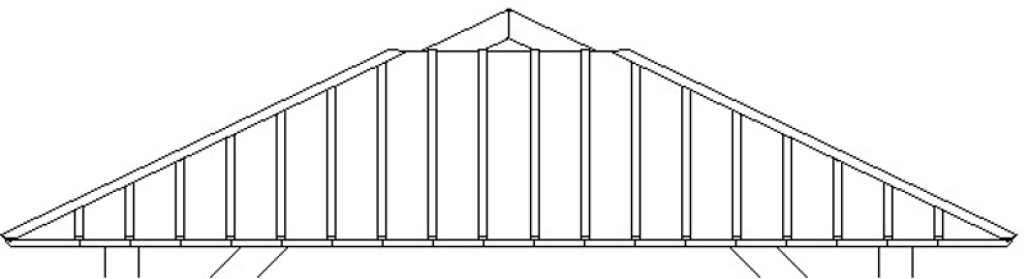
Step three – Put up the rafters

Cut 4 rafters as per plan in the roof plan drawing, 2 @ 72-1/2″ (1842mm), and 2 @ 71-1/2″ (1816mm), A and B respectively.
Make up one truss as shown in the drawing above comprising of two rafters (A) and a collar tie (C).

Place and fix the ‘truss’ on top of the posts and then add the other two rafters at right angles joining at the apex.
Fix the rafters at the apex and at the corner posts.

Step four – Put in the purlins

Cut four upper purlins at 27″ (685mm) long to the longest points, and four lower purlins at 64″ (1630mm) long to the longest point.
The angle: The ends of the purlins require a compound cut. A compound cut consists of two angles – A bevel angle and a miter angle. In this case the angle across the top of the wood (the miter angle) will be 42.1° , and the bevel (the blade tilt) will be 17.7°.
See the next section ‘Cutting the angles’ for more information
Once cut, fix them in place between the rafters according to the plans, although it will become obvious where they go.
Ensure the upper and lower purlins are parallel to each other and the beam.
Cutting the angles
Both the purlins and the roof boards require a compound cut.
A compound cut consists of two angles (off square) in one cut – A miter and a bevel.
In this case, the miter angle is 42.1° off square. That is the angle across the top of the wood.
The bevel angle is 17.7°. That is the angle you tilt the blade on your saw to make the cut.

Set the blade on your saw to 17.7° for both the purlin and the roof board cuts.
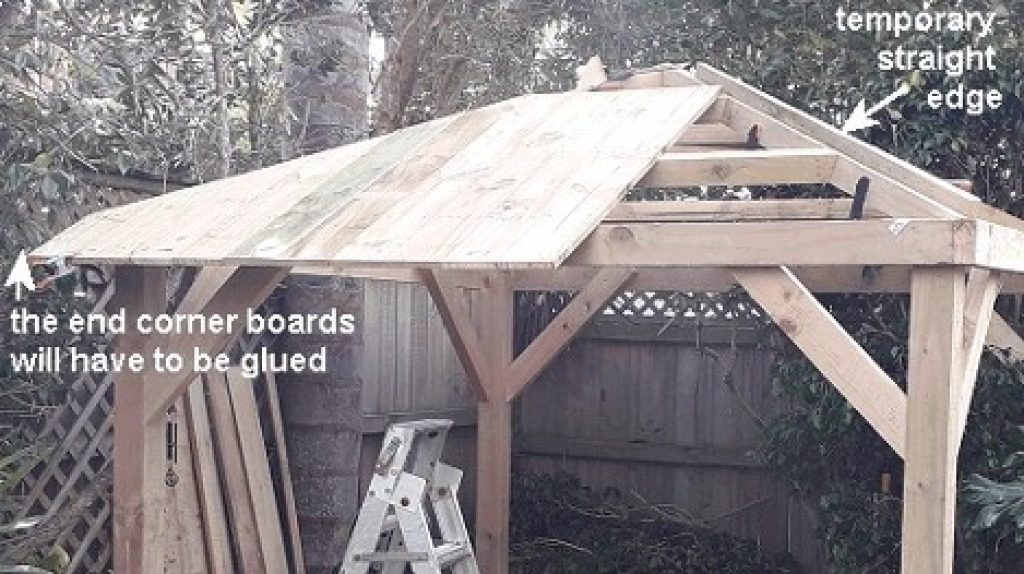
Step five – Put on the roof boards
The roof boards are 1″x6″ (25mm x 150mm).
Start the first board in the middle of the sides. It will be 51″ (1300mm) long.
Have the top a little above the top purlin and the bottom should run past the beam approximately 12″ (300mm).
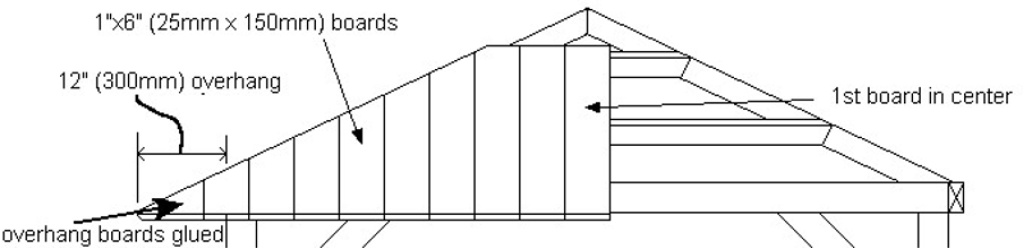
At the corner (hip) rafters, the tops of the boards will have to be angled to suit. Refer to the previous chapter for the angles.
Fix a temporary straight edge down the middle of the rafter giving something to align the tops of the roof boards to.
The relevant side of the temporary straight edge must be in the middle of the rafter.
When you get down to the very lower corner (the boards protruding past the beam), there will be nothing to nail those boards to so they will have to be glued in place.
Will the boards be waterproof?
There may be a drip or two simply because the boards are placed together and not sealed in any way.
There will be the odd gap due to movement caused by weather.
Most water directed at the joins will run down the boards (capillary action) but some runoff may get redirected by the purlins causing a drop or two.
The people I built the gazebo for, found it to be no problem at all (having used it for nearly 1-1/2 years at the time of posting this revised version, and at times in huge downpours).
However, if you want the gazebo for another use other than a hot tub, and you require total shelter – then simply fix a narrow batten over each join such as shown in the drawing below.
Step six – Build the bar
Using six 8ft (2400mm) lengths of 2″x3″ (50mm x 75mm) lumber, do the following…
- Mark the drill holes along the center of each piece – one 6-1/2″ (165mm) in from each end. And one in the middle.
- On two pieces only (the outside two pieces) drill starter (countersink) holes
1-1/4″ (32mm) diameter, to a depth of 5/8″ (15mm) to house the washers and nuts. Continue through the wood with a 9/16″ (13mm) drill bit and do the rest of the holes with that.
- Glue and join the pieces and hold them in place with clamps.
- Using 3 lengths of 1/2″ (12mm) galvanized threaded rod, put a washer and nut on one end of each and thread them through the holes. Add a washer and nut at the other end – and tighten them. Sand the top of the bar when the glue has dried.
- Cut out the two corners on one side to fit the posts, and round the opposite corners.
- Fix it in place 39-1/2″ (1000mm) from ground to the top, and fix the two end braces as show in the drawings.

Step seven – The skylight drawings
Looking down view

Cross-section view

Step seven – The skylight instructions
Referring to the previous step-by-step pictures
Pic 1.: All ready to commence making the skylight.
Pic 2.: Fix a strip of wood [a] the same thickness as the roof boards (it can be a ripping off a roof board) to the top of the rafters.
Pic 3.: Measure for the skylight acrylic sheet (plastic glass) [b]. The side edges will overlap the rafters by 1/2″ (12mm) and the bottom edge will overlap the roof boards about 1″ (25mm).
Once you have measured for one piece, the other three should be the same but check just in case.
When cut, put them in place and hold with 2 screws [c] along the bottom edge. Predrill the screw hole in the acrylic sheet and ensure the hole is bigger that the screw shank. Refer to the pictures for placement.
Pic 4.: Cover the gap between the acrylic sheets (over the rafters) with a strip of wood [d] on top. It can be a ripping off a roof board but ideally a strip about 3/8″ (10mm) by 1-1/2″ (38mm) would look the best. Fix it with three screws [e] spread along the length as shown in the picture. Do not over tighten the screws.

An exotic addition nearly a year and a half down the track
Nearly a year and a half down the track brushsticks were added to the roof, solely for a more exotic look.
That was a simple task. It was just a matter of cutting the brushsticks to fit and stapling them to the existing roof.
Easy peasy lemon squeazy.

General notes
Nailing:
There is no nailing detail for individual steps, but in general, use 2-1/2″ (60mm) galvanized flat head nails for the roof boards (2 at each meeting, placed 3/4″ (18mm) in from each side), and use 3-1/2″ (90mm) galvanized flat head nails for everything else.
Nowadays a lot of people prefer nail guns or screws and in most cases they would have their own fixing preferences.
Wood:
All wood is treated and rough sawn.

Done!
Copyright stuff
These plans and writings are copyright protected. In short, that means this:
These plans are for personal use only and cannot be passed on, resold, or redistributed without the copyright owner’s express written permission. All rights are reserved.
However, you can do what you like with what you make with these plans. You can make as many of the items as you want. Keep them, give them away, sell them, and do what you want with them.
It is the plan that is copyright protected – not the item that you build from the plan.
Disclaimer
Although all due care is taken, no responsibility is accepted by the author (Les Kenny) for any wrongful information, omissions, or any other irregularities regarding this article.
This project is to be undertaken at the user’s own risk.
No responsibility will be accepted by the author (Les Kenny) for any injury, harm, or loss to any person while using or undertaking this project, either directly or indirectly.
Work safe – have fun.
If you have never used a power tool before – do so under the supervision of a capable person.
Copyright © Les Kenny. All rights reserved. Reproduction of this content is strictly prohibited.
About the author
With a background in building, Les Kenny has had an online presence spanning over two decades of designing, building, and writing about ‘How to Make’ woodworking and DIY projects.
From 2000 until 2018 (for 18 years) he wrote primarily for buildeazy.com.


Buildeazy.com started as a hobby for Les Kenny over eight years ago when he decided he would share his successful DIY projects with the wider world, putting them up online for anyone to access.


