Contents
A miter saw is one of the most versatile cutting tools. You need to take precautions when setting up your workspace and operating one. Spending a few minutes reviewing these instructions to use a miter saw could save you a trip to the emergency room!
Stick to our guide, and you’ll be safely cutting in no time.
3 Steps To Using A Miter Saw: Tips and tricks
1: You’ll Need Some Miter Saw Safety Gear
Some accidents with miter saws occur because the operator does not have the saw setup correctly. Or they try to cut a small piece and their fingers are too close to the saw. Other injuries happen when the operator believes they have proper control but they don’t and kickback happens.
Avoiding these potential hazards is accomplished when you take your time and make sure you are ready to work. Work should begin by making sure you have the equipment to protect yourself.
- Goggles: Even for quick, minor cuts you should wear goggles. One spec of wood or dust may cause damage to your eyes.
- Ear Protection: Prolonged exposure to loud noises may have long term effects on your hearing. It is a good idea to protect your ears with muff style hearing protectors or ear plugs designed to block out high noise levels.
- Gloves: Thick gloves are a must as they can reduce injury caused by a blade touching your fingers or hand.
Now that you have the right equipment and took off your jewelry before starting, you are ready to begin your project. Before you do, let’s take a look at the saw and make sure it is ready for safe operation.
2: Safety Checks Before Using Your Saw
First, before inspecting the saw, make sure no power is getting to it. Make sure all of the guards are in place and functional. Does the lower guard need cleaning? If so, clean it before you begin cutting.
Finally, check your blade. Are the blade and fasteners secured? Has the blade become blunt? Does it need sharpening or adjusting?
With the prep work behind us, let’s look at some tips you can use to safely operate your miter saw.
3: Cutting Instructions For Safe Use
With all the gear and prep work out of the way, it’s finally time to get cutting. Stick to these 4 instructions to use a miter saw while keeping safe!
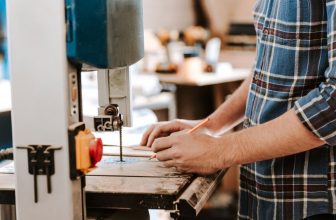
- Whenever possible, use clamps so that material is secure on the miter saw. If the best woodworking clamps for the job are not available or possible, make sure you have a good hold on the material. If you are cutting long material, make sure you support it at the same height as your table.
- Do not cut small pieces with your miter saw. You should always keep your fingers at least six inches away from the blade. This isn’t possible when cutting small pieces.
- If your lower guard is no longer allowing for proper visibility, stop your work, disconnect power and clean the guard. This allows you to see clearly when you use a miter saw, and helps with movement.
- Release the trigger after completing a cut and wait for the blade to come to a complete stop before raising the blade. In addition to being a good safety tip, it helps maintain a smooth cut line.
These tips should be part of your routine whenever working with miter saws. Using these suggestions whenever you work with any power tools will lower the odds of injury and increase your overall satisfaction with your handiwork.
What Can A Miter Saw Be Used For
I have always been in love with making things, especially woodworking. When I started high school my first actual experience working with a power tool was a compound miter saw I used to cut 2x4s for building a theater set, and four years later when I was 17 it was also the first saw I purchased for my own use.
Miter Saws Are One Of The Most Useful Tools
I would argue that a miter saw is one of the most useful saws that a novice woodworker can have in their shop, they’re easy to use and have many functions they can perform.
In general, there are two types of saws. Saws where you move your material through the saw blade, such as a table saw, and saws where you move the blade through your material.
A miter saw, also commonly called a chop saw, has the latter function, moving the blade through your material. A miter saw can perform various functions such as making cross cuts, repeated cuts with accuracy and miters. In this article, I will be covering all of these topics as well as some general information about miter saws.
Types Of Cuts: Cross Cuts And Miters
To begin let’s look at the two cuts miter saws perform, cross cuts and miters.
A cross cut is a cut made across the grain of a piece of wood at a right angle, this is particularly useful for squaring up the ends of boards and preparing materials for butt joints. A miter is a cut made once again across the grain of a board but at an angle. A miter saw has the ability to rotate its base and therefore changing the angle the blade comes down onto your material at, creating angled cuts.
Typically a miter saw will also have commonly used angles such as 45 and 22.5 degrees marked along its base so you know how far you have rotated your saw. Miters are commonly used in picture frame making, jewelry box making and any other project where the joints will be seen.
Miter Saws Are Great For Making Repeated Cuts
Another function of miters saws which makes them incredibly useful is their ability to produce repeated cuts at exactly the same length when used in combination with a stop block.
A stop block, in general, is a piece of material that you clamp along the fence of your miter saw a certain distance away from the blade. When making repeated cuts you adjust the distance the block is away from your saw blade to the desired length of the cut you’re making, press the end of your material against the stop block and proceed to make a cut as normal.
This creates a quick and easy way to make a lot of cuts that are all exactly the same length and can be made in a short amount of time.
Making Cuts With Complex Angles
Miter saws also usually have the ability to tilt the angle of the blade as well, allowing you another way to make angled cuts besides rotating the base of the saw. As with rotating the base of the saw, when you tilt the blade there will almost always be indicators as to how far you have tilted your saw so you know the exact angle you will be cutting at.
You can use the two ways of adjusting your saws angle in combination with each other to produce very complex angles that would be difficult to recreate on most other types of saws. It’s worth noting that not all saws advertised as miter saws have this function so be sure to research saws carefully before purchasing one if you want it to include this feature.
Some Safety Tips
As far as safety concerns and practices for miter saws, they really are in general very safe to use, however, like any power tool there are things you need to account for before using it.
The first of which being make sure you have your material firmly pressed against the fence of the saw. Allowing a piece to sit freely on the saw’s base could allow it to rotate and bind in the saw blade during the cut and in turn, throw the piece out of the work space. Beyond that, just use common sense, keep your fingers away from the blade and make sure to routinely tune your miter saw.
A miter saw is a wonderful tool to have in your shop especially as a beginner, it’s easy to use and fairly safe to operate. A well taken care of miter saw can last you for years and is definitely going to be a tool you will use often once you have one.