Contents
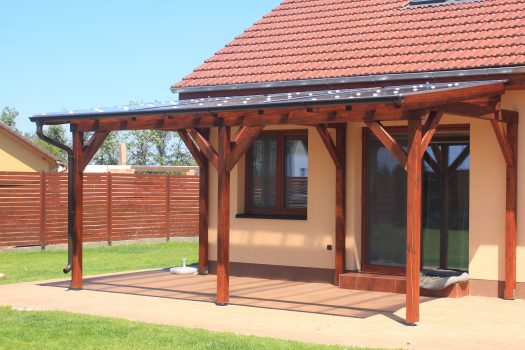
The pergola in this example is 9m (30ft) long x 2.4m (8ft) wide.
The project is broken into sections (pages) which include working plans, construction details, roof details, and materials. Each section contains it’s own instructions and diagrams etc.
The lumber list is at bottom of this page.
Lumber required for the lean-to pergola
| <span”>LUMBER | USED FOR | AMOUNT |
| 100×50 (2×4) suitable for exterior use | rafters 13 @ 2.4m (8ft); purlins and ledger 50m (166ft) | 82m (270ft) |
| 100×100 (4×4) suitable for exterior use | posts 5 @ 3m (10ft) | 15m (50ft) |
| 200×50 (2×8) suitable for exterior use | Beam 2 @ 4.5m (15ft) | 9m (30ft) |
| 150×25 (1×6) fascia bd | front fascia bd and side barge bd. | 18m (60ft) |
The plans
The plans for the lean-to pergola. An example of working plans for a lean-to pergola and roof, 9m (30ft) long x 2.4m (8ft) wide.
Below is an example of working plans for a lean-to pergola and roof, 9m (30ft) long x 2.4m (8ft) wide.
The Site Plan

This plan shows the placement of the pergola in relation to the existing house and boundaries.
The Flat Plan (footprint)
")
The flat plan is an arial (looking down) view of the pergola addition.
It shows the overall dimensions of the project and information such as footing placements, bearer and rafter placement and spacings between rafters.
The Cross-Section Plan
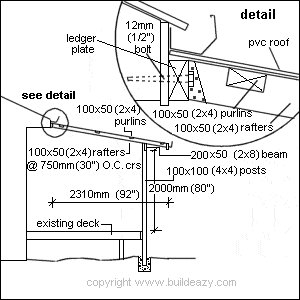
The cross section plan is a plan taken from a cross section of the flat plan. The cross section shows lumber sizes and footing size.
A detail plan is accompanied to give clearer detail.
A detail plan is a blow up (magnified) part of the plan.
The Elevation Plan

The elevation plan is more like a drawing of the outside of the addition rather than a plan although is still drawn to scale. The elevation plan gives a good perspective of the addition to the untrained eye.
The construction
This page shows construction details for making the pergola frame along with variations on how to fix the pergola roof frame to the eaves or house.
About lumber sizes.
The lumber sizes referred to in this project are the nominal sizes. The nominal size of a piece of lumber is the size of the lumber before it is surfaced/dressed or seasoned and is the size generally referred to when purchasing from the lumber yard. The actual size, or dressed size of the lumber will be less than the nominal size so please make necessary allowances. For example, a piece of 100×50 (2×4) lumber when dressed may be 90×45 (1 1/2″x 3 1/2″) actual size.
STEP 1: The footings and posts.
- Dig five footing holes 350×350 (14″x14″) and 500 (20″) deep. Refer to flat plan for hole positions. Max span between any two posts must be no more than 2400mm (8ft)
- Place at least 100mm (4″) thick pad of concrete at the bottom of the footing holes, place the posts in position and fill the footing holes up with concrete. Check the posts for plumb (vertical), brace if necessary and leave till concrete sets.
STEP 2: Trim the posts

- Trim the top of the 5 posts at the desired height. Refer to the cross-section plan.
- Work out the height of the top of the posts in relation to the required rafter fall.
- The fall should be at least 10 degrees (1 in 5.7) if possible.
In this example, trim the top of the posts off 316mm (12 1/2″) below the highest point of the underside of the rafter. (see drawing).
STEP 3: The beam

- Check out the top of each post for the beam by marking a horizontal line 200mm (8″) down from the top outside edge of each post.
- Cut along the pencil mark with a power saw to a depth of 50mm (2″) (the thickness of the beam) Do this to all posts. Scribe a line 50mm (2″) in from the outside edge of each post from the top, down 200mm (8″). Cut down that line using a sharp handsaw.
- Bolt the 200×50 (2×8) beam to the posts using m12 (1/2″) galvanized bolts and washers. (see diagram). Ensure all posts are plumb (vertical) and parallel
STEP 4: The ledger plate

In this example the ledger plate is bolted to the fascia board just below the spouting.
Sometimes this is not possible due to lack of free fascia board or fixing area below the spouting in which case the ledger plate will have to be fixed to the house wall beneath the eaves.
SCENARIO (1) FIXING TO THE FASCIA BOARD
- Mark a level line just below the spouting. Use a spirit level or a water level .
- Fix the ledger plate to the level line on the fascia board using coach screw at least every 1200mm (48″) apart, penetrating through the fascia board and into solid timber, usually the end of a roof rafter or eaves sprocket.
SCENARIO (2) FIXING TO THE HOUSE WALL
- Mark a level line just below the eaves. Use a spirit level or a water level . Fix the ledger plate to the level line with coach screws penetrating through the cladding and into the studs (house frame uprights) or lintels (beams above windows and doors). Seal around coach screws with weatherproof silicone sealant.
- If the wall is masonry (concrete, brick, block) fix the ledger plate to the wall using masonry anchors every 1200mm. Before fixing, place DPC (Damp Proof Course) between the ledger plate and the wall.
STEP 5: Rafters, purlins, fascia and brace

- Cut the rafters to length and angle cut each end to suit. Work out the rafter length to suit the roof sheets if possible (so as the roof sheets wont need cutting). In this example cut the rafters 2280mm (91 1/4″) long for 2400 (96″) roof sheets. Thus ledger 50mm (2″) + rafter 2280mm (91 1/4″) + fascia 20mm (3/4″) + roof overhang 50mm (2″) = 2400mm (96″)
Refer to the plans for reference if necessary. - Fix the rafters @ 750crs (30″ O.C.) that is, spaced every 750mm (30″) apart, to the ledger with joist hangers and to the beam with skew nails (nails angled in, toe nailed) and angle clips or Z nails. Ensure the rafters are square, at right angles to the building.
- Fix four rows of 100×50 (2×4) nogs on edge in-between the rafters as in the flat plan These are the nogs (purlins) that the roofing is fixed to.
- Fix the top row of nogs (purlins) 100mm (4″) down from the top of the rafters and fix the bottom row of nogs (purlins) 100mm (4″) up from the end of the rafters.
- Fix the other two rows of nogs (purlins) equal distance apart.
- Alternatively the purlins can be fixed on top of the rafters if there is enough room between the top of the rafters and the eaves.
- Fix fascia board along the end of the rafters and also up the sides of the two end rafters (barge board).
- Brace on top of the frame diagonally from corner to corner with metal strap brace. see flat plan.
The roof
PVC / Polycarbonate sheet roofing
Pvc and polycarbonate sheet roofing come in a variety of profiles, sizes, and colors. Quality and prices vary immensely.
The most common profile is corrugated.
Quality varies enormously from cheaper pvc sheets up to lifetime guaranteed polycarbonate sheets and the price varies accordingly. Guarantees range from zero to lifetime.
Sometimes the cheapest is not the most cost effective. Pamphlets relevant to the type of sheeting required are usually available from most stockists, it is advisable to read them.

Roof pitch
- Most type of PVC or polycarbonate manufacturers recommend a 10 degree pitch (approx 1 in 5.7 fall).
- A lesser pitch could require additional weatherproofing such as extra flashings or appropriate sealants.
Cutting
- Garden scissors or a fine tooth saw can be used to cut most sheets. The higher the quality, the easier the cutting. Sometimes a carborundum blade on a disk grinder will do the trick but only one sheet at a time or it could cause fusion and weld the sheets together.
Drilling
- Pre-drill the holes in the sheets before fixing. The holes should be 8mm (5/16″) to 10mm (3/8″) and at least 2mm (1/8″) larger than the shaft of the screws to allow for expansion and contraction. Ensure the holes are in the high part of the corrugation. Sometimes it might be easiest to lay the sheets upside down on the ground and pre-drill. Another tip is to use a stick with a hole in it as a guide for the drill.
Fixing
- Appropriate screws are readily available from any suppliers that stock the PVC or polycarbonate roof sheets. If the choice is available, hexagonal heads are the easiest to use. Most sheets should be fixed at every fourth corrugation and every second corrugation at gutters, ridging and overlaps.
Accessories
- Accessories such as ridge flashings, apron flashings and foam eave fillers are also readily available from any suppliers that stock the PVC or polycarbonate roof sheets.


I have generally followed this plan over an existing pergola, with modifications to suit my situation.
This site was the most helpful I have found.
For purlins (nogs) I reused existing 2x2s across the top of the rafters, planning to fix the Suntuf sheets to them directly.
This plan does not address painting, but I would observe that it is a helluva lot easier to paint structural wood components before installation. Most of the structure is the typical outdoor white.
Cut the rafters, angle the ends, and paint them on the ground, to save a lot of work.
After hammering or bolting the steel anchors and truss ties, I hit them with some white spray primer to hide the nail heads and hammer marks.
I am using the smoked gray Suntuf, and I wish I had painted the purlins more of a matching gray color (instead of white) before screwing them down to the rafters. I would prefer the purlins to fade out of view against the polycarb sheets.
The plan and equipment list make no mention of the foam closure strips offered by Suntuf, to match the contour of the sheets across the top of the purlins. I am planning to use them, hopefully to provide some noise damping, and wonder if paint will have any effect on them. They are supplied in bright white, which would upset my gray “camouflage” scheme.
Also, the closure strips are very lightweight and make placing the sheets difficult, especially if you are doing this singlehandedly. A couple little folded pieces of duct tape keep them on the purlin when sliding the sheet into place.