Contents
Build a playhouse by Les Kenny
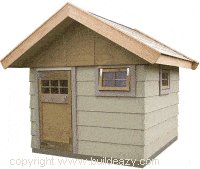
Built like a real house.
This is a very sturdy playhouse, constructed along the lines of a real house.
And although this little playhouse is only 1800mm x 1800mm (6ft x 6ft), you could use the same basic principles to build a larger structure.
This in-depth article to some extent is a peep into how to build a real house – albeit in this case, a miniature.
This article will show how to build wall-frames, make a door, make a window, make the roof, do the siding, in fact many aspects of building a house – even how to make a concrete floor slab.
And… there are a few different options on how to do things.
The dimensions are:
- Floor – 1800mm x 1800mm (6ft x 6ft);
- Height inside – 1850mm (74″);
- Height overall – 2100mm (7ft);
All the framing lumber, walls and roof are made using 100×50 (2×4) stock. 100×50 (2×4) is a very common size lumber and is readily available at most lumber yards. In some cases it can be less expensive than a smaller stock size, however you can use a smaller size framing lumber such as 75×50 (2×3), as long as you make the necessary adjustments to achieve the same overall dimensions.
The exterior covering (both walls and roof) is covered with a cement fibreboard, a horizontal lap siding (clapboard, weather board) that is increasingly out-performing its lumber counterpart. The roof and walls are of the same material purely as a convenience.
Cement fibreboard siding is now very obtainable and its popularity is growing fast. It is user-friendly, very strong, resistant to fires, insects and rot, and looks good. More about where to obtain it can be found in the ‘Lumber and materials information’ page.
6 x 6 playhouse
$5.00- Pay online by credit card, debit card, or Paypal using Secure Server Paypal. You do not need a Paypal account if paying by credit or …
|
Identifying the members
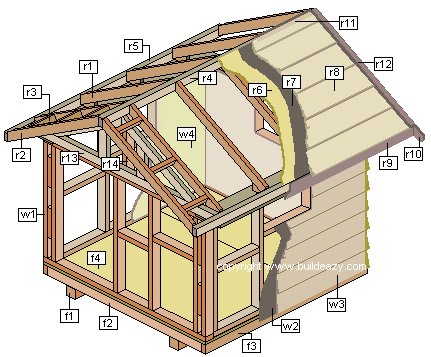
Wall
- [w1] 100×50 (2×4) framing lumber
- [w2] Building wrap, cover underlay or similar.
- [w3] Cement fibreboard – lap siding 240mm wide x 7.5mm thick (9 1/4″ wide x 5/16″ thick)
- [w4] Interior plywood lining approximately 7mm (11/32″) thick
Roof
- [r1] Common rafter. 100×50 (2×4)
- [r2] Fly rafter. 100×50 (2×4)
- [r3] Outrigger. Blocking between common rafter and fly rafter. 100×50 (2×4)
- [r4] Ridge beam. 100×50 (2×4)
- [r5] Lower horizontal roof frame member. 100×50 (2×4)
- [r6] 12mm (1/2″) plywood roof sheathing
- [r7] Building wrap, cover underlay or similar.
- [r8] Cement fibreboard – lap siding 240mm wide x 7.5mm thick (9 1/4″ wide x 5/16″ thick)
- [r9] Fascia board. 150×25 (1×6)
- [r10] Barge board. 150×25 (1×6)
- [r11] Galvanized metal ridge cap
- [r12] Barge cap. 100×25 (1×4)
- [r13] Gable truss frame. 100×50 (2×4)
- [r14] Ridge beam support. 100×50 (2×4)
Floor (lumber)
- [f1] Skid. 100×100 (4×4) treated or suitable for outside use
- [f2] Joist. 100×50 (2×4) treated or suitable for outside use
- [f3] Rim/boundary joist. 100×50 (2×4) treated or suitable for outside use
- [f4] 18mm (3/4″) plywood floor
Lumber and materials information
The playhouse walls and roof are covered with a 240mm wide x 7.5mm thick (9 1/4″ wide x 5/16″ thick) cement fibreboard. Cement fibreboard lap siding is now very obtainable and its popularity is growing fast. It is easy to work with, very strong, resistant to fires, insects and rot, and looks good.
One company that manufactures cement fibreboards in many countries worldwide including North America, Europe, Australasia and Asia, is James Hardie. Go to their website http://www.jameshardie.com to find a stockist near you. There are also other companies that manufacture a similar product or alternatively, you can use lumber boards (clap board) in place of cement fibreboard.
Lumber sizes
The dimensions of the lumber used for this project are given in both metric and inches. All dimensions are first written in millimeters, followed by feet and/or inches in brackets.
The lumber used in this project is dressed (surfaced, smooth) lumber. Therefore the actual size (width and thickness) of the lumber is less than the nominal size. The nominal size is usually the size that you refer to when purchasing the lumber, but the actual size is different.
| Metric | Inches | ||
|---|---|---|---|
| Nominal Size | Actual Size | Nominal Size | Actual Size |
| 100×50 | 90×45 | 2×4 | 1 1/2x 3 1/2 |
| 100×100 | 90×90 | 4×4 | 3 1/2x 3 1/2 |
| 150×25 | 140×18 | 1×6 | 3/4x 5 1/2 |
| 300×25 | 280×18 | 1×12 | 3/4x 11 1/4 |
Safe working practices
Cement fibreboard. Working with cement fibreboard, as with most unnatural products, can pose health risks. It is therefore advisable to obtain all necessary information about possible health hazards from the manufacturer of the product or from the outlet where the product is purchased. Sometimes information can also be obtained from the manufacturer’s website.
Some common safe working practices include…..
• Work in outdoor areas with ample ventilation
• Minimize dust when cutting by using a ‘score and snap’ knife or guillotine-type shears
• Only use circular saw if attached to appropriate vacuum bag
• Wear a properly fitted approved dusk mask
• Refer to material safety data sheets from the product’s manufacturer
Making concrete. Prolonged contact with fresh concrete will burn your skin. Wear safety goggles, gloves, rubber boots and long sleeves when working with concrete.
Shopping and Cutting lists
Shopping list
Scroll down for cutting list.
Note 1: The list does not include door or window materials or make allowances for nails, hinges, door latches, door bolts, window catches, caulking sealant or any fasteners.
Note 2: Door and window materials will be dealt with on the respective door and window pages.
| Lumber / Material | Used For | Amount |
|---|---|---|
| 100×50 (2×4) Dressed framing lumber | Walls and roof | 100 lineal meters (330 lienal ft) |
| 300×25 (1×12) suitable for exterior use | Soffit board under eaves and under gable overhang | 3.8 lineal meters (13 lienal ft) |
| 150×25 (1×6) suitable for exterior use | Fascia board and Barge board (gable rake board) | 10.5 lineal meters (25 lineal ft) |
| 100×25 (1×4) suitable for exterior use | Barge board capping | 5.5 lineal meters (18 lienal ft) |
| 50×25 (1×2) suitable for exterior use | Gable battens | 8 lineal meters (26 lienal ft) |
| 50×25 (1×2) | Inside finishing trim | 14 lienal meters (45 lienal ft) |
| 25×25 (1×1) | Trim around window (interior) | 5.5 lienal meters (18 lienal ft) |
| 1200mm x 2400mm(4’x8′) plywood sheets 9mm (3/8”) thick | Roof sheathing | 2 sheets |
| 1200mm x 2400mm (4’x8′) plywood sheets 12mm (1/2”) thick | Gable ends cover (siding) | 1 sheets |
| 50×50 (2×2) galvanized flashing | Ridge capping | 2400mm (8ft) |
| Cement fibreboard siding or alternative type weather board | Roof cover / Siding / gable soffit board | Enough to cover 15.2 sq meters (164 sq ft) |
| Building wrap, cover underlay or similar | Under siding and roof boards | 16 sq meters (172 sq ft) |
| FLOOR: Option one – Lumber floor | ||
| 100×100 (4×4) Treated lumber | Skids | 2 pieces at 1800mm (72”) |
| 100×50 (2×4) Treated lumber | Floor Joists and rim joists | 15 lineal meters (50 lineal ft) |
| 1200m x 2400mm (4’x8′) plywood sheets 18mm (3/4”) thick | Floor | 1.5 sheets |
| FLOOR: Option two – Concrete slab | ||
| 40kg (94lb) bags of Portland cement | Concrete slab | 3 bags |
| Sand | Concrete slab | Approximately 0.2 cubic meters (7 cubic ft) |
| Gravel 20mm (3/4”) diameter and smaller | Concrete slab | Approximately 0.3 cubic meters (11 cubic ft) |
| #3 rebar (10mm (3/8”) steel rod) | Concrete slab | 10 meters (30 ft) |
| EXTERIOR CORNERS: Option one – soakers | ||
| Galvanized soakers | Exterior corners | 24 |
| EXTERIOR CORNERS: Option two – wood trim | ||
| 100×25 (1×4) suitable for exterior use | Exterior corners | Four pieces @ 1300mm 52” |
| 75×25 (1×3) suitable for exterior use | Exterior corners | Four pieces @ 1300mm 52” |
Frame cutting list
| Amount and length | Used for |
|---|---|
| 100×50 (2×4) dressed framing lumber, walls and roof | |
| 3 pieces @ 2400 (96”) long | Roof ridge beam and 2 lower horizontal members |
| 4 pieces @ 1800 (72”) long | Top and bottom wall plates (front and rear walls) |
| 4 pieces @ 1620 (65”) long | Top and bottom wall plates (side walls) |
| 4 pieces @ 1620 (65”) long | Bottom horizontal member gable truss frame |
| 20 pieces @ 1160 (46 1/2”) long | Wall studs |
| 14 pieces @ 1160 (46 1/2”) long angled each and 30 degrees off square | Common rafters and fly rafters |
| 4 pieces @ 990 (39 1/2”) long angled each end as shown on plan | Raking frame members, gable truss |
| 2 pieces @ 612 (24 1/2”) long | Ridge beam support |
| 4 pieces @ 270 (11”) long angled back one end 30 degrees off square | Vertical members gable frame |
| 12 pieces @ approximately 255 (10 1/2”) long. Chek on-site | Blocking between the end rafters and the fly rafters |
| 10 pieces @ approximately 210 (8 1/4”) long, angled as shown on plan | Common rafter attachments |
| 300×25 (1×12) dressed lumber (suitable for exterior use) | |
| 2 pieces @ 1890 (75 1/2”) | Soffit board under gable overhang |
| 150×25 (1×6) dressed lumber (suitable for exterior use) | |
| 4 pieces @ approximately 1400 (56”) long angled each end as shown on plan | Barge board (gable rake board) |
| 2 pieces @ approximately 2400 (96”) long. Check on-site | Fascia board |
| 100×100 (4×4) dressed treated lumber | |
| 2 pieces @ 1800 (72”) long | Skids |
| 100×50 (2×4) dressed treated lumber | |
| 2 pieces @ 1800 (72”) long | Rim joists |
| 6 pieces @ approximately 1710 (69”) long. Check on-site | Floor joists |
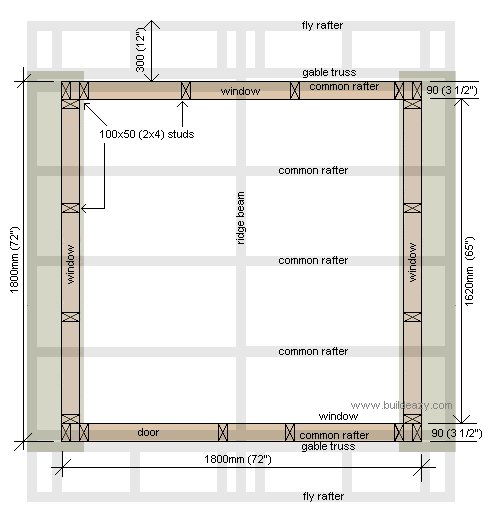
Plans – Footprint and front elevation
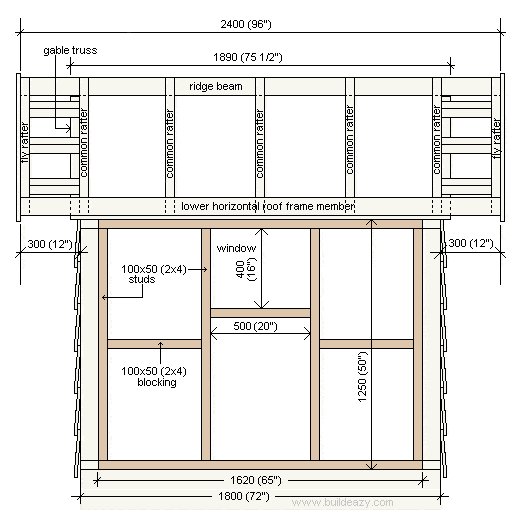
Footprint plan
This is the flat plan or footprint, which is from a bird’s-eye-view, or looking down view.
This plan shows the dimensions, placement of the studs as well as position of any doors or windows.
The roof frame is depicted by the shaded lines.
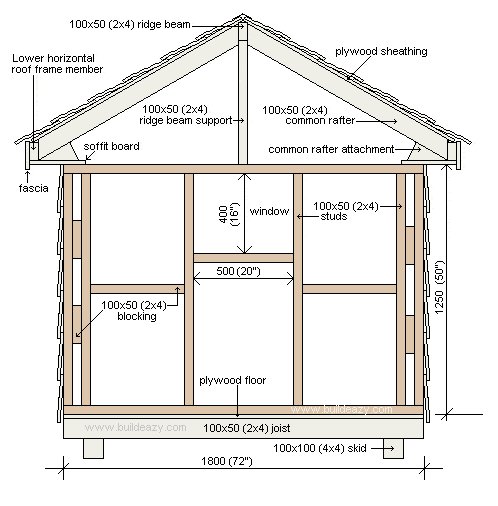
Front elevation plan
This is the front elevation plan.
This plan gives a perspective of the frame viewed from the front. This plan also gives the width and height of the playhouse front wall frame, the shape of the roof and an idea of construction from the ground to the apex.
The skids (which are what the structure sits on) are of 100×100 (4×4) stock and the joists are of 100×50 (2×4) stock. Both skids and floor joists need to be of lumber suitable for outside use. The floor, 18mm (3/4″) plywood is fixed to the floor joists and then the rest of the frame is built on that. The playhouse frame (wall and roof) is all of 100×50 (2×4) stock.

Plans – Rear and Side Elevation
Rear elevation
This is the rear elevation plan which gives a perspective of the frame viewed from the rear. This plan also gives the width and height of the playhouse front wall frame, the shape of the roof and an idea of construction from the ground to the apex.
The skids (which are what the structure sits on) are of 100×100 (4×4) stock and the joists are of 100×50 (2×4) stock. Both skids and floor joists need to be of lumber suitable for outside use. The floor, 18mm (3/4″) plywood is fixed to the floor joists and then the rest of the frame is built on that. The playhouse frame (wall and roof) is all of 100×50 (2×4).
Side elevation
This is the side elevation plan – both sides of the structure are the same. This plan shows a perspective of the frame viewed from the side, dimensions of the side frame, placement of the studs and roof rafters.
Plans – Roof, cuts and angles
The entire roof frame is constructed solely of 100×50 (2×4) stock. All the pieces that require angle cuts are shown below.

Making a wood floor
1800mm x 1800mm (6ft x 6ft) floor on skids Instructions below the drawings.

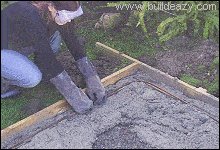
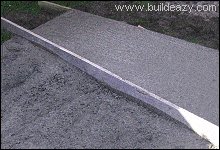
Place the 100×100 (4×4) skids level and parallel on firm ground free of any vegetation.
Space the skids apart so that the overall measurement is 1400mm (56″).
On level ground, make up the Floor Frame comprising of two 100×50 (2×4) joists nailed together at each end, two 100×50 (2×4) intermediate joists evenly spaced and two 100×50 (2×4) rim (boundary) joists. The end result should be a square 1800×1800 (72″ x 72″).
Place the square floor frame on top of the skids, ensure the floor frame is square and then fasten in place. Toenail (angle nail) through the joists into the skids.
Cover the floor with 18mm (3/4″) plywood, nailing a maximum of 200mm (8″) apart on all joists. Any join should be over a joist.
All the wood used in the floor structure should be suitable for exterior use.
Making a concrete floor

- On prepared firm ground (free of vegetation) make a 1800mm x 1800mm frame (inside measurement) out of 100×20 (1×4) form work.
- Note: the form work is the frame that borders the concrete and stops it from spreading.
- Ensure that the form work is square and level and then secure it by hammering pointed 50×50 (2×2) or 50×25 (1×2) pegs at 900mm (3ft) intervals against the outside of the form work.
- Dig a trench around the perimeter of the floor area about 100mm (4″) deep and about the width of the spade wide or approximately 200mm (8″). This acts like a ‘footing’ to give the perimeter of the concrete floor more depth and strength since it is the part of the floor that will be supporting the shed walls.
- Lightly hose (dampen) the pour area with water prior to pouring the concrete. Work as quickly as possible when placing concrete in form work. For instructions on how to mix concrete click here .
- Start pouring the concrete into the pour area. Fill up the trench (footing) first to a height approximately 75mm (3″) below the top of the form work.
- Lay a rod of #3 rebar (which is 10mm (3/8″) thick reinforcing steel), around the perimeter of the pour area. The rod should be at least 50mm (2″) in from the form work and at least 50mm (2″) down from the top of the form work.
- Wherever the reinforcing rod joins, make an overlap of at least 400mm (16″) and tie together with tie wire
- Fill the pour area up with concrete approximately to the height of the top of the form work.
- Tap around the outside of the form work with a hammer. This will vibrate the wet concrete and help it to settle, as well as getting rid of any air pockets.
- Use a straight piece of lumber (the bracing piece off the form work will do) to “screed” or level out the concrete. Work the screed board back and forth with a sawing motion along the tops of the form work until the concrete is level all over
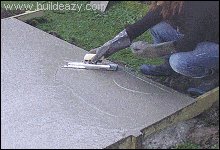
- Smooth over the level concrete with a trowel or float. Hold the blade flat against the surface and sweep it back and forth in wide arcs.
Tip: you will probably not get it near perfect in the first going-over, but that doesn’t matter. Leave it until it dries a bit or until all the excess surface water has evaporated and then re-trowel.
A novice may need to go over it another two or three times to get a nice smooth finish, letting it dry a bit in between each smoothing.
Note 1: The form work can be taken off the next day ONLY if it can be easily removed. If for some reason the form work needs a lot of hammering and knocking to remove it, then best leave it in place for three days or so, until the concrete is hard enough to withstand the punishment.
Note 2: The concrete will now need to set (cure). Keep the concrete moist for about three days by hosing with a fine mist every now and then. This is especially crucial in warmer conditions.
Note 3: Concrete in direct sunlight should be covered with some type of building wrap, roofing felt or shaded for the curing period. If you must pour the concrete on a very hot day, then leave it till mid or late afternoon. Concrete sets very fast on hot days in direct sunlight and can be hard if not impossible to work with. This is especially a concern when you’re hand mixing, which requires a bit of time.
Making the playhouse wall frames
- Cut all the 100×50 (2×4) wall frame members, both studs and plates to the lengths given in the ‘Frame cutting list’.
- The studs are the vertical (upright) members of the wall frame and the plates are the horizontal top and bottom members.
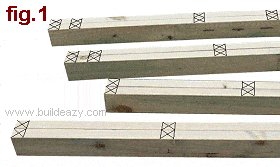
- Temporarily nail the top and bottom plates of each frame together and mark the positions of the studs as shown in fig.1. Refer to the ‘Plan – Looking down view’ and the ‘Plan -elevation’ for dimensions and stud placement.
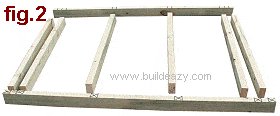
- On even ground spread the top and bottom plates apart. Lay the studs in between the top and bottom plates as shown in fig.2.

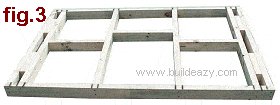
- Ensure the studs line up with the stud marks on the top and bottom plates and nail them in place. Measure, cut and fix in place all blocking as shown in fig.3.

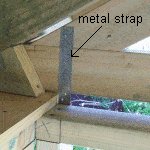
- When all of the wall frames have been made up on the ground, they can then be stood up on the floor, fixed in place, made vertical and braced. Do this in the following order….
- Nail the wall frames. Secure the top plates with nail plates, metal straps or similar fasteners. see fig.4a.
- Ensure the corner of frames are in the right position before securing to the floor then fix the bottom plate to the floor as close as possible to the corner studs. Use nails if the floor is wood and anchor bolts or similar if the floor is concrete.
Note: If the floor is concrete, place a damp-proof membrane between the bottom plate and concrete floor before fixing in place.
- Ensure the bottom plates are straight and then add further fixings along all bottom plates.
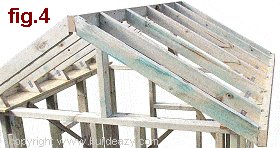
- Plumb the frames (make vertical) and add temporary diagonal braces to the insides of the frames to stop movement. See fig.4.
Making the playhouse roof frame
- Refer to the ‘Frame Cutting List’ and The ‘Roof, Cuts and Angles’ to cut all the pieces required for the roof frame.
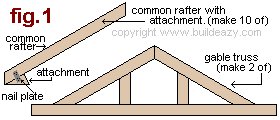
- The roof frame pieces comprise of 1 ridge beam, 2 lower horizontal roof frame members, 2 ridge beam supports, 10 common rafters, 4 fly rafters, 10 common rafter attachments and also the pieces required to make the two gable trusses.
- Also cut 2 pieces of 300×25 (1×12) soffit board 1890mm (75 1/2″) long.

- Attach the 10 attachment pieces to the 10 common rafters. They can be fixed using nails and nail plates. See fig.1.
- Make up the two gable trusses. Refer to the The ‘Roof, Cuts and Angles’.
- Temporarily clamp the 2 soffit boards in place so that they are overhanging outside of the side walls approximately 170 (7″), and overhanging the front and rear walls approximately 45mm (1 3/4″)
- Fix the two Ridge Beam Supports on top of (and in the middle of) the front and rear Wall Frame Top Plates. The Ridge Beam can then be fixed in place on top of the two Beam Supports. Ensure the beam supports are vertical and the beam overhang is the same each end. Add a temporary brace: See fig.2.
- Fix the end common rafters to the ridge beam directly above the front and rear walls. DO NOT NAIL THE BOTTOMS OF THE RAFTERS YET.
- Fix the two lower roof frame horizontal members to the bottom of the end rafters, one each side. Ensure the overhangs past each rafter at each end are equal and they should also be equal to the ridge beam overhang: See fig.3.
- Undo the clamps and fix the soffit board to the underside of the roof frame horizontal member (one each side). Ensure that the outside edges of the two soffit boards are flush with the outside edge of the two roof frame horizontal members and that the bottoms of the end rafters are 45mm (1 3/4″) in from the ends of the soffit board.
- If necessary, move the soffit board so that the opposing overhangs on the wall frames are equal and then nail the soffit board to the top plate.
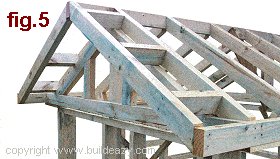
- Add the intermediate common rafters and the front and rear fly rafters (fig.4). Refer to the The ‘Roof, Cuts and Angles’ for rafter placement.
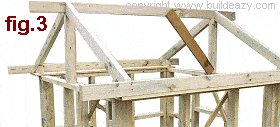
- Add the two gable trusses (one each end) and the blocking between the common rafter and the fly rafter (fig.5). Refer to the The ‘Roof, Cuts and Angles’ for blocking placement.
Putting on the playhouse roof cover
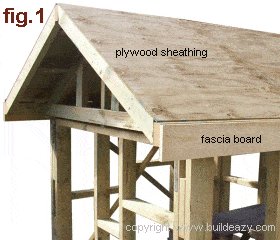
- fig.1 Fix 12mm (1/2″) plywood sheathing on top of the roof rafters. A standard 2400mm x 1200mm (4ft x 8ft) sheet should fit each side neatly without the need for any cutting.
- Nailing should be a maximum of 200mm (8″) apart on all rafters, ridge beam and lower horizontal roof frame member.
- Next fix the fascia boards (one each side of the roof) to the lower horizontal roof frame members.
The fascia board should be flush with the top and ends of the lower horizontal roof frame member.
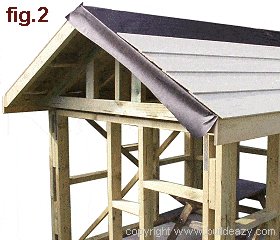
- fig.2 Cover the plywood sheathing firstly with building wrap and then with the cement fibre boards.
- Cut the boards the same length as the roof. See below for cutting instructions.
- Begin by fixing the bottom board in place overhanging the fascia board by 30mm (1 1/4″) and work up towards the top so that each board is overlapping the previous board by 30mm (1 1/4″).
- See below for nailing instructions.
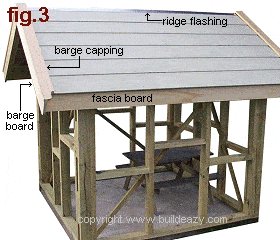
- fig.3 Fix a length of galvanized flashing on the ridge covering the cement fibre boards by at least 50mm (2″) each side.
- Fix the barge boards to the fly rafters flush with the top of the cement fibre boards. Run the barge board about 150mm (6″) past the fascia board and round the bottom corners so as to eliminate any sharp points.
- Next fix the barge cap over the top of the barge board and covering the ends of the cement fibre boards.
- Round off the lower ends of the barge cap and caulk between the barge cap and the cement fibre boards.
Note: Cutting cement fibreboards
Cement fibreboards can be cut by scoring (scratching a deep mark) across the board and then by snapping. Score repeatedly against a straight edge to a depth of about 1/3 of the board thickness and then snap (bend) the board upwards to achieve the break.
You can use a purpose-made score and snap tool that has a hardened scoring tip or similar type tool.
Also hand or pneumatic guillotine (shears) can be used.
There are also other ways of cutting cement fibreboard, but this method produce the least dust.
Note: Nailing cement fibreboards Use 50mm (2″) galvanized flathead nails. Only nail where there is something solid beneath the board such as a stud or a rafter. Nail where the boards overlap. Do not nail closer than 20mm (3/4″) from the end of a board. Pre-drill any nail hole that is closer than 50mm (2″) from the end of any board.
Putting on the playhouse wall cover

- fig.1 Cover the wall frames with building wrap. Fix a continuous strip of treated wood (the same thickness as the cement fibreboard) to the bottom plate (see fig.2) before fixing the first (bottom) board in place. Let the first board hang 50mm (2″) below the bottom plate.
- Continue with the subsequent boards working from bottom to top ensuring that each board is overlapping the previous board by 30mm (1 1/4″).

External corners
- fig.2 option 1: Corner soakers
- Used mainly in Australasia but not so common in North America and parts of Europe.
- Corner soakers are purpose-made to be used with a wide variety of weather boards or board siding. They are usually made of thin aluminum or galvanized metal.
- Apply the soakers to each row of boards before continuing with the next row. Nail soaker (at the top) into position before fixing the ends of the boards. (See fig.2 option 1.)
- fig.2 option 2: Corner trim
- Corner trim is a widely used method of finishing external corners on structures with wood or cement fibreboard siding.
- When the cement fibreboards are fixed to the walls you can then apply the corner trim.
The top of the trim will need to be cut at an angle the same as the rake of the roof. - By using one piece of 100×25 (1×4) wood and one piece of 75×25 (1×3) wood at each corner you will achieve a balanced look. (See fig.2 option 2.)
- Caulk between the cement fibreboards and the trim.
Making the door
How to make a door suitable for a shed or a playhouse.
This particular door is made specifically for a playhouse although a bigger version would also be suitable for a shed or similar type of structure.
The lumber
- For the door you will need 2200mm (88″) of 50×50 (2×2) dressed/surfaced lumber and 1500mm (60″) of 150×50 (2×6) dressed/surfaced lumber.
Note: The actual size of the lumber when dressed finishes smaller than the nominal size stated above so make any necessary allowances.
For more information on lumber sizes click here. Also ensure the lumber that you use is suitable for exterior use.
You will also need a piece of 3mm (1/8″) thick acrylic sheet (plastic glass) for the pane, a panel of 12mm (1/2″) plywood, some strips of wood for the decorative grille, some glue and 4 pieces of 25mm metal strap.
The door parts, the dimensions and cutting detail
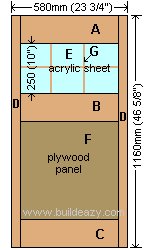
A): Top rail. 150×50 (2×6) cut approximately 490mm (20 1/4″) long to fit between the stiles.
B): Middle rail. 150×50 (2×6) cut approximately 490mm (20 1/4″) long to fit between the stiles.
C): Bottom rail. 150×50 (2×6) cut approximately 490mm (20 1/4″) long to fit between the stiles.
D): Vertical stiles. Two pieces of 50×50 stock 1160mm long (2×2 stock 46 5/8″ long)
E): Acrylic sheet (plastic glass) 3mm (1/8″) thick. Cut to suit
F): Plywood panel 12mm (1/2″) thick. Cut to suit
G): Muntin bar (grille). In this case it is a strip of wood glued to the pane and is decorative only.
Step 1. Cut and groove the door members
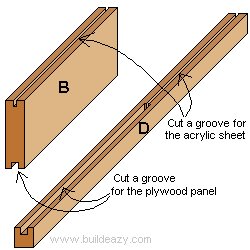
- Cut grooves in the members that house the acrylic sheet and the plywood panel. The grooves can be made with a router or by making multiple cuts with a circular saw or bench saw.
A): Top rail. Cut a 12mm deep x12mm wide (1/2″ deep x 1/2″ wide) groove along the bottom edge.
B): Middle rail. Cut a 12mm deep x12mm wide (1/2″ deep x 1/2″ wide) groove along the top edge and a 12mm deep x3mm wide (1/2″ deep x 1/8″ wide) groove along the bottom edge.
C): Bottom rail. Cut a 12mm deep x3mm wide (1/2″ deep x 1/8″ wide) groove along the top edge.
D): Vertical stiles. Cut a 12mm deep x12mm wide (1/2″ deep x 1/2″ wide) groove along the portion that houses the plywood and cut a 12mm deep x3mm wide (1/2″ deep x 1/8″ wide) groove along the portion that houses the acrylic sheet.
Step 2. Assemble the door
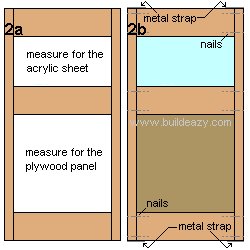
- Place the door members A, B, C, and D, together without nailing to measure the required sizes of the acrylic sheet and the plywood panel. Make them both 20mm (3/4″) bigger than the opening so as to fit into the grooves.
- Unassemble the door members and then re-assemble with the acrylic sheet and the plywood panel in place.
- Fix by nailing as shown in the illustration and also nail metal straps to the top and the bottom of the door for added strength.
Step 3. Add the decorative grille
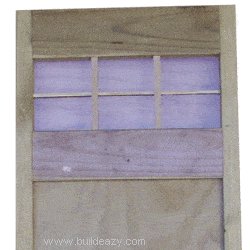
- Cut and glue strips of 10mm x 10mm (3/8″x 3/8″) wood to the acrylic sheet (plastic glass) making a grid.
- This is solely decorative and the size of the wood can vary depending on personal preference.
- Use an exterior type glue that will adhere to both wood and plastic.
Making the playhouse door frame
The door frame is all of the members that surround the door. The frame consist of head and side jambs. Some door frames also include the sill or threshold but that is not the case for this project.
The lumber
- For the door frame you will need 3100mm (124″) of 150×50 (2×6) dressed/surfaced lumber.
Note: The actual size of the lumber when dressed finishes smaller than the nominal size stated above so make any necessary allowances.
Dimensions and some important measurements
Actual lumber sizes vary from place to place so use all dimensions as a guide only.
The important measurements are….
1.) The overall height and width of the door frame should be 10mm (3/8″) less than the overall height and width of the rough opening in the wall, to allow for some play.
2.) Allow enough gap between the door and frame to ensure ease of opening. In this case at least 5mm (3/16″) clearance all the way around the door.
How wide should the door frame be?
Usually the width of a door frame should be the same as the thickness of the wall, including the interior lining and the exterior siding. This is so the frame will be flush with both the inside and outside of the wall allowing for trims and moldings to fit neatly around both the inside and outside of the door frame. However in this case, the frame is wider than the wall which means it will project into the building an inch or so, reflecting our personal preference regarding the finished look.
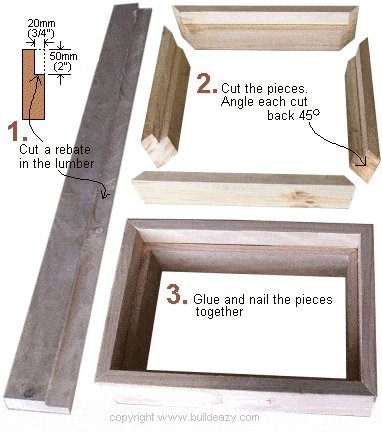
Step 1. Rebate the frame
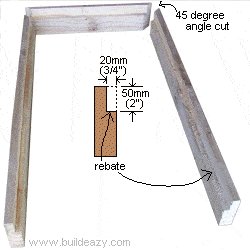
- Cut a rebate in a piece of lumber 150×50 x 3100 long (2×6 x 124″ long). This is best done with a bench saw by making two cuts along the length of the lumber as follows: make one cut 50mm (2″) deep along the edge and one cut 20mm (3/4″) deep along the face.
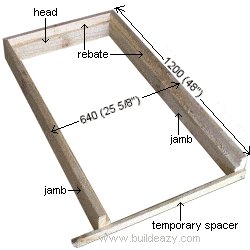
Step 2. Cut the frame members
- Cut the 3 frame members to length. The frame members comprise of a head piece and two side jamb pieces. Cut the head 640mm (25 5/8″) long with a 45° angle cut at each end.
- Cut the two side jambs 1200mm (48″) long with a 45° angle cut at the top ends and a standard square cut at the bottom ends.
Step 3. Glue and fix
- Glue and nail the frame members together.
- Nail a temporary spacer to the bottom of the door frame to keep the side jambs parallel.
Installing the playhouse door
Step 1. Assemble

- Lay the door frame on a flat surface and then sit the door into the door frame rebate.
- Make sure that the gap between the door and door frame is even all the way around.
- Screw two hinges to the door and the door frame: one at the top and one at the bottom.
- Use either butt hinges or T-hinges.
- With the door still laying on a flat surface fix 75mm x 25mm (1×3) trim to the perimeter of the door frame.
Step 2. Install
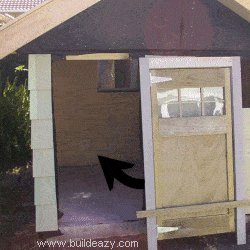
- Place the completed door and frame into the door hole (rough opening) in the wall. Ensure that the door is level and plumb and that the gap between the door and frame is even all the way around. Then fix it in place by nailing through the trim into the wall.
- From inside the room, nail the door frame side jambs to the wall rough opening frame.
Because the rough opening will be (or should be) slightly bigger than the door frame, packing pieces will need to be placed between the jamb and the wall frame where nailing occurs.
- Usually the door frame is of an exact width so that the inside of the window frame will be flush with the inside of the wall allowing for a molding, architrave or casing to go neatly around the frame.
However……
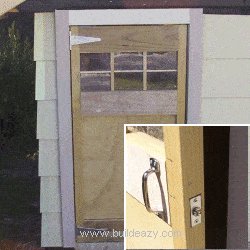
in this case the door frame is wider than the wall and therefore projects in to the room.
Finish by fixing a 25mm x 25mm (1×1) square bead (piece of wood) around the perimeter of the door frame to the wall. - Fit hardware of choice: in this case we’ve used D handles and a roller catch so the door can always be easily pushed open
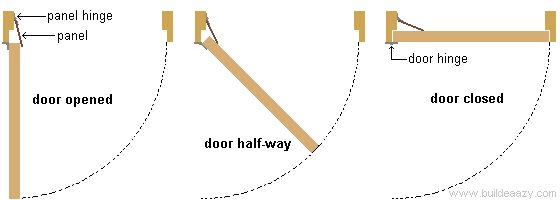
Safety tip: Prevent jammed fingers
How to help prevent little fingers from being jammed by a door
- This particular door is likely to be more of a risk to little fingers than a normal house door because it is a lot narrower than a normal door making it easier for a child to reach the hinge side of the door, and also because the door is a playhouse door, it is always going to be surrounded by kids. Big kids should not be of concern, it is more for the little kids, crawlers and toddlers that may need a bit of “finger protection”.
How to help prevent fingers from being jammed in a door.
1). The most likely hazard area

- The most likely area of a door to be of concern to a small child’s fingers is the hinge side of the door.
- That is because only a little bit of force is needed to push the door shut but at the same time the hinge edge of the door closing in to the door jamb is of a far greater force. It is all to do with leverages, and even a moderate wind strong enough to move a door may cause injury to the unsuspecting toddler’s fingers that might be between the door hinge and jamb.
Possible solution? Cover the area of concern.
2.) Cover the area
- Open the door wide out as far as it will go.
- In this case we have put a post in the ground to stop the door from opening much more than at right angles (90 degrees) to the door way.
- spacer
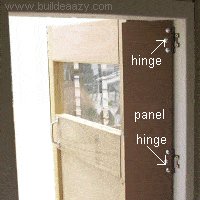
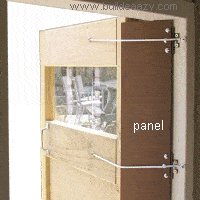
- Cut a panel to cover the hinged edge of the door and the rebate in the adjacent jamb.
- The panel can be a rigid plastic type material or wood about 4mm (3/16″) thick. The panel must be durable.
- Make the panel wide enough to cover (run slightly past) the edge of the door and also to cover most of the jamb. You will be able to get a perspective by looking at the photos.
- Make the panel high enough to sit between the door frame head and sill
- Fix three hinges to the panel, one at the top, one at the bottom and one in the middle.
- Use bolts and nuts to secure the hinges to the panel (will require drilling bolt holes in the panel) as the panel is not thick enough to support screws.
- Hold the panel in place and screw the free sides of the hinges to the jamb.
3.) Attach flexible wire
- Use stretch curtain wire or similar to hold the panel against the door when the door is open. Stretch curtain wire can be obtained from just about any drapery store and eyes (screws with circular heads) can easily be screwed into the ends of the stretch curtain wire.

- Cut three pieces at a length to hold the panel tight to the door when the door is opened and also long enough so as not to be in the way of the panel when the door is shut.
- Screw the three pieces of stretch curtain wire in place as shown in the photos. There will be one piece at the top, one at the bottom and one in the middle.
- Screw through the eyes of the screws in the curtain wire into the door and jamb.
- Depending on the size of the screw head, washers may be required.

- When the door shuts, the panel hinges will allow the panel to move with the door.
- When the door is in the closed position, the stretch curtain wire will sag.
- When the door opens, The stretch curtain wire will pull taut thus guiding the panel around and against the door.
How to make a playhouse window
Making the window frame
The window frame in this project is made out of 150×50 (2×6) dressed/surfaced lumber which is a common stock size. However, the actual size of the lumber when dressed finishes at approximately 140×45 (1 1/2″x 5 1/2″) and this may vary slightly from place to place so make necessary allowances.
Identifying the window parts

A window frame is the outermost sides of a window. It consists of head, sill and two side jambs forming a box or rectangle to which the sash (moving segment of the window) is attached.
The window parts are….
[a] Jambs: The side upright members of the window frame.
[b] Head: The top horizontal member of the window frame.
[c] Sill: The bottom horizontal member of the window frame.
[d] Stile: The vertical member, or side of a sash. A sash is the moving segment of the window.
[e] Top rail: The top horizontal member of a sash.
[f] Bottom rail: The bottom horizontal member of a sash.
[g] Trim: Finishing piece of wood around the outside of the window frame.
[h] Muntin bar or grille: Strip of wood glued to pane. In this case it is decorative only.
Some important measurements

Actual lumber sizes vary from place to place so use all dimensions as a guide only.
The important measurements are….
1.) The overall height and width of the window frame should be 10mm (3/8″) less than the overall height and width of the rough opening in the wall to allow for some play.
2.) Allow enough gap between the sash and frame to ensure ease of opening. In this case we’ve used at least 5mm (3/16″) clearance all the way around the sash.
How wide should the window frame be?
Usually the width of a window frame should be the same as the thickness of the wall, including the interior lining and the exterior siding. This is so the frame will be flush with both the inside and outside of the wall allowing for trims and moldings to fit neatly around both the inside and outside of the window. However in this case the frame is wider than the wall which means it will project into the building an inch or so, reflecting our personal preference regarding the finished look.
Making the playhouse window frame
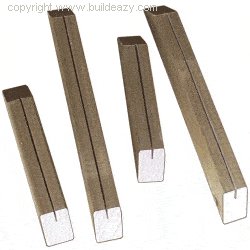
Step 1.
- Cut a rebate in a piece of lumber 150×50 x 1800 long (2×6 x 72″ long). This is best done using a bench saw to make two cuts along the length of the lumber: one cut 50mm (2″) deep along the edge and one cut 20mm (3/4″) deep along the face. See the drawing.
Step 2.
- Cut the 4 frame members to length: 2 pieces at 490mm (19 5/8″) and 2 pieces at 390mm (15 5/8″). Angle each cut at 45°.
Step 3.
- Glue and nail the frame members together, forming a rectangle
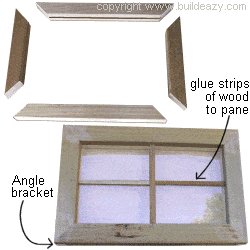
Making the window sash
The window sash in this project is made out of 50×50 (2×2) dressed/surfaced lumber, however the actual size of the lumber when dressed finishes at approximately 45×45 (1 1/2″x 1 1/2″). Since this may vary slightly from place to place, make any necessary allowances.
The window sash is the moving segment of the window. It is the framework that holds the panes of a window. The sash is fixed to the window frame with hinges.
You will need four pieces of 50×50 (2×2) dressed/surfaced lumber: 2 pieces approximately 430mm (17 3/4″) long and 2 pieces approximately 330mm (13 3/4″) long.
You will also need a piece of 3mm (1/8″) thick acrylic sheet (plastic glass) for the pane, a couple of strips of wood for the decorative grille, some glue and 4 25mm (1″) angle brackets.
Step 1.
- Cut a grove 12mm (1/2″) deep and 3mm (1/8″) wide up the middle of a piece of 50×50 x 1600 long (2×2 x 64″ long) lumber.
This can be done by making a cut with a circular saw or a bench saw. If the groove is not wide enough to accommodate the acrylic sheet (plastic glass), then a second cut will be needed to widen the grove. - Next cut the 4 sash members to length: 2 pieces at approximately 490mm (19 5/8″) and 2 pieces at approximately 390mm (15 5/8″). Angle each cut at 45°.
Note: The length of the above sash members are only approximate. If the window frame is already made (see previous page), then that will determine the required overall size of the sash.
Ensure there is a gap of at least 5mm (3/16″) between the sash and frame all the way around.
Step 2.
- Cut the acrylic sheet to size. The size will be 20mm (3/4″) bigger than the inside measurement of the sash frame.
Next glue and screw the sash members together ensuring the acrylic sheet is fitted into all the grooves. - Cut and glue strips of 10mm x 10mm (3/8″x 3/8″) wood to the acrylic sheet (plastic glass) making a cross.
This is solely decorative and the size of the wood can vary depending on personal preference.
Use an exterior type glue that will adhere to both wood and plastic.
Note: For added strength fix 25mm (1″) angle brackets to the external corners of the sash frame. When doing so, make sure the window will still be able to open freely without the angle bracket rubbing against the window frame. The angle bracket may need to be checked partially into the sash.
Note: For extra weather proofing add some free flowing sealant or mastic to the grooves before fitting the acrylic sheet.
Installing the playhouse window
Step 1. Assemble
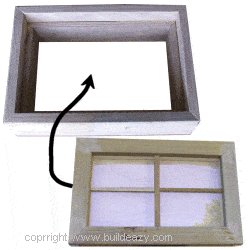
- Lay the window frame on a flat surface and then sit the window sash into the window frame rebate.
Make sure that the gap between the sash and window frame is even all the way around.
Screw two hinges to the top rail of the sash and the head of the window frame, one each end.
Use either butt hinges or T-hinges. - With the window still laying on a flat surface fix 70mm x 25mm (1×3) trim to the perimeter of the window frame.
Step 2. Install

- Place the completed window into the window hole (rough opening) in the wall. Ensure that the window is level and plumb and then fix it in place by nailing through the trim into the wall.
- From inside the room, nail the window frame side jambs to the wall rough opening frame.
The rough opening will be (or should be) slightly bigger than the window frame, so packing pieces will need to be placed between the jamb and the wall frame where nailing occurs.
Step 3. Inside finishing
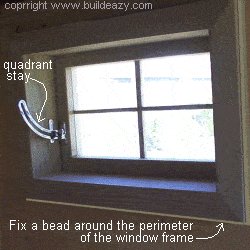
- Usually the window frame is of an exact width so that the inside of the window frame will be flush with the inside of the wall, allowing for a molding, architrave or casing to go neatly around the frame.
- However……
- in this case the window frame is wider than the wall and therefore projects in to the room.
- Finish by fixing a 20mm x 20mm (3/4″x 3/4″) square bead (piece of wood) around the perimeter of the window frame to the wall.
- Fit hardware of choice. In this case a quadrant stay has been fitted which allows the window to be opened and locked at various positions.
Playhouse Gable and Soffit
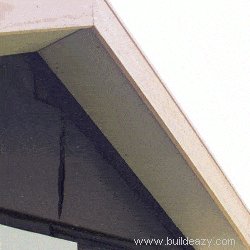
- The soffit is the material that covers the underside of an overhang on a roof.
- The soffit board is already in place under the eaves (the horizontal overhang along the side of the structure, see Instructions – The roof frame page 14) so there is only the soffit under the gable overhang to put up.
- This is simply a matter of nailing a length of soffit board, which in this case is 240mm (9 1/4″) wide cement fibreboard, to the underside of the gable overhang. There will be four lengths altogether: two at the front of the structure with one on each plane, and the same at the back of the structure.
- Cut the length of the boards so that they fit neatly against the inside of the fascia board at the lower end and fit to the top of the rake at the other end.
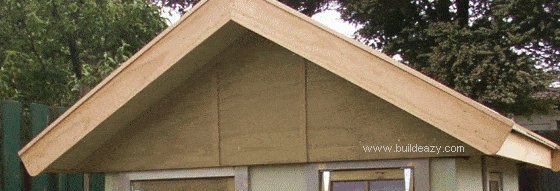
- By now the exterior is all but finished. There is just the gable (the triangular portion of the front and rear walls directly under the sloping roof) to cover.
- Measure and cut a piece of 12mm (1/2″) plywood in a triangular shape fitting under the gable soffit so that the bottom is in line with the bottom of the fascia board each side.
- Fix 50×25 (1×2) battens hard against the top of the plywood and the soffit board, following the rake of the roof and also add a couple of vertical battens (as in the picture above) solely for decorative purposes.
Weatherproofing doors and windows
- It is common for galvanized sheet metal or plastic Z-shaped strip (flashing) to be attached to the outside of the top horizontal trim on doors and windows, and tucked under the siding to prevent water getting in.
- However…..
- In this case that is not necessary as the gable frame is off-set from the wall frame below it and the plywood siding on the gable covers the top horizontal door and window trim.
Inside finishing
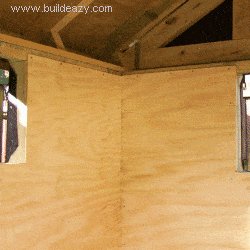
- The interior walls can be covered with the plywood sheet at any time once the roof is finished, building wrap (cover underlay) envelops the structure and the door and windows are installed.
- Cover the interior walls with 7mm (11/32″) or thicker plywood. Nail to the studs. Cut out for the door and windows where necessary and also cut the plywood sheets so that any join will be over a stud.
A standard 1200mm (48″) wide plywood sheet will reach from the middle of the bottom plate to the middle of the top plate. - Finish with trim around the windows and door, around the top of the walls and around the bottom of the walls (baseboard, skirting).
Use 20mm x 20mm (3/4″x 3/4″) wood around the windows and 50×25 (1×2) wood for the rest.
That’s it!

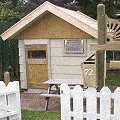
A bit of paint, a few curtains, a piece of furniture and the kids have their own private retreat.
Final note. Wind:
A playhouse is usually tucked away in a sheltered part of the garden without any real concern about the wind, and because the playhouse is a heavy and solid structure without much height, it is highly unlikely that it is going to blow away under normal conditions.
However…..
If the playhouse is situated in a windy area and there are concerns, then additional securing measures should be taken. The playhouse will need to be fastened against uplift, from the footings to the roof.
1.) Concrete a pile or post into the ground under each corner and fasten to the bottom plate with a metal strap or similar type of fastener. (This doesn’t apply to concrete floors).
2.) At each corner fasten the bottom plate to the stud with a metal strap or similar type of fastener.
3.) At each corner fasten the stud to the top plate with a metal strap or similar type of fastener.
4.) At each corner fasten the top plate to the rafter with a metal strap or similar type of fastener.


why couldn’t you just mail blue prints to a post office box ?
Pallet play house basic 6×6 design, step by step prints .
thank you for such a well thought out and very detailed copy of how to build a 6×6 playhouse. Very beginner ready. This must’ve took some time to put together. I for one am very grateful to you for doing this. I can’t wait to see what else you have done for us for free. Did I mention that I love that this is free, no matter how I get it, in the mail or downloading it online to print it out. I printed my copy and I am vey plz. thank you!
Very grateful for you,
Charlotte