Making the post holes in the deck
Use the same decking materials to construct a fixed deck seat, as used on the deck itself.
In this example, 90mm x 18mm (3/4″ x 3 1/2″) hardwood is used. If your deck is constructed out of some other material, make any necessary measurement adjustments to compensate for any material size differences exampled in the following plans.
Step one
Marking the post holes in the deck
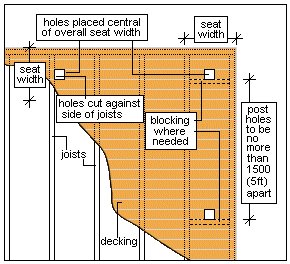
- It will be necessary to cut square holes in the deck for the seat posts to slot into.
- The distances between seat posts will vary depending on the existing deck’s joist spacings, but should never be more than 1500mm (5ft) apart.
- Position the holes next to the joists (see drawing), or in the case where that is not possible or where there are no joists, blocking needs to be fitted.
Cutting the post holes in the deck
- Mark the holes central to the width of the seat, and ensure the holes do not span more than 1500mm (5ft). Use the end of a post as a marking template. Cut the holes out using a jig saw, drilling a 10mm (3/8″) hole in one corner first, to enable the jigsaw to get started.
Putting in the seat posts
Step two
Putting in the seat posts
- Cut all the 90mm x 90m (3 1/2″ x 3 1/2″) seat posts 500mm (20″) long. The number of posts will depend on the overall length of the seat.
- Place the posts into the holes that have been cut in the decking (as explained above) so that the posts are 350mm (14″) above the top of the decking and 150mm (6″) below. Use clamps to hold the posts in place, check they are vertical, then drill and bolt the posts to the joists, as shown in the drawing below.
- Use two 12mm (1/2″) galvanized bolts per post.
The Parts
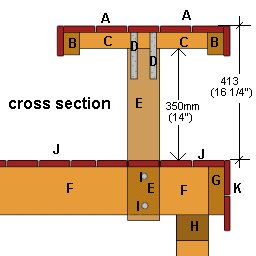
A. Hardwood decking. 90mm x 18mm (3/4″ x 3 1/2″)
B. Seat frame sides. Treated 65m x 45mm (1 1/2″ x 2 1/2″) on edge
C. Seat frame cross members. Treated 65mm x 45mm (1 1/2″ x 2 1/2″) on flat. Approx 400mm (16″) apart
D. Galvanized metal brace strap to fix the seat frame to the posts
E. Seat post. Treated 90mm x 90mm (3 1/2″ x 3 1/2″). Goes through the holes cut in the deck and bolted to the joists
F. Existing joists
G. Existing deck boundary joist
H. Existing bearer. Not necessarily in that position
I. Galvanized 12mm (1/2″) bolts to fix the seat posts to the joists
J. Existing decking
K. Existing side decking. Decorative only, and not on all decks
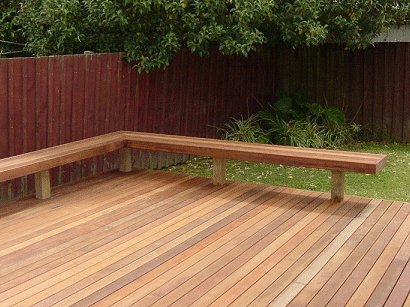
Making the seat frame
Step three
Making the seat frame
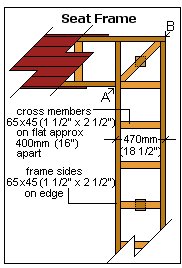
The seat frame structure is similar to that of a ladder, with the cross members being the ‘ladder rungs’ and the seat frame sides being the ‘ladder sides’.
The over all frame width (in this case) is 470mm (18 1/2″). That measurement is worked out by the number of decking boards to go on the seat top and the gaps between the boards.
- Make the seat frame (ladder) up on the ground. The cross members should be approx 400mm (16″} apart, but when spacing them out, ensure there will be a cross member in line with each post.
- Make the seat frame longer than needed. It can be trimmed after being fixed in place.
- Corner fitting: Sit the (over length) seat frames on top of the posts, temporary in position. The frames will overlap one another at the corners. It will then become obvious where to mark and cut where the seat frames overlap.
- Fix the seat frame in place by nailing the cross members to the posts and then securing with two metal galvanized straps (see picture next page). This will stop any tilting movement. (Note: Some type of stainless steel straps or fittings should replace the galvanized straps, if the seat is close to salt water, i.e. the sea).
- Trim the ends of the seat frames to the required length ensuring there is a cross member or end frame piece at each end of the frame.
Decking the seat frame
Step four
Laying the decking on the seat frame
- Begin by fixing the two outside decking boards in place. Start from the corner of the seat, (A-B in seat frame drawing in the previous page), keep the decking boards flush with the sides of the seat frame and slightly overhang them at each end, to be trimmed off later.
- If the corners of the seat are at right angles (square), then the angle cuts required on the decking boards, at that corner, will be 45degrees, but if the corners of the seat are anything other than right angles, then that angle will be the line from A to B as shown in the seat frame drawing in the previous page.

- Next lay and fix the 3 intermediate decking boards in the same way as the two outside boards ensuring the gaps between them are even.
- Trim the off the ends of the decking boards flush with the ends of the seat frame.
- Finish by fixing a decking board, on edge, around the perimeter of the seat.
Use only galvanized nails throughout the construction of the seat. 90mm (3 1/2″) long nails for the frame and 60mm (2 1/2″) long nails for the decking board. The decking boards will need to be drilled before being nailed.
Material quantities
- Because the length of the seat is unknown (depending on the length of the deck and personal preference etc) the material quantities are worked out in 1500mm (5ft) lengths as that is the spacing of the posts.
Materials per 1500mm (5ft) length:
- Hardwood decking 90×18 (3/4″ x 3 1/2″) – 11 meters (36ft) of
- 65×45 (1 1/2″ x 2 1/2″) treated framing – 5 meters (17ft) of
- 90×90 (3 1/2″ x 3 1/2″) treated post – 0.5 meters (20″) of
- 12mm (1/2″) galvanized bolts and straps – 2 of each


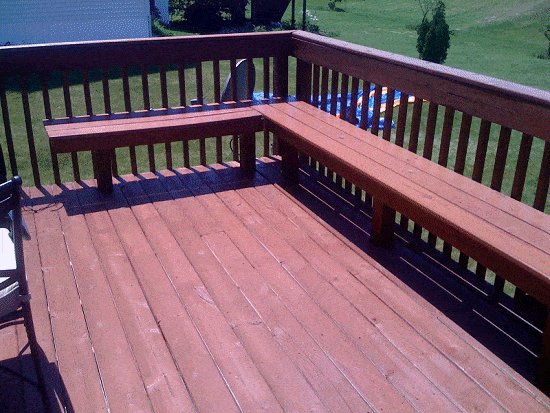
Thanks for your excellent Deck Bench Idea. I built mine in a jiffy. Thanks again for a great website for us DIYers … More projects lined up. Gopi
Hi!
I wanted to submit some of my bench project photos.
I was helped out a great deal by the other submissions and this may help someone else.
I did things just a bit differently.
You can see from the photos that I put a trim piece, “smart-board” we call it here, around the outside of the bench.
Then the topping pieces, 2X4 in this case, hang out over the edge of the trim by about 1/1 inch (could be more if you want).
This way it is not so critical how the top boards are placed. Gives you a bit of room to play with.
In fact, although you would never know it, the front hangs over 1/2 inch but the back is closer to 3/4 inch and it varies all around the bench. Notice also that the first part of the bench frame was just built as a box, and then the second “arm” as added as a second step.
One last thing, the bench frame had to be build not connected to the 4X4 supports because I did not have room to put on the trim pieces because the bench was so close to the house and the fence.
I pre-cut the supports, removing just 1/2 inch from each side, and then glued and bolted the frame to the supports.
All in all turned out well. The bench needs to be painted and stained before it is complete.
Thanks
A while back (about April, 2010) I inquired about the measurements of the lumber you used in your deck plan. You explained that these were measurements from Australia and/or New Zealand. I have incorporated the plans to work in my situation in the USA and attached are the photos of my work and finished product.
Thanks for those plans you provided. I have never built a deck before, let alone a custom bench, and your photos and plans were a motivator to see this through to the finish. My wife and I love the finished project. It is nice and sturdy and adds a nice contemporary element to the deck, with the look and feel of a custom deck plan.
Thanks again.
Jeff Schulze – New Bern, NC, USA
Hi
John Leary is my name. I have been endeavoring to submit a photo of a DIY thru your website but could not access an email connection.
I love the site and it inspired me to undertake a deck project.
Attached is a photo of the almost finished project.
Regards
John W Leary
would love to see the posted pictures…. all blank
What if I do not have access to the joists/blocking? What would be your recommendation to secure to deck? U-brackets?
I was just getting ready to build this at my job. Very very good point! I will not be doing that now.