Contents
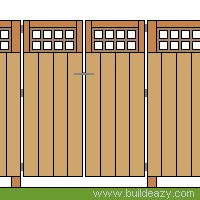
This project “how to build a gate” to match a trellis top fence was sent to us by Esteban Ramirez, Pinole CA/USA.
Materials:
- Three 2″X4″X8′ for the gate sides.
- One 2X2.
- Four 90 degrees angle brackets.
- Three home door style door hinges.
- 1 1/2″ galvanize wood screws.
- 3 1/2″ galvanize wood screws.
- 2″ galvanize nails.
Tools:
- Table Saw
- Screw Driver Drill
- Hammer
- Measuring Tape
- T-Square
Method:
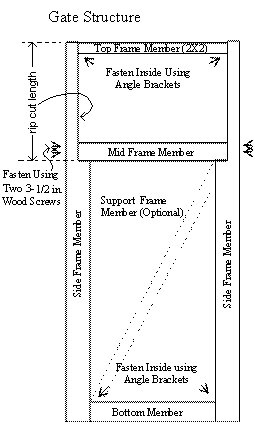
Building the Gate Frame Members:
1. Side Frame Members:
- Determine the gate height. The height should line up with the fence height. However, the bottom of the gate may be slightly shorter than the bottom of the fence, to allow for clearance to the ground. The gate should have a clearance of 2 to 3 inches from the ground.
- Cut the two 2X4X8 to the desire gate height.
- Determine the side members rip cut length by measuring the total distance between the top of your fence and the top of the planks. This measurement is critical to assure a nicely flush fit between the gate trellis and the fence trellis. To this measurement add 3-1/2 inches. Mark the side members perpendicularly at the rip cut length.
- Set up the table saw to cut at 1-1/2 inches. Then, cut the side members longitudinally to the rip cut length.
- The side members should now have a longitudinal cut near the center, one side of the cut measures 1-1/2 in. and the other side measures approximately two inches. Cut out the remainder 2″ sections at the rip cut length.
- Determine the gate width by measuring the gate opening and subtracting 3/4 inch. For example, a 36 inch gate opening gives a 35 1/4 inches gate width.
2. Mid Frame Member:
- Determine the Mid Frame Member Width by subtracting 3 inches from the gate width.
- Cut a 2X4 to the Mid Frame Member Width.
3. Top Frame Member:
- Using the Mid Frame Member mark a 2X2 exactly to the same length. To ensure a perfectly square gate it is critical to mark the Top Frame Member by following this method.
- Cut the 2X2 along the mark.
4. Bottom Gate Member:
- Cut a 2X4 4″ shorter than the Mid Frame Member in step 3.
Assembling the Gate Frame:
- Slide in the mid Frame Member. Screw the member in place by two 3-1/2″ wood screws on both sides.
- Slide in the Bottom Frame Member ensuring that the side frame and bottom frame are perfectly square.
- Secure the Bottom Frame Member to the Side Frame Members using 90 degrees angle brackets. Install the brackets using 1 1/2″ galvanize wood screws.
- Slide in the Top Frame Member ensuring that the side frame and bottom frame are perfectly square.
- Secure the Top Frame Member to the Side Frame Members using 90 degrees angle brackets. Install the brackets using 1 1/2″ galvanize wood screws.
Installing the planks:
- Install the gate planks so that they fit flush with the top and middle frame members. To add rigidity, install the first plank so that it overlaps the side member. Nail the planks using two inches galvanize nails.
- After completing these steps the frame should feel very, very, strong. But if the gate is wider than 3-1/2 feet, it may be necessary to install the optional support member. If necessary, install a cross member so that it braces from the opening side of the gate to the other bottom support member.
Installing the trellis
- Install the trellis following the same method as with the fence.
Installing the swing hinges
- Install the gate hinges 7 inches from the top and bottom of the gate and in the center. For the center and bottom hinges use 3 1/2 inches wood screws. Use 1 1/2 wood screws for the upper hinge
Installing the gate
- Install the swing hinges to back edge of the post using 3 1/2 inch nails.
Enjoy !


