Contents
Materials and post installation
| Materials to use | |
| 100×100 (4×4) posts | 2400 (8ft) long. Can either be sawn (rough) or dressed (smooth). Must be of stock suitable for in ground applications. Posts should not be more than 2400mm (8ft) apart. |
| 100×50 (2×4) rails | Can either be sawn (rough) or dressed (smooth). Must be of stock suitable for exterior use. 4800mm (16ft) lengths will span 3 fence posts. |
| 150×25 (1×6) fence boards | Can either be sawn (rough) or dressed (smooth). Must be of stock suitable for exterior use. Fence boards should not touch the ground. |
| 100mm (4″) galvanized nails | To fix the rails to the posts. |
| 60mm (2 1/4″) galvanized flat head nails | To fix the fence boards to the rails. |
| Concrete | To concrete the posts into the ground. |
Installing the Fence Posts:
- Determine the fence line and mark it out with a string line. Continue the string line 600mm (2ft) past each end of the fence line and tie each end to stakes hammered into the ground. Ensure the string line is taut and not touching the ground at any part.
- Push two small pegs into the ground marketing the center position of the two end posts.
- Next, peg the position of the intermediate posts along the string line, ensuring all pegs are equal distant apart and not exceeding 2400mm (8ft). Offset all pegs 50mm (2″) in from the string line. This is to establish the center of the post, as the posts are 100mm (4″) wide.
- Remove the string line and dig the post holes, 250mm (10″) square x 700mm (28″) deep. The pegs mark the centers of the postholes.
- When all holes are dug and cleaned out, replace the string line to its original position, checking the string line is not touching the ground at any part.
- Make a mix of concrete in a wheelbarrow at a ratio of 3 gravel, 2 sand and 1 cement. Add clean water and mix to a uniform consistency until wet enough to fill around the posts, yet stiff enough to hold the posts upright without the need of supports or braces. Of course you will need a wind free day. Carefully shovel 100mm (4″) of concrete into the bottom of every hole.
- Starting at one end, commence putting the posts in the holes. Using a plumb level against two adjacent sides, check that each post is plumb (vertical), and almost, but not quite, touching the string line.
- Fill hole with concrete to within 50mm (2″) of ground level. Check again the post is plumb and not quite touching the string line. Because of the depth of the hole, the concrete will support the post without the need for bracing, but not on a very windy day. Continue until all posts are concreted in.
This method saves a lot of time and lumber without the need of bracing each post, check the posts again for plumb (vertical) and that they are not touching (but close to) the string line. Leave until concrete cures.
Fixing the rails and fence boards
Fixing the Fence Rails
- Fix a string line to both of the end posts 1750mm (70″) above ground, and mark all the intermediate posts along the string line.
- Trim the top of the posts at the height marks.
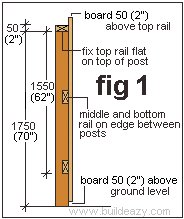
- Nail the top rail flat on top of the posts (fig 1). One rail will span two sections (3 posts).
- Cut, fit and nail the middle and bottom rail in between the posts so that the underside of the bottom rail is 1550mm (62″) down from the top of the post, about 200mm (8″) off the ground and the middle rail is central between top and bottom rail.
Fixing the Fence Boards
- Fix the first board at the start of the fence line with the top of the board 50mm (2″) above the top rail. The bottom of the board should also be 50mm (2″) from ground. Use a plumb level to ensure the board is plumb (vertical) and nail in place using 60mm (2 1/4″) galvanized flathead nails, 2 at each rail.
- Temporary fix another board in place at the other end of the fence line.
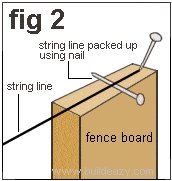
- Fix a string line to the top of both end boards, pull taut and raise slightly using a nail as a packer (fig 2).
- Continue by placing another board against the first and just below the string line.
- Nail in place and repeat that action until all boards are in place.
- Check, as you are going, about every 10th board with a plumb level for plumb (vertical), and make any necessary adjustments. Ensure the tops of the palings do not touch the string line. keep approx 3mm (1/8″) below. This can be done by eye.


