Contents
How deep? What size?
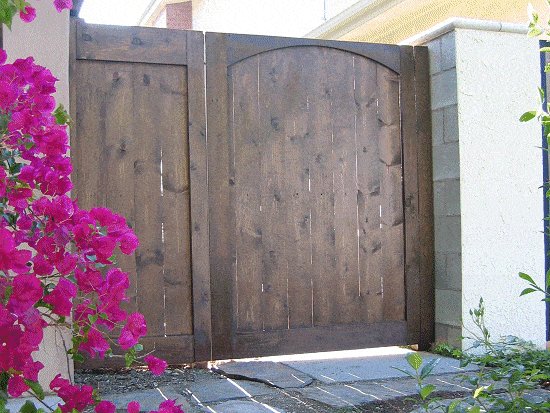
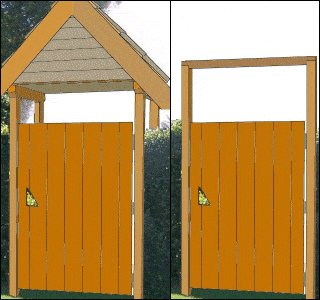
A simple side or garden gate.
This tutorial is given in both Metric (mm) and Imperial (inches) measurements.
The metric measurements are given first followed by the standard measurements in brackets ( )
For example: 100mm x 50mm (2″ x 4″).
A side gate or garden gate is usually placed to protect certain areas and/or to keep kids or pets in, intruders or animals out, or even just for privacy. Generally, a side gate or garden gate is about 1800mm (6ft) high.
As with all outside lumber structures, gates have to be designed to withstand the elements. It is a relatively common experience to have difficulty trying to open (and shut) some lumber gates that are either jammed between the posts, or have sagged and are dragging on the ground. A bit of forethought can alleviate these problems.
1: Posts. How deep? What size?
- Lumber used for posts should be suitable for in ground application. That is, they should either have a natural resistance to decay (rot) or be suitably treated.
- Post size: As a rule of thumb for free-standing posts, use 100mm x 100mm (4″ x 4″) lumber for narrow gates up to 1200mm (4ft) high, use 125mm x 125mm (5″ x 5″) posts for narrow gates 1800mm (6ft) high, and use at least 150mm x 150mm (6″ x 6″) posts for wide gates. A smaller size post can be used if the post is supported in other ways, such as bolted to another structure, held rigid at the top with a cross-member, or forms part of a pergola, arbor or other type of walk-through structure.
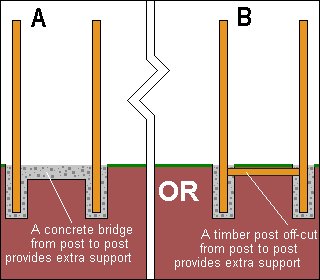
- Hole size: For most, a lumber post should be concreted into a hole 600mm (2ft) deep and 300mm (1ft) square. A wider heavier gate such as a driveway gate, could require a hole 900mm (3ft) deep. Running a bridge made out of concrete or timber from post to post just below ground level, is a way of keeping the posts at bay against the pulling forces of the gate. (See diagram.)
- Post spacing: Space the gate posts wide enough apart i.e. about 900mm (3ft), to allow for common garden and yard implements such as wheelbarrows, to go through.
Other ways to keep gate posts rigid
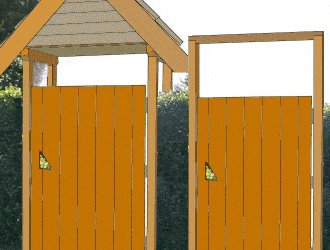
2: Other ways to keep gate posts rigid.
- Having a spreader of some type fixed between the gate posts above head height is a good way to ensure that the posts cannot move in towards one another, thus helping to eliminate the possibility of the gate jamming or sagging.
- This can be achieved by having extended gate posts and fixing a spreader (beam or header) in between the two gate posts at least 2000mm (6′-6″) above ground.
- Another alternative is to include the gate posts in a walk-through pergola, arbor or gable roof type construction.
Making the gate
3: Making the gate.
- To establish the gate width, measure between the two gate posts and deduct 25mm (1″). This is to allow 12mm (1/2″) clearance each side of the gate.
- In this example, the posts are 900mm (3ft) apart so the gate width will need to be 875mm (35″). Use standard 150mm x 25mm (1″ x 6″) boards 1800mm (6ft) long.
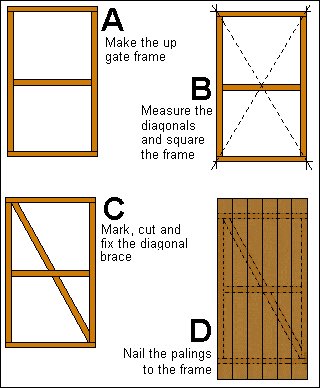
- The gate frame: On even ground, make a rectangular frame 875mm (35″)wide and 1500mm (5ft) long, out of 75mm x 50mm (2″ x 3″). Mark and cut a piece of 75mm x 50mm (2″ x 3″) lumber and fix in place centrally between the two longer frame members. (Refer to A in diagram.)
- Note: The frame size referred to is just an example. You can use other stock sizes such as 100mm x 50mm (2″ x 4″), 50mm x 50mm (2″ x 2″), or even 100mm x 25mm (1″ x 4″). It depends on the look you want or the wood you are able to source.
- Squaring and bracing the gate frame: Measure the two opposing diagonals of the gate frame. Adjust the frame until the two opposing diagonal measurements are the same, then the corners of the rectangle will be at right angles. (In other words, the frame will be square and not be skew-whiff.) (Refer to B in diagram.)
- For the gate bracing, lay a piece of 75mm x 50mm (2″ x 3″) lumber diagonally from corner to corner on the frame. Mark, cut and fix in place (inside the frame) with galvanized nails. (See diagram.) (Refer to C in diagram.)
- Gate vertical boards: Nail the 150mm x 25mm (1″ x 6″) fence boards to the frame using 60mm (2 1/2″) flat head Galvanized nails. The boards will be flush with the sides of the frame and overhanging top and bottom equally. The last board might need to be ripped (cut down lengthwise) in order to fit flush with the edge of the gate frame. (Refer to D in diagram.)
Hanging (fitting) the gate

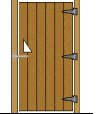
4: Hanging (fitting) the gate.
- Place the gate in between the two gate posts and sit it on packers so the gate is about 50mm (2″) off the ground. (Adjust accordingly if required, to allow for the contour of the ground and to ensure that the gate will be able to swing all the way open.)
- Place wedges or packers at the sides of the gate so that the gaps between the gate and posts are even, and the gate is ‘jammed in place’.
- The gate should be able to stay in position by itself while the “T” hinges are screwed in place. Place a hinge on each horizontal frame member (3 in all). If the gate is to open inwards, then the hinges will be fixed to the inside of the gate to the horizontal frame members. If the gate is to open outwards, then the hinges will be fixed to the outside of the gate, to the boards and in line with the horizontal frame members.
- Once the hinges are screwed in place, take out the wedges and/or packing and fit the gate latch. Note that usually, the latch should be put half-way up the gate, but if the gate is to keep little kids in or out, then put the gate latch more towards the top of the gate.
- Finally, cut a hole in the gate handy to the latch and big enough to put a hand through. This is so the gate can be opened from inside or outside.
Fitting the gate stops – more recourses
5: Fixing the gate stop.
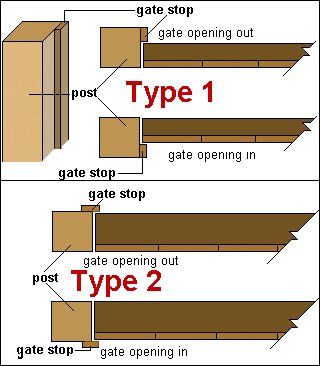
- The gate stop is a vertical strip of wood fixed to the post, that will block the gate from going further than intended and help avoid any damage to the gate latch and hinges should the gate be excessively blown or slammed shut for any reason.
- The gate stop can be a ripping of 25mm (1″) thick board or similar, and is fixed to the post in such a position that will keep the gate flush with the post when it is in a closed position.
- Make the gate stop the same length as the gate and the position will be determined by the thickness of the gate and also by which side of the gate that the hinges are on. (Refer to the diagram.)
More onsite resources
There is an article here that takes you step-by-step through the actual process of making a similar type of gate. It shows another framing option, a slightly different way of making the gate, and also explains hole digging and post setting.
All done. Eazy with a “Z”!


I am a single female homeowner and I needed a side gate for my house and looked into a re-furbished iron gate. When I got their quote for $750, I thought “I could make my own gate for less than half.” The only problem was… I had NEVER done something like that before! It seemed to be basic enough, but again I had no idea what to do. I Googled “How to build a gate” and found your web page. I read the instructions, printed them out, and went to work. Your step-by-step instructions definitely helped me dodge the “trial & error” bullet, and I had very few “do overs”.
The one fear I had was cutting the diagonal brace(s) accurately. I laid the rectangular frame over the diagonal 2×4, and traced the lines as you suggested. Wow, what a great idea! It saved me most of my anxiety. I was using a skill saw for and did end up having to borrow my neighbor’s chop saw (and my neighbor) to re-do those cuts for a better fit.
I also wanted to show you my proud photos!
Thanks to you for your help. You saved me over $500! Plus I DID IT!
Carolyn Bell
I have just decided to build a side gate for the first time in my life and decided to search the internet for instructions and advice.
This was the first web site that came up in the search engine and I was pleasantly surprised to find a short, easy to read and understand tutorial with brilliant pictures on how to do it. I am confident now about building it after reading such wonderful instructions! Thanks a million!
Doug Christchurch, New Zealand.
It would be prudent to leave a note of caution if one wants to use the concrete bridge design.
Frost heaving is always a problem but with the bridge design the frost can easily lift the bridge portion of the gate.
This can obviously be a disaster.
I don’t understand how the diagonal brace will fit? Will it no clash with the horizontal brace ?
Your right – it should be cut in 2 sections or leave out the horizontal brace